Showing dynamic checkout buttons on your online store

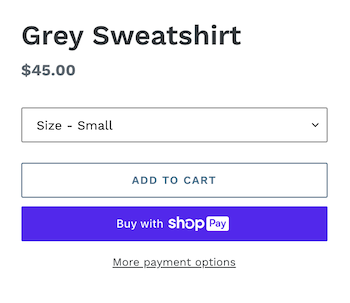
Dynamic checkout buttons are an alternative to the Add to cart button for single products. With dynamic checkout buttons, customers can skip the cart and go directly to the checkout. Customers can choose to check out with Shopify, or with another familiar accelerated checkout method. This helps to speed up the payment process and lets customers check out using a method that they're comfortable with.
A branded dynamic checkout button with an Apple Pay logo

Overview

The dynamic checkout button displays beside or below the Add to cart button, depending on your theme and the customer's device. There are two different kinds of dynamic checkout buttons:

  • Unbranded buttons display Buy it now text. If a customer clicks an unbranded Buy it now button, then they skip the cart and go to the checkout.

An unbranded dynamic checkout button with Buy it now text

  • Branded buttons include the logo for third-party accelerated checkout methods. If a customer clicks on a branded button for a third-party accelerated checkout method, such as Apple Pay, then they go to the checkout for that method with their information pre-populated. Learn more about accelerated checkouts. The following third-party accelerated checkout methods are available:

Each payment method has specific requirements before it displays as a branded button.

The kind of dynamic checkout button that displays to your customers depends on the following factors:

  • your payment settings
  • whether Shop Promise is active, which will prioritize Shop Pay over other checkouts
  • the customer's browser
  • the customer's device
  • the customer's personal payment history

If you use gift cards or discount codes in your store, then customers can still enter the codes at checkout.

Compatibility

There are a few cases where dynamic checkout buttons might not be suitable for your online store. Before you include dynamic checkout buttons on your online store, consider their compatibility with the following features:

Apps

Dynamic checkout buttons might conflict with certain apps.

If you use any of the following kinds of apps, then dynamic checkout buttons might not be compatible with your online store:

  • Currency converters
  • Apps that interact with the cart
  • Apps that take customers to an external checkout

Cart attributes

Dynamic checkout buttons don't support cart attributes. Cart attributes are custom form fields that you can use to collect additional information from your customers on the cart page.

Examples of cart attributes include the following additions to the cart page:

  • Terms and conditions checkboxes
  • Gift-wrapping options
  • Delivery date pickers

If you rely on cart attributes, then dynamic checkout buttons aren't suitable for your online store.

Products, payment settings, and button text

Before you include dynamic checkout buttons on your online store, consider the following details:

  • Dynamic checkout buttons can only be used to buy a single variant of a product. However, if you display a quantity selector on the product page, then customers can buy more than one of that product. For example, a customer can use a dynamic checkout button to buy three baking cups in aqua, but not to buy one in aqua and one in purple. Unless your online store receives many orders for one kind of product, then dynamic checkout buttons might not benefit your sales.
  • If you don't have a third-party accelerated checkout method active in your payment settings, then the unbranded version of the dynamic checkout button is the only version that will display.
  • The unbranded version of the dynamic checkout button includes Buy it now text. If your Add to cart button displays Buy it now or other custom text, then this might confuse customers.

Update your theme to use dynamic checkout buttons

Dynamic checkout buttons are available on all current versions of the themes in the Shopify Theme Store. If you're using an older version of a theme, then you can update your theme to use dynamic checkout buttons. If you don't want to update your theme, then you can edit your theme code.

Display dynamic checkout buttons on product pages

Steps:

Desktop
  1. From your Shopify admin, go to Online Store > Themes.
  2. Click Customize next to the theme that you want to edit.
  3. Click the Home page drop-down menu.
  4. Click Products, and then select the template that you want to edit.
  5. In the Product information section, click Buy buttons.
  6. Select Show dynamic checkout buttons.
  7. Click Save.
iPhone
  1. From the Shopify app, tap the button.
  2. In the Sales channels section, tap Online Store.
  3. Tap Manage themes.
  4. Find the theme that you want to edit, and then tap Customize.
  5. Tap Templates.
  6. Select Product pages.
  7. Tap the Product pages or Product section.
  8. Check Show dynamic checkout button.
  9. Tap Save.
Android
  1. From the Shopify app, tap the button.
  2. In the Sales channels section, tap Online Store.
  3. Tap Manage themes.
  4. Find the theme that you want to edit, and then tap Customize.
  5. Tap Templates.
  6. Select Product pages.
  7. Tap the Product pages or Product section.
  8. Check Show dynamic checkout button.
  9. Tap Save.

Most themes include a setting to include dynamic checkout buttons on a featured product section.

Steps:

Desktop
  1. From your Shopify admin, go to Online Store > Themes.
  2. Click Customize next to the theme that you want to edit.
  3. Click an existing featured product section, or click Add section > Featured product to add a new featured product section.
  4. In the Featured product section, click Buy buttons.
  5. Select Show dynamic checkout buttons.
  6. Click Save.
iPhone
  1. From the Shopify app, tap the button.
  2. In the Sales channels section, tap Online Store.
  3. Tap Manage all themes.
  4. Find the theme that you want to edit, and then tap Customize.
  5. Tap Edit.
  6. Tap an existing featured product section, or click Add section to add a new featured product section.
  7. Enter your product details and check Show dynamic checkout button.
  8. Tap Save.
Android
  1. From the Shopify app, tap the button.
  2. In the Sales channels section, tap Online Store.
  3. Tap Manage all themes.
  4. Find the theme that you want to edit, and then tap Customize.
  5. Tap Edit.
  6. Tap an existing featured product section, or click Add section to add a new featured product section.
  7. Enter your product details and check Show dynamic checkout button.
  8. Tap Save.

Hide dynamic checkout buttons on product pages

You can hide all of the dynamic checkout buttons on your product pages, but you can't hide specific dynamic checkout buttons.

Steps:

Desktop
  1. From your Shopify admin, go to Online Store > Themes.
  2. Click Customize next to the theme that you want to edit.
  3. Click the Home page drop-down menu.
  4. Click Products, and then select the template that you want to edit.
  5. In the Product information section, click Buy buttons.
  6. Deselect Show dynamic checkout buttons.
  7. Click Save.
iPhone
  1. From the Shopify app, tap the button.
  2. In the Sales channels section, tap Online Store.
  3. Tap Manage themes.
  4. Find the theme that you want to edit, and then tap Customize.
  5. Tap Templates.
  6. Select Product pages.
  7. Tap the Product pages or Product section.
  8. Uncheck Show dynamic checkout button.
  9. Tap Save.
Android
  1. From the Shopify app, tap the button.
  2. In the Sales channels section, tap Online Store.
  3. Tap Manage themes.
  4. Find the theme that you want to edit, and then tap Customize.
  5. Tap Templates.
  6. Select Product pages.
  7. Tap the Product pages or Product section.
  8. Uncheck Show dynamic checkout button.
  9. Tap Save.

You can hide all of the dynamic checkout buttons on your featured product sections, but you can't hide specific dynamic checkout buttons.

Steps:

Desktop
  1. From your Shopify admin, go to Online Store > Themes.
  2. Click Customize next to the theme that you want to edit.
  3. Click the featured product section.
  4. Deselect Show dynamic checkout buttons.
  5. Click Save.
iPhone
  1. From the Shopify app, tap the button.
  2. In the Sales channels section, tap Online Store.
  3. Tap Manage all themes.
  4. Find the theme that you want to edit, and then tap Customize.
  5. Tap Edit.
  6. Tap the featured product section.
  7. Uncheck Show dynamic checkout button.
  8. Tap Save.
Android
  1. From the Shopify app, tap the button.
  2. In the Sales channels section, tap Online Store.
  3. Tap Manage all themes.
  4. Find the theme that you want to edit, and then tap Customize.
  5. Tap Edit.
  6. Tap the featured product section.
  7. Uncheck Show dynamic checkout button.
  8. Tap Save.

Test dynamic checkout buttons on your theme

Because the kinds of dynamic checkout buttons that display on your theme depend on multiple factors, you can run a test so that you can review all of the combinations. Before you test dynamic checkout buttons on your theme, make sure that the buttons are showing.

Steps:

Desktop
  1. From your Shopify admin, go to Online Store > Themes.
  2. Click View your store.
  3. To test the button on a product page, go to a product page. To test the button on a featured product section, stay on the home page.
  4. In your browser's address bar, add one of the following strings to the end of the current URL:
    • To display a branded button for Shop Pay, add ?shopify-debug=true&show=Shop.
    • To display a branded button for Amazon, add ?shopify-debug=true&show=Amazon.
    • To display a branded button for Apple Pay, add ?shopify-debug=true&show=ApplePay (Apple Pay only works on Safari).
    • To display a branded button for Google Pay, add ?shopify-debug=true&show=Google.
    • To display a branded button for PayPal, add ?shopify-debug=true&show=PayPal.
    • To display a branded button for Venmo, add ?shopify-debug=true&show=Venmo.
    • To display an unbranded button, add ?shopify-debug=true&show=checkout.
  5. Press Enter to reload the page. Depending on the string that you added to the URL, either a branded or an unbranded dynamic checkout button will display.
  6. Repeat with the other strings to review the different types of dynamic checkout buttons.
iPhone
  1. From the Shopify app, tap the button.
  2. In the Sales channels section, tap Online Store.
  3. Tap Manage themes.
  4. Tap View your store.
  5. To test the button on a product page, go to a product page. To test the button on a featured product section, stay on the home page.
  6. In your browser's address bar, add one of the following strings to the end of the current URL:
    • To display a branded button for Shop Pay, add ?shopify-debug=true&show=Shop.
    • To display a branded button for Amazon, add ?shopify-debug=true&show=Amazon.
    • To display a branded button for Apple Pay, add ?shopify-debug=true&show=ApplePay (Apple Pay only works on Safari).
    • To display a branded button for Google Pay, add ?shopify-debug=true&show=Google.
    • To display a branded button for PayPal, add ?shopify-debug=true&show=PayPal.
    • To display a branded button for Venmo, add ?shopify-debug=true&show=Venmo.
    • To display an unbranded button, add ?shopify-debug=true&show=checkout.
  7. Press Enter to reload the page. Depending on the string that you added to the URL, either a branded or an unbranded dynamic checkout button will display.
  8. Repeat with the other strings to review the different types of dynamic checkout buttons.
Android
  1. From the Shopify app, tap the button.
  2. In the Sales channels section, tap Online Store.
  3. Tap Manage themes.
  4. Tap View your store.
  5. To test the button on a product page, go to a product page. To test the button on a featured product section, stay on the home page.
  6. In your browser's address bar, add one of the following strings to the end of the current URL:
    • To display a branded button for Shop Pay, add ?shopify-debug=true&show=Shop.
    • To display a branded button for Amazon, add ?shopify-debug=true&show=Amazon.
    • To display a branded button for Apple Pay, add ?shopify-debug=true&show=ApplePay (Apple Pay only works on Safari).
    • To display a branded button for Google Pay, add ?shopify-debug=true&show=Google.
    • To display a branded button for PayPal, add ?shopify-debug=true&show=PayPal.
    • To display a branded button for Venmo, add ?shopify-debug=true&show=Venmo.
    • To display an unbranded button, add ?shopify-debug=true&show=checkout.
  7. Press Enter to reload the page. Depending on the string that you added to the URL, either a branded or an unbranded dynamic checkout button will display.
  8. Repeat with the other strings to review the different types of dynamic checkout buttons.

Display dynamic checkout buttons for some products but not for others

If you want to display dynamic checkout buttons for some products but not for others, then you can create an alternate template. An alternate template is a duplicate theme code template that you can edit without affecting the original. By using an alternate product template, you can display dynamic checkout buttons for products that use one template and hide them for products that use the other.

To create an alternate product template, refer to Create a new template.

After you create an alternate product template and assign it to a product, you can display or hide dynamic checkout buttons for that product.

Steps:

Desktop
  1. From your Shopify admin, go to Online Store > Themes.
  2. Click Customize next to the theme for which you created an alternate template.
  3. Go to the product page for a product to which you've assigned the alternate template.
  4. In the Product information section, click Buy buttons.
  5. To display a dynamic checkout button for products that use the alternate template, select Show dynamic checkout button. To hide a dynamic checkout button for products that use the alternate template, deselect Show dynamic checkout button.
  6. Click Save. The changes are applied to any product that uses the alternate template.
iPhone
  1. From the Shopify app, tap the button.
  2. In the Sales channels section, tap Online Store.
  3. Tap Manage themes.
  4. Find the theme for which you created an alternate template, and then tap Customize.
  5. In the theme editor, go to the product page for a product to which you've assigned the alternate template.
  6. Tap the Product pages or Product section.
  7. To display a dynamic checkout button for products that use the alternate template, check Show dynamic checkout button. To hide a dynamic checkout button for products that use the alternate template, uncheck Show dynamic checkout button.
  8. Tap Save. The changes are applied to any product that uses the alternate template.
Android
  1. From the Shopify app, tap the button.
  2. In the Sales channels section, tap Online Store.
  3. Tap Manage themes.
  4. Find the theme for which you created an alternate template, and then click Customize.
  5. In the theme editor, go to the product page for a product to which you've assigned the alternate template.
  6. Tap the Product pages or Product section.
  7. To display a dynamic checkout button for products that use the alternate template, check Show dynamic checkout button. To hide a dynamic checkout button for products that use the alternate template, uncheck Show dynamic checkout button.
  8. Tap Save. The changes are applied to any product that uses the alternate template.
Can’t find the answers you’re looking for? We’re here to help.