Mostrar números de SKU en las páginas de productos
Los SKU (códigos de artículo) son números, normalmente alfanuméricos, que se usan para ayudar a identificar los productos y hacer seguimiento de inventario. Si una tienda usa los SKU, se asigna un número único a cada variante de producto individual. Puedes mostrar números SKU para variantes en tus páginas de producto editando el código de tu tema:
Temas con y sin secciones
Pasos para los temas con secciones
Mostrar números de SKU en las páginas de productos
- Desde el panel de control de Shopify, ve a Tienda online > Temas.
- Busca el tema que desees editar, haz clic en el botón … para abrir el menú de acciones y, luego, haz clic en Editar código.
- En el directorio Secciones, haz clic en
product.liquidoproduct-template.liquid. - Busca la siguiente etiqueta Liquid:
{{ product.title }}Este es el código que renderiza los nombres de tus productos en la página de producto.
- En una nueva línea debajo de la línea de código que incluye
{{ product.title }}, pega el siguiente código:
{% assign current_variant = product.selected_or_first_available_variant %}
<span class="variant-sku">{{ current_variant.sku }}</span>- Haz clic en Guardar.
Seleccionar tu tema
Los pasos siguientes para esta personalización varían según tu tema. Haz clic en el botón de tu tema y sigue las instrucciones.
Pasos para Boundless
- En el directorio Componentes, haz clic en
theme.js.liquid. -
Busca
variant.sku.- Si puedes encontrar
variant.sku, habrás completado la personalización. - Si no puedes encontrar
variant.sku, avanza al siguiente paso.
- Si puedes encontrar
En la parte inferior del archivo, pega el siguiente código:
document.addEventListener('DOMContentLoaded', () => {
  setTimeout(function() {
    const productJson = [...document.querySelectorAll('[id^=ProductJson-')];
    if (productJson.length > 0) {
      productJson.forEach((product) => {
        const sectionId = product.id.replace("ProductJson-", "shopify-section-");
        const variantSKU = document.querySelector('#' + sectionId + ' .variant-sku');
        const inputSelects = [...document.querySelectorAll('#' + sectionId + ' .single-option-selector')];
        const productInfo = JSON.parse(product.innerHTML);
        const inputValues = [];
        const optionValues = [];
        let count = 0;
        inputSelects.forEach((input) => {
          inputValues.push(input.value);
          optionValues.push(count);
          input.addEventListener('change', (evt) => {
            const currentValue = evt.currentTarget.value.toString();
            const changedIndex = inputSelects.indexOf(evt.target);
            inputValues[changedIndex] = currentValue;
            variantSKU.innerText = ' ';
            productInfo.variants.forEach((variant) => {
              if (JSON.stringify(variant.options) == JSON.stringify(inputValues)) {
                variantSKU.innerText = variant.sku;
              }
            });
          });
          count += 1;
        });
      });
    }
  }, 100);
});- Haz clic en Guardar.
Pasos para Brooklyn
- En el directorio Componentes, haz clic en
theme.js.liquid. -
Busca
variant.sku.- Si puedes encontrar
variant.sku, habrás completado la personalización. - Si no puedes encontrar
variant.sku, avanza al siguiente paso.
- Si puedes encontrar
En la parte inferior del archivo, pega el siguiente código:
document.addEventListener('DOMContentLoaded', () => {
  const productJson = [...document.querySelectorAll('[id^=ProductJson-')];
  if (productJson.length > 0) {
    productJson.forEach((product) => {
      const sectionId = product.id.replace("ProductJson-", "shopify-section-");
      const variantSKU = document.querySelector('#' + sectionId + ' .variant-sku');
      const productInfo = JSON.parse(product.innerHTML);
      const radioButtons = document.querySelector('.single-option-radio');
      let inputSelects;
      if (radioButtons !== null) {
        inputSelects = [...document.querySelectorAll('#' + sectionId + ' .single-option-radio')];
      } else {
        inputSelects = [...document.querySelectorAll('#' + sectionId + ' .single-option-selector__radio')];
      }
      const inputValues = [];
      const optionValues = [];
      let count = 0;
      inputSelects.forEach((input) => {
        if (radioButtons !== null) {
          inputValues.push(input.firstElementChild.value);
        } else {
          inputValues.push(input.value);
        }
        optionValues.push(count);
        input.addEventListener('change', (evt) => {
          const currentValue = evt.target.value.toString();
          const changedIndex = inputSelects.indexOf(evt.currentTarget);
          inputValues[changedIndex] = currentValue;
          variantSKU.innerText = ' ';
          productInfo.variants.forEach((variant) => {
            if (JSON.stringify(variant.options) == JSON.stringify(inputValues)) {
              variantSKU.innerText = variant.sku;
            }
          });
        });
      count += 1;
      });
    });
  }
});- Haz clic en Guardar.
Pasos para Debut
- En el directorio Componentes, haz clic en
theme.js. -
Busca
variant.sku.- Si puedes encontrar
variant.sku, habrás completado la personalización. - Si no puedes encontrar
variant.sku, avanza al siguiente paso.
- Si puedes encontrar
En la parte inferior del archivo, pega el siguiente código:
document.addEventListener('DOMContentLoaded', () => {
  const productJson = [...document.querySelectorAll('[id^=ProductJson-')];
  if (productJson.length > 0) {
    productJson.forEach((product) => {
      const sectionId = product.id.replace("ProductJson-", "shopify-section-");
      const variantSKU = document.querySelector('#' + sectionId + ' .variant-sku');
      const inputSelects = [...document.querySelectorAll('#' + sectionId + ' .single-option-selector')];
      const productInfo = JSON.parse(product.innerHTML);
      const inputValues = [];
      const optionValues = [];
      let count = 0;
      inputSelects.forEach((input) => {
        inputValues.push(input.value);
        optionValues.push(count);
        input.addEventListener('change', (evt) => {
          const currentValue = evt.currentTarget.value.toString();
          const changedIndex = inputSelects.indexOf(evt.target);
          inputValues[changedIndex] = currentValue;
          variantSKU.innerText = ' ';
          productInfo.variants.forEach((variant) => {
            if (JSON.stringify(variant.options) == JSON.stringify(inputValues)) {
              variantSKU.innerText = variant.sku;
            }
          });
        });
        count += 1;
      });
    });
  }
});- Haz clic en Guardar.
Pasos para Express
- En el directorio Diseño, haz clic en
theme.liquid. -
Busca la etiqueta de cierre
</body>. - En la línea justo arriba de la etiqueta de cierre
</body>, pega el siguiente código:
<script>
document.addEventListener('DOMContentLoaded', () => {
  const productJson = [...document.querySelectorAll('[data-product-json]')];
  if (productJson.length > 0) {
    productJson.forEach((product) => {
      const sectionId = "shopify-section-" + product.closest('[data-section-id]').dataset.sectionId;
      const variantSKU = document.querySelector('#' + sectionId + ' .variant-sku');
      const inputSelects = [...document.querySelectorAll('#' + sectionId + ' .form__input--select')];
      const productInfo = JSON.parse(product.innerHTML);
      const inputValues = [];
      const optionValues = [];
      let count = 0;
      inputSelects.forEach((input) => {
        inputValues.push(input.value);
        optionValues.push(count);
        input.addEventListener('change', (evt) => {
          const currentValue = evt.currentTarget.value.toString();
          const changedIndex = inputSelects.indexOf(evt.target);
          inputValues[changedIndex] = currentValue;
          variantSKU.innerText = ' ';
          productInfo.variants.forEach((variant) => {
            if (JSON.stringify(variant.options) == JSON.stringify(inputValues)) {
              variantSKU.innerText = variant.sku;
            }
          });
        });
        count += 1;
      });
    });
  }
});
</script>- Haz clic en Guardar.
Pasos para Minimal
- En el directorio Componentes, haz clic en
theme.js. -
Busca
variant.sku.- Si puedes encontrar
variant.sku, habrás completado la personalización. - Si no puedes encontrar
variant.sku, avanza al siguiente paso.
- Si puedes encontrar
En la parte inferior del archivo, pega el siguiente código:
document.addEventListener('DOMContentLoaded', () => {
  const productJson = [...document.querySelectorAll('[id^=ProductJson-')];
  if (productJson.length > 0) {
    productJson.forEach((product) => {
      const sectionId = product.id.replace("ProductJson-", "shopify-section-");
      const variantSKU = document.querySelector('#' + sectionId + ' .variant-sku');
      const inputSelects = [...document.querySelectorAll('#' + sectionId + ' .single-option-selector')];
      const productInfo = JSON.parse(product.innerHTML);
      const inputValues = [];
      const optionValues = [];
      let count = 0;
      inputSelects.forEach((input) => {
        inputValues.push(input.value);
        optionValues.push(count);
        input.addEventListener('change', (evt) => {
          const currentValue = evt.currentTarget.value.toString();
          const changedIndex = inputSelects.indexOf(evt.target);
          inputValues[changedIndex] = currentValue;
          variantSKU.innerText = ' ';
          productInfo.variants.forEach((variant) => {
            if (JSON.stringify(variant.options) == JSON.stringify(inputValues)) {
              variantSKU.innerText = variant.sku;
            }
          });
        });
        count += 1;
      });
    });
  }
});- Haz clic en Guardar.
Pasos para Narrative
- En el directorio Componentes, haz clic en
custom.js. - En la parte inferior del archivo, pega el siguiente código:
document.addEventListener('DOMContentLoaded', () => {
  const productJson = [...document.querySelectorAll('[data-product-json]')];
  if (productJson.length > 0) {
    productJson.forEach((product) => {
      const sectionId = "shopify-section-" + product.closest('[data-section-id]').dataset.sectionId;
      const variantSKU = document.querySelector('#' + sectionId + ' .variant-sku');
      const inputSelects = [...document.querySelectorAll('#' + sectionId + ' .single-option-selector')];
      const productInfo = JSON.parse(product.innerHTML);
      const inputValues = [];
      const optionValues = [];
      let count = 0;
      inputSelects.forEach((input) => {
        inputValues.push(input.value);
        optionValues.push(count);
        input.addEventListener('change', (evt) => {
          const currentValue = evt.currentTarget.value.toString();
          const changedIndex = inputSelects.indexOf(evt.target);
          inputValues[changedIndex] = currentValue;
          variantSKU.innerText = ' ';
          productInfo.variants.forEach((variant) => {
            if (JSON.stringify(variant.options) == JSON.stringify(inputValues)) {
              variantSKU.innerText = variant.sku;
            }
          });
        });
        count += 1;
      });
    });
  }
});- Haz clic en Guardar.
Pasos para Simple
- En el directorio Componentes, haz clic en
theme.js.liquid. -
Busca
variant.sku.- Si puedes encontrar
variant.sku, habrás completado la personalización. - Si no puedes encontrar
variant.sku, avanza al siguiente paso.
- Si puedes encontrar
En la parte inferior del archivo, pega el siguiente código:
document.addEventListener('DOMContentLoaded', () => {
  const productJson = [...document.querySelectorAll('[id^=ProductJson-')];
  if (productJson.length > 0) {
    productJson.forEach((product) => {
      const sectionId = product.id.replace("ProductJson-", "shopify-section-");
      const variantSKU = document.querySelector('#' + sectionId + ' .variant-sku');
      const inputSelects = [...document.querySelectorAll('#' + sectionId + ' .single-option-selector')];
      const productInfo = JSON.parse(product.innerHTML);
      const inputValues = [];
      const optionValues = [];
      let count = 0;
      inputSelects.forEach((input) => {
        inputValues.push(input.value);
        optionValues.push(count);
        input.addEventListener('change', (evt) => {
          const currentValue = evt.currentTarget.value.toString();
          const changedIndex = inputSelects.indexOf(evt.target);
          inputValues[changedIndex] = currentValue;
          variantSKU.innerText = ' ';
          productInfo.variants.forEach((variant) => {
            if (JSON.stringify(variant.options) == JSON.stringify(inputValues)) {
              variantSKU.innerText = variant.sku;
            }
          });
        });
        count += 1;
      });
    });
  }
});- Haz clic en Guardar.
Pasos para Supply
- En el directorio Componentes, haz clic en
theme.js.liquid. -
Busca
variant.sku.- Si puedes encontrar
variant.sku, habrás completado la personalización. - Si no puedes encontrar
variant.sku, avanza al siguiente paso.
- Si puedes encontrar
En la parte inferior del archivo, pega el siguiente código:
document.addEventListener('DOMContentLoaded', () => {
  const productJson = [...document.querySelectorAll('[id^=ProductJson-')];
  if (productJson.length > 0) {
    productJson.forEach((product) => {
      const sectionId = product.id.replace("ProductJson-", "shopify-section-");
      const variantSKU = document.querySelector('#' + sectionId + ' .variant-sku');
      const inputSelects = [...document.querySelectorAll('#' + sectionId + ' .single-option-selector')];
      const productInfo = JSON.parse(product.innerHTML);
      const inputValues = [];
      const optionValues = [];
      let count = 0;
      inputSelects.forEach((input) => {
        inputValues.push(input.value);
        optionValues.push(count);
        input.addEventListener('change', (evt) => {
          const currentValue = evt.currentTarget.value.toString();
          const changedIndex = inputSelects.indexOf(evt.target);
          inputValues[changedIndex] = currentValue;
          variantSKU.innerText = ' ';
          productInfo.variants.forEach((variant) => {
            if (JSON.stringify(variant.options) == JSON.stringify(inputValues)) {
              variantSKU.innerText = variant.sku;
            }
          });
        });
        count += 1;
      });
    });
  }
});- Haz clic en Guardar.
Pasos para Venture
- En el directorio Componentes, haz clic en
theme.js. -
Busca
variant.sku.- Si puedes encontrar
variant.sku, habrás completado la personalización. - Si no puedes encontrar
variant.sku, avanza al siguiente paso.
- Si puedes encontrar
En la parte inferior del archivo, pega el siguiente código:
document.addEventListener('DOMContentLoaded', () => {
  const productJson = [...document.querySelectorAll('[id^=ProductJson-')];
  if (productJson.length > 0) {
    productJson.forEach((product) => {
      const sectionId = product.id.replace("ProductJson-", "shopify-section-");
      const variantSKU = document.querySelector('#' + sectionId + ' .variant-sku');
      const inputSelects = [...document.querySelectorAll('#' + sectionId + ' .single-option-selector')];
      const productInfo = JSON.parse(product.innerHTML);
      const inputValues = [];
      const optionValues = [];
      let count = 0;
      inputSelects.forEach((input) => {
        inputValues.push(input.value);
        optionValues.push(count);
        input.addEventListener('change', (evt) => {
          const currentValue = evt.currentTarget.value.toString();
          const changedIndex = inputSelects.indexOf(evt.target);
          inputValues[changedIndex] = currentValue;
          variantSKU.innerText = ' ';
          productInfo.variants.forEach((variant) => {
            if (JSON.stringify(variant.options) == JSON.stringify(inputValues)) {
              variantSKU.innerText = variant.sku;
            }
          });
        });
        count += 1;
      });
    });
  }
});- Haz clic en Guardar.
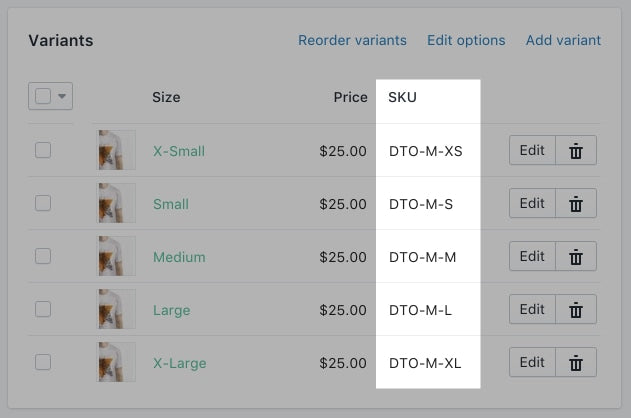
Agrega números de SKU a tus variantes de producto desde el panel de control
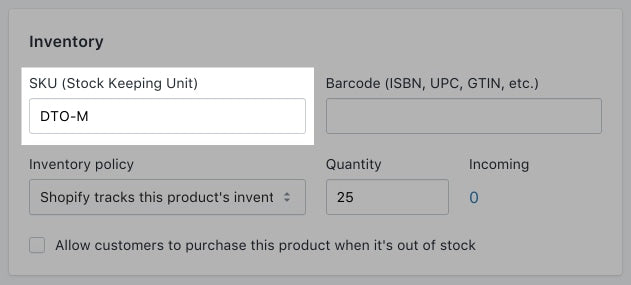
Para que los SKU aparezcan en tus páginas de producto, debes agregar números de SKU a tus variantes de producto desde el panel de control de Shopify.
Desde tu panel de control de Shopify, ve a Productos.
Haz clic en el producto que deseas editar.
Para productos con múltiples variantes, en la sección Variantes, agrega tus números de SKU:
Haz clic en Guardar.
Pasos para los temas sin secciones
Mostrar números de SKU en las páginas de productos
Pasos:
- Desde el panel de control de Shopify, ve a Tienda online > Temas.
- Busca el tema que desees editar, haz clic en el botón … para abrir el menú de acciones y, luego, haz clic en Editar código.
- En el directorio Templates, haz clic en
product.liquid. - Busca la siguiente etiqueta Liquid:
{{ product.title }}Este es el código que renderiza los nombres de tus productos en la página de producto.
- En la nueva línea debajo de la línea de código que incluye
{{ product.title }}, pega el siguiente:
{% assign current_variant = product.selected_or_first_available_variant %}
<span class="variant-sku">{{ current_variant.sku }}</span>- Haz clic en Guardar.
- Si usas un tema gratuito de Shopify que no es Brooklyn ni Venture, busca la siguiente línea de código:
var selectCallback = function(variant, selector) {Si no puedes encontrar la línea de código anterior en product.liquid, lo encontrarás en theme.liquid, en el directorio Diseño.
-
Brooklyn y Venture: si usas alguna de estas plantillas, tendrás que buscar y editar una línea de código distinta. En el directorio Recursos, haz clic en
theme.js.liquidy busca la siguiente línea de código:
theme.productVariantCallback = function (variant, selector) {- En una nueva línea debajo, pega el siguiente código:
if (variant) {
      document.querySelector('.variant-sku').innerText = variant.sku;
    }
    else {
      document.querySelector('.variant-sku').innerText = '';
    }
Tu código debería verse así:
var selectCallback = function(variant, selector) {

      if (variant) {
        document.querySelector('.variant-sku').innerText = variant.sku;
      }
      else {
        document.querySelector('.variant-sku').innerText = '';
      }

        self.productPage({
          money_format: theme.moneyFormat,
          variant: variant,
          selector: selector,
          translations: {
            add_to_cart : theme.productStrings.addToCart,
            sold_out : theme.productStrings.soldOut,
            unavailable : theme.productStrings.unavailable
          }
        });
};- Haz clic en Guardar.
Agrega números de SKU a tus variantes de producto desde el panel de control
Para que los SKU aparezcan en tus páginas de producto, debes agregar números de SKU a tus variantes de producto desde el panel de control de Shopify.
Desde tu panel de control de Shopify, ve a Productos.
Haz clic en el producto que deseas editar.
Para productos con múltiples variantes, en la sección Variantes, agrega los números de SKU:
Haz clic en Guardar.