제품 페이지에 SKU(재고 관리 코드) 번호 표시
SKU(재고 관리 코드)는 제품을 식별하고 재고를 추적하는 데 사용되는 숫자(일반적으로 영숫자)입니다. 스토어에서 SKU(재고 관리 코드)를 사용하는 경우 각 개별 제품 이형에 고유 번호가 할당됩니다. 테마 코드를 편집하여 이형 상품에 대한 SKU 번호를 제품 페이지에 표시할 수 있습니다.
섹션 지원 및 섹션 미지원 테마
이 페이지의 정보
섹션 구분된 테마의 단계
제품 페이지에 SKU(재고 관리 코드) 번호 표시
- Shopify Admin에서 온라인 스토어 > 테마로 이동합니다.
- 편집할 테마를 찾아 ... 버튼을 클릭하여 작업 메뉴를 연 다음 코드 편집을 클릭합니다.
-
섹션 디렉토리에서
product.liquid또는product-template.liquid를 클릭합니다. - 다음 Liquid 태그를 찾습니다.
{{ product.title }}이는 제품 페이지에서 제품 이름을 렌더링하는 코드입니다.
-
{{ product.title }}를 포함하는 코드 행 아래의 새 행에 다음 코드를 붙여넣습니다.
{% assign current_variant = product.selected_or_first_available_variant %}
<span class="variant-sku">{{ current_variant.sku }}</span>- 저장을 클릭합니다.
테마 선택
이 사용자 지정의 다음 단계는 테마에 따라 다릅니다. 테마 버튼을 먼저 클릭하고 지침을 따릅니다.
Boundless용 단계
-
자산 디렉토리에서
theme.js.liquid을(를) 클릭합니다. -
variant.sku를 찾습니다.-
variant.sku를 찾을 수 있는 경우 사용자 지정을 완료한 것입니다. -
variant.sku를 찾을 수 없는 경우 다음 단계를 계속 진행합니다.
-
파일 맨 아래에 다음 코드를 붙여넣습니다.
document.addEventListener('DOMContentLoaded', () => {
  setTimeout(function() {
    const productJson = [...document.querySelectorAll('[id^=ProductJson-')];
    if (productJson.length > 0) {
      productJson.forEach((product) => {
        const sectionId = product.id.replace("ProductJson-", "shopify-section-");
        const variantSKU = document.querySelector('#' + sectionId + ' .variant-sku');
        const inputSelects = [...document.querySelectorAll('#' + sectionId + ' .single-option-selector')];
        const productInfo = JSON.parse(product.innerHTML);
        const inputValues = [];
        const optionValues = [];
        let count = 0;
        inputSelects.forEach((input) => {
          inputValues.push(input.value);
          optionValues.push(count);
          input.addEventListener('change', (evt) => {
            const currentValue = evt.currentTarget.value.toString();
            const changedIndex = inputSelects.indexOf(evt.target);
            inputValues[changedIndex] = currentValue;
            variantSKU.innerText = ' ';
            productInfo.variants.forEach((variant) => {
              if (JSON.stringify(variant.options) == JSON.stringify(inputValues)) {
                variantSKU.innerText = variant.sku;
              }
            });
          });
          count += 1;
        });
      });
    }
  }, 100);
});- 저장을 클릭합니다.
Brooklyn용 단계
-
자산 디렉토리에서
theme.js.liquid을(를) 클릭합니다. -
variant.sku를 찾습니다.-
variant.sku를 찾을 수 있는 경우 사용자 지정을 완료한 것입니다. -
variant.sku를 찾을 수 없는 경우 다음 단계를 계속 진행합니다.
-
파일 맨 아래에 다음 코드를 붙여넣습니다.
document.addEventListener('DOMContentLoaded', () => {
  const productJson = [...document.querySelectorAll('[id^=ProductJson-')];
  if (productJson.length > 0) {
    productJson.forEach((product) => {
      const sectionId = product.id.replace("ProductJson-", "shopify-section-");
      const variantSKU = document.querySelector('#' + sectionId + ' .variant-sku');
      const productInfo = JSON.parse(product.innerHTML);
      const radioButtons = document.querySelector('.single-option-radio');
      let inputSelects;
      if (radioButtons !== null) {
        inputSelects = [...document.querySelectorAll('#' + sectionId + ' .single-option-radio')];
      } else {
        inputSelects = [...document.querySelectorAll('#' + sectionId + ' .single-option-selector__radio')];
      }
      const inputValues = [];
      const optionValues = [];
      let count = 0;
      inputSelects.forEach((input) => {
        if (radioButtons !== null) {
          inputValues.push(input.firstElementChild.value);
        } else {
          inputValues.push(input.value);
        }
        optionValues.push(count);
        input.addEventListener('change', (evt) => {
          const currentValue = evt.target.value.toString();
          const changedIndex = inputSelects.indexOf(evt.currentTarget);
          inputValues[changedIndex] = currentValue;
          variantSKU.innerText = ' ';
          productInfo.variants.forEach((variant) => {
            if (JSON.stringify(variant.options) == JSON.stringify(inputValues)) {
              variantSKU.innerText = variant.sku;
            }
          });
        });
      count += 1;
      });
    });
  }
});- 저장을 클릭합니다.
Debut용 단계
-
자산 디렉토리에서
theme.js을(를) 클릭합니다. -
variant.sku를 찾습니다.-
variant.sku를 찾을 수 있는 경우 사용자 지정을 완료한 것입니다. -
variant.sku를 찾을 수 없는 경우 다음 단계를 계속 진행합니다.
-
파일 맨 아래에 다음 코드를 붙여넣습니다.
document.addEventListener('DOMContentLoaded', () => {
  const productJson = [...document.querySelectorAll('[id^=ProductJson-')];
  if (productJson.length > 0) {
    productJson.forEach((product) => {
      const sectionId = product.id.replace("ProductJson-", "shopify-section-");
      const variantSKU = document.querySelector('#' + sectionId + ' .variant-sku');
      const inputSelects = [...document.querySelectorAll('#' + sectionId + ' .single-option-selector')];
      const productInfo = JSON.parse(product.innerHTML);
      const inputValues = [];
      const optionValues = [];
      let count = 0;
      inputSelects.forEach((input) => {
        inputValues.push(input.value);
        optionValues.push(count);
        input.addEventListener('change', (evt) => {
          const currentValue = evt.currentTarget.value.toString();
          const changedIndex = inputSelects.indexOf(evt.target);
          inputValues[changedIndex] = currentValue;
          variantSKU.innerText = ' ';
          productInfo.variants.forEach((variant) => {
            if (JSON.stringify(variant.options) == JSON.stringify(inputValues)) {
              variantSKU.innerText = variant.sku;
            }
          });
        });
        count += 1;
      });
    });
  }
});- 저장을 클릭합니다.
Express 단계
-
레이아웃 디렉토리에서
theme.liquid을(를) 클릭합니다. - 닫는
</body>태그를 찾습니다. - 닫는
</body>태그 바로 위쪽 행에 다음 코드를 붙여넣습니다.
<script>
document.addEventListener('DOMContentLoaded', () => {
  const productJson = [...document.querySelectorAll('[data-product-json]')];
  if (productJson.length > 0) {
    productJson.forEach((product) => {
      const sectionId = "shopify-section-" + product.closest('[data-section-id]').dataset.sectionId;
      const variantSKU = document.querySelector('#' + sectionId + ' .variant-sku');
      const inputSelects = [...document.querySelectorAll('#' + sectionId + ' .form__input--select')];
      const productInfo = JSON.parse(product.innerHTML);
      const inputValues = [];
      const optionValues = [];
      let count = 0;
      inputSelects.forEach((input) => {
        inputValues.push(input.value);
        optionValues.push(count);
        input.addEventListener('change', (evt) => {
          const currentValue = evt.currentTarget.value.toString();
          const changedIndex = inputSelects.indexOf(evt.target);
          inputValues[changedIndex] = currentValue;
          variantSKU.innerText = ' ';
          productInfo.variants.forEach((variant) => {
            if (JSON.stringify(variant.options) == JSON.stringify(inputValues)) {
              variantSKU.innerText = variant.sku;
            }
          });
        });
        count += 1;
      });
    });
  }
});
</script>- 저장을 클릭합니다.
Minimal용 단계
-
자산 디렉토리에서
theme.js을(를) 클릭합니다. -
variant.sku를 찾습니다.-
variant.sku를 찾을 수 있는 경우 사용자 지정을 완료한 것입니다. -
variant.sku를 찾을 수 없는 경우 다음 단계를 계속 진행합니다.
-
파일 맨 아래에 다음 코드를 붙여넣습니다.
document.addEventListener('DOMContentLoaded', () => {
  const productJson = [...document.querySelectorAll('[id^=ProductJson-')];
  if (productJson.length > 0) {
    productJson.forEach((product) => {
      const sectionId = product.id.replace("ProductJson-", "shopify-section-");
      const variantSKU = document.querySelector('#' + sectionId + ' .variant-sku');
      const inputSelects = [...document.querySelectorAll('#' + sectionId + ' .single-option-selector')];
      const productInfo = JSON.parse(product.innerHTML);
      const inputValues = [];
      const optionValues = [];
      let count = 0;
      inputSelects.forEach((input) => {
        inputValues.push(input.value);
        optionValues.push(count);
        input.addEventListener('change', (evt) => {
          const currentValue = evt.currentTarget.value.toString();
          const changedIndex = inputSelects.indexOf(evt.target);
          inputValues[changedIndex] = currentValue;
          variantSKU.innerText = ' ';
          productInfo.variants.forEach((variant) => {
            if (JSON.stringify(variant.options) == JSON.stringify(inputValues)) {
              variantSKU.innerText = variant.sku;
            }
          });
        });
        count += 1;
      });
    });
  }
});- 저장을 클릭합니다.
Narrative용 단계
-
자산 디렉토리에서
custom.js을(를) 클릭합니다. - 파일 맨 아래에 다음 코드를 붙여넣습니다.
document.addEventListener('DOMContentLoaded', () => {
  const productJson = [...document.querySelectorAll('[data-product-json]')];
  if (productJson.length > 0) {
    productJson.forEach((product) => {
      const sectionId = "shopify-section-" + product.closest('[data-section-id]').dataset.sectionId;
      const variantSKU = document.querySelector('#' + sectionId + ' .variant-sku');
      const inputSelects = [...document.querySelectorAll('#' + sectionId + ' .single-option-selector')];
      const productInfo = JSON.parse(product.innerHTML);
      const inputValues = [];
      const optionValues = [];
      let count = 0;
      inputSelects.forEach((input) => {
        inputValues.push(input.value);
        optionValues.push(count);
        input.addEventListener('change', (evt) => {
          const currentValue = evt.currentTarget.value.toString();
          const changedIndex = inputSelects.indexOf(evt.target);
          inputValues[changedIndex] = currentValue;
          variantSKU.innerText = ' ';
          productInfo.variants.forEach((variant) => {
            if (JSON.stringify(variant.options) == JSON.stringify(inputValues)) {
              variantSKU.innerText = variant.sku;
            }
          });
        });
        count += 1;
      });
    });
  }
});- 저장을 클릭합니다.
Simple용 단계
-
자산 디렉토리에서
theme.js.liquid을(를) 클릭합니다. -
variant.sku를 찾습니다.-
variant.sku를 찾을 수 있는 경우 사용자 지정을 완료한 것입니다. -
variant.sku를 찾을 수 없는 경우 다음 단계를 계속 진행합니다.
-
파일 맨 아래에 다음 코드를 붙여넣습니다.
document.addEventListener('DOMContentLoaded', () => {
  const productJson = [...document.querySelectorAll('[id^=ProductJson-')];
  if (productJson.length > 0) {
    productJson.forEach((product) => {
      const sectionId = product.id.replace("ProductJson-", "shopify-section-");
      const variantSKU = document.querySelector('#' + sectionId + ' .variant-sku');
      const inputSelects = [...document.querySelectorAll('#' + sectionId + ' .single-option-selector')];
      const productInfo = JSON.parse(product.innerHTML);
      const inputValues = [];
      const optionValues = [];
      let count = 0;
      inputSelects.forEach((input) => {
        inputValues.push(input.value);
        optionValues.push(count);
        input.addEventListener('change', (evt) => {
          const currentValue = evt.currentTarget.value.toString();
          const changedIndex = inputSelects.indexOf(evt.target);
          inputValues[changedIndex] = currentValue;
          variantSKU.innerText = ' ';
          productInfo.variants.forEach((variant) => {
            if (JSON.stringify(variant.options) == JSON.stringify(inputValues)) {
              variantSKU.innerText = variant.sku;
            }
          });
        });
        count += 1;
      });
    });
  }
});- 저장을 클릭합니다.
Supply용 단계
-
자산 디렉토리에서
theme.js.liquid을(를) 클릭합니다. -
variant.sku를 찾습니다.-
variant.sku를 찾을 수 있는 경우 사용자 지정을 완료한 것입니다. -
variant.sku를 찾을 수 없는 경우 다음 단계를 계속 진행합니다.
-
파일 맨 아래에 다음 코드를 붙여넣습니다.
document.addEventListener('DOMContentLoaded', () => {
  const productJson = [...document.querySelectorAll('[id^=ProductJson-')];
  if (productJson.length > 0) {
    productJson.forEach((product) => {
      const sectionId = product.id.replace("ProductJson-", "shopify-section-");
      const variantSKU = document.querySelector('#' + sectionId + ' .variant-sku');
      const inputSelects = [...document.querySelectorAll('#' + sectionId + ' .single-option-selector')];
      const productInfo = JSON.parse(product.innerHTML);
      const inputValues = [];
      const optionValues = [];
      let count = 0;
      inputSelects.forEach((input) => {
        inputValues.push(input.value);
        optionValues.push(count);
        input.addEventListener('change', (evt) => {
          const currentValue = evt.currentTarget.value.toString();
          const changedIndex = inputSelects.indexOf(evt.target);
          inputValues[changedIndex] = currentValue;
          variantSKU.innerText = ' ';
          productInfo.variants.forEach((variant) => {
            if (JSON.stringify(variant.options) == JSON.stringify(inputValues)) {
              variantSKU.innerText = variant.sku;
            }
          });
        });
        count += 1;
      });
    });
  }
});- 저장을 클릭합니다.
Venture용 단계
-
자산 디렉토리에서
theme.js을(를) 클릭합니다. -
variant.sku를 찾습니다.-
variant.sku를 찾을 수 있는 경우 사용자 지정을 완료한 것입니다. -
variant.sku를 찾을 수 없는 경우 다음 단계를 계속 진행합니다.
-
파일 맨 아래에 다음 코드를 붙여넣습니다.
document.addEventListener('DOMContentLoaded', () => {
  const productJson = [...document.querySelectorAll('[id^=ProductJson-')];
  if (productJson.length > 0) {
    productJson.forEach((product) => {
      const sectionId = product.id.replace("ProductJson-", "shopify-section-");
      const variantSKU = document.querySelector('#' + sectionId + ' .variant-sku');
      const inputSelects = [...document.querySelectorAll('#' + sectionId + ' .single-option-selector')];
      const productInfo = JSON.parse(product.innerHTML);
      const inputValues = [];
      const optionValues = [];
      let count = 0;
      inputSelects.forEach((input) => {
        inputValues.push(input.value);
        optionValues.push(count);
        input.addEventListener('change', (evt) => {
          const currentValue = evt.currentTarget.value.toString();
          const changedIndex = inputSelects.indexOf(evt.target);
          inputValues[changedIndex] = currentValue;
          variantSKU.innerText = ' ';
          productInfo.variants.forEach((variant) => {
            if (JSON.stringify(variant.options) == JSON.stringify(inputValues)) {
              variantSKU.innerText = variant.sku;
            }
          });
        });
        count += 1;
      });
    });
  }
});- 저장을 클릭합니다.
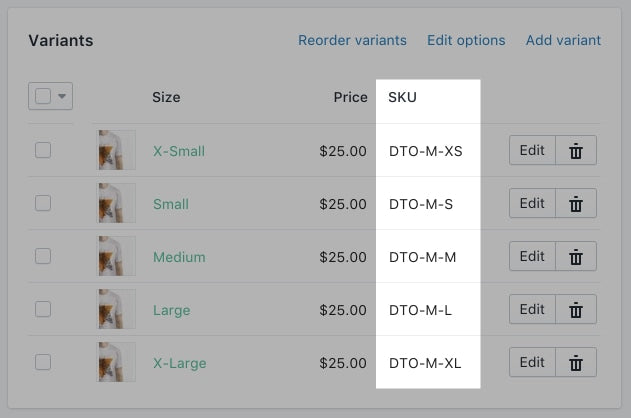
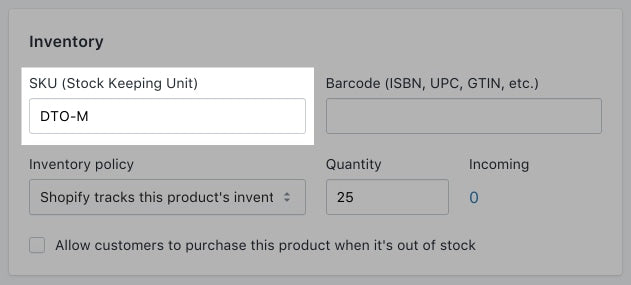
관리자에서 제품 이형에 SKU(재고 관리 코드) 번호 추가
제품 페이지에 SKU(재고 관리 코드)를 표시하려면 Shopify Admin에서 제품 이형에 SKU(재고 관리 코드) 번호를 추가해야 합니다.
Shopify 관리자에서 제품으로 이동합니다.
편집할 제품을 클릭합니다.
이형 상품이 여러 개인 제품의 경우 이형 상품 섹션에서 SKU(재고 관리 코드) 번호를 추가합니다.
저장을 클릭합니다.
섹션 구분되지 않은 테마의 단계
제품 페이지에 SKU(재고 관리 코드) 번호 표시
단계:
- Shopify Admin에서 온라인 스토어 > 테마로 이동합니다.
- 편집할 테마를 찾아 ... 버튼을 클릭하여 작업 메뉴를 연 다음 코드 편집을 클릭합니다.
-
템플릿 디렉토리에서
product.liquid를 클릭합니다. - 다음 Liquid 태그를 찾습니다.
{{ product.title }}이는 제품 페이지에서 제품 이름을 렌더링하는 코드입니다.
-
{{ product.title }}태그가 포함된 코드 아래의 새로운 행에 다음을 붙여넣습니다.
{% assign current_variant = product.selected_or_first_available_variant %}
<span class="variant-sku">{{ current_variant.sku }}</span>- 저장을 클릭합니다.
- Brooklyn 및 Venture가 아닌 무료 Shopify 테마를 사용하는 경우 다음 코드 행을 찾습니다:
var selectCallback = function(variant, selector) {product.liquid에서 위의 코드 행을 찾을 수 없는 경우 레이아웃 디렉토리의 theme.liquid에서 찾을 수 있습니다.
-
Brooklyn 및 Venture: Brooklyn 또는 Venture를 사용하는 경우 다른 코드 행을 찾아 편집해야 합니다. 자산 디렉토리에서
theme.js.liquid를 클릭한 후 다음 코드 행을 찾습니다:
theme.productVariantCallback = function (variant, selector) {- 아래의 새 행에 다음 코드를 붙여넣습니다.
if (variant) {
      document.querySelector('.variant-sku').innerText = variant.sku;
    }
    else {
      document.querySelector('.variant-sku').innerText = '';
    }
코드는 다음과 같이 보여야 합니다.
var selectCallback = function(variant, selector) {

      if (variant) {
        document.querySelector('.variant-sku').innerText = variant.sku;
      }
      else {
        document.querySelector('.variant-sku').innerText = '';
      }

        self.productPage({
          money_format: theme.moneyFormat,
          variant: variant,
          selector: selector,
          translations: {
            add_to_cart : theme.productStrings.addToCart,
            sold_out : theme.productStrings.soldOut,
            unavailable : theme.productStrings.unavailable
          }
        });
};- 저장을 클릭합니다.
관리자에서 제품 이형에 SKU(재고 관리 코드) 번호 추가
제품 페이지에 SKU(재고 관리 코드)를 표시하려면 Shopify Admin에서 제품 이형에 SKU(재고 관리 코드) 번호를 추가해야 합니다.
Shopify 관리자에서 제품으로 이동합니다.
편집할 제품을 클릭합니다.
이형 상품이 여러 개인 제품의 경우 이형 상품 섹션에서 SKU(재고 관리 코드) 번호를 추가합니다.
저장을 클릭합니다.