Adding color swatches using category metafields
Category metafields map to specific product categories in Shopify's Standard Product Taxonomy. Category metafields, which are called product attributes in the taxonomy, help you add the right information to your products to make them more discoverable by visitors on your site, on marketplaces, and on search engines.
For example, if you add the product category Apparel & Accessories > Clothing > Shirts & Tops, then you can add category metafields for clothing size, neckline, sleeve length type, and more. Based on Shopify Magic predictions, some category metafields are added by default. Other category metafields might be suggested and you can choose to add them to your store. Category metafields have default entries that you can either use as is or customize further.
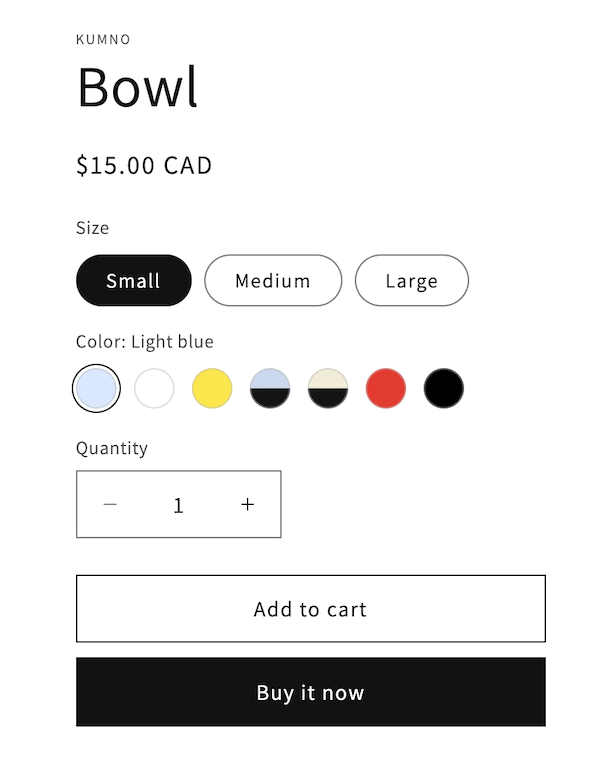
You can connect category metafields to your product variant options and the entries to your option values. This means that you can edit the color black to be graphite and your variant values are updated anywhere that color is used. When you use color entries as variant options, you can display variant options as swatches for color options on your storefront product pages.
You can add category metafields to your products directly from your Shopify admin.
To complete all the steps, you need the latest version of Dawn or a theme that supports variant options with swatches. If you're using vintage themes, or if you want to add features that your theme doesn't support, then you can edit your theme code or hire a Shopify Partner to help you.
This is a 4-step tutorial that introduces Shopify's Standard Product Taxonomy, adding category metafields, connecting variant options to category metafields, and publishing color swatches on your online store.
On this page
Step one: Add a product category
A product category is selected from the pre-defined categories in Shopify's Standard Product Taxonomy.
Shopify's Standard Product Taxonomy is used for the following purposes:
- Unlock product attributes, referred to as category metafields, that map to each product category.
- Manage your products better within Shopify, for example, as a condition for an automated collection or to help filter your product list.
- Make it easier to sell products on other channels that require a standardized product type, such as Facebook or Google.
- Determine the rate at which the product is taxed when you're using Shopify Tax. Your products might be subject to special rates or exemptions. When a product is categorized correctly, the most accurate tax rate is collected at checkout. Collecting too much or not enough sales tax can create financial or legal liability for your business.
An example of a product category is Apparel & Accessories > Clothing > Shirts & Tops. This is the example category used throughout this tutorial. However, you can add color swatches for any category metafield with the color product attribute.
Other category metafields for Apparel & Accessories > Clothing > Shirts & Tops include size, neckline, sleeve length type, top length type, age group, fabric, target gender, and clothing features. Category metafields have default entries that you can either use as is or customize further to maintain consistent branding. For example, if the color black isn't in line with your branding, then you can rename it to graphite.
Depending on the information and media you provide for a product, a category might be autofilled. You can change to a different category.
Steps:
Step two: Add and edit entries for your category metafields
After you add a product category, you can add all the entries that you need for your product's variant option values.
Steps:
Step three: Connect your category metafields to variant options
For the purpose of this tutorial, you'll be connecting the category metafield for color. You can connect any other category metafields, as needed.
When you're adding a variant, a list of category metafields display that you can connect to or you can create a custom option.
Steps:
Migrate your variant options to category metafields
If you've already created a product with variant options, then you can migrate your values to category metafields and quickly generate multiple new variant combinations. If you use category metafields to create your variant options, then you can update variant option names in a single location and it updates wherever that category metafield value is connected.
Connect the category metafield to an existing option by clicking the dynamic source icon:

Step four: Add color swatches to your online store
Next you will publish your color swatches on your online store.
Customize swatches in Dawn
- From your Shopify admin, go to Online Store > Themes.
- Make sure you have the latest version of Dawn installed, then click Customize.
- Navigate to the product that you added color options to.
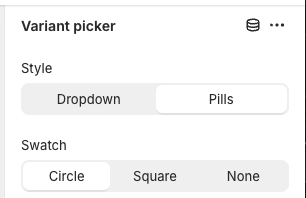
- Optional: To customize swatches, click the Variant picker block. You can change the display of the swatches by choosing between Circle, Square, or None.
- Click Save to save the theme.
You can now navigate to the product page on your online store and the color swatches are displayed for your variant option values.