For this customization to work, some themes require that a script tag for jQuery is added to the theme.liquid layout file. If you use a free Shopify Online Store 2.0 theme, then you might need to follow the next step:
In the Layout directory, click theme.liquid.
Find the closing </head> tag in the code. On a new line above the closing </head> tag, paste the following code:
To create a snippet for your delivery date picker:
From your Shopify admin, go to Online Store > Themes.
Find the theme you want to edit, click the … button to open the actions menu, and then click Edit code.
In the Snippets directory, click Add a new snippet:
Create the snippet:
Name your snippet delivery-date.
Click Create snippet. The new snippet file will open in the code editor.
In your new delivery-date.liquid snippet, paste the following code:
{{ '//code.jquery.com/ui/1.9.2/themes/base/jquery-ui.css' | stylesheet_tag }}
<script src="https://ajax.googleapis.com/ajax/libs/jqueryui/1.9.2/jquery-ui.min.js"defer="defer"></script><divstyle="width:300px; clear:both;"><p><labelfor="date">Pick a delivery date:</label><inputid="date"type="text"name="attributes[date]"value="{{ cart.attributes.date }}"/><spanstyle="display:block"class="instructions"> We do not deliver during the weekend.</span></p></div><script>window.onload=function(){if (window.jQuery){let$=window.jQuery;$(function(){$("#date").datepicker({minDate:+1,maxDate:'+2M',beforeShowDay:$.datepicker.noWeekends});});}}</script>
Click Save.
Include the snippet in your cart page
To include the delivery date snippet in your cart page:
In the Sections directory, click main-cart-items.liquid.
Find the closing </form> tag in the code. On a new line above the closing </form> tag, paste the following code:
{%render'delivery-date'%}
Click Save.
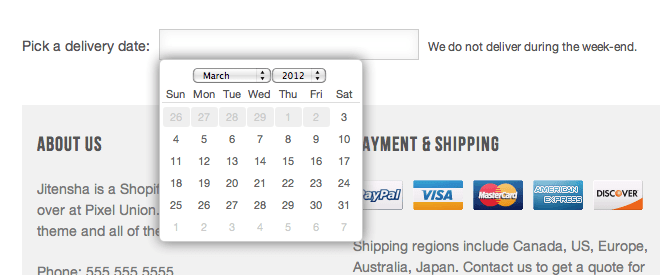
You now have a delivery date input field on your cart page. When you click inside the text field, a calendar will appear:
The date picker used in this customization is a widget from the jQuery UI library.
Can’t find the answers you’re looking for? We’re here to help.