Uploading images
You can use different types of images, such as your company logo, product images, slideshows, banners, and blog posts images. You can transform your images with crop and resize actions. You can customize your media settings in your theme to change the border or shadow on all media displayed on your store.
To display images in your online store exactly as you want them to, you need to use the correct image aspect ratio. Images are automatically optimized for your storefront with the Shopify CDN.
On this page
Upload an image in the theme editor
You can add images to your theme in the theme editor. You can also upload images on the Files page of your Shopify admin. To learn more, refer to Uploading files to your website.
Steps:
- From your Shopify admin, go to Online Store > Themes.
- Click Customize next to the theme that you want to customize.
- Use the drop-down menu to select the template that you want to edit.
- From the theme editor sidebar, click the section or block that you want to add an image to.
- Click Select Image, and then do one of the following:
- To upload an image from your computer, click Upload.
- To use a free stock image from Burst, click Explore free images.
- Click an image to see a preview of the image in your theme. After you find an image that you want to use, click Select.
- Click Save.
Add an image by using metafields
If you have metafields set up for your images, then you can use the dynamic source picker to add an image. For more information about metafields and supported image formats, refer to Metafield content types and values.
Image banners
You can create image banners with the following elements:
- one or two images
- text
- an action button
On desktop computers, banner images are displayed side by side. Because this format isn't suited for mobile devices, you can stack your image banner pictures by selecting the Stack images on mobile option in the Image banner theme settings. For more information on image banners and slideshows, refer to Best practices for slideshow and image banners.
Set a focal point on a theme image
You can use focal points to define the most important part of an image on your online store's theme. When you set a focal point on an image, you make it the area of focus. Focal points always appear in frame, even if you have a theme that crops your image to fit the layout. Focal points give you more control over the way your image is displayed when themes use different aspect ratios, and on varying screen sizes.
You can only have one focal point per image, but you can change it or remove it at any time.
Setting a focal point is available on the following versions of free Shopify themes:
- Craft version 5.0.0 or higher
- Crave version 5.0.0 or higher
- Colorblock version 3.0.0 or higher
- Dawn version 7.0.0 or higher
- Refresh version 2.0.0 or higher
- Ride version 3.0.0 or higher
- Sense version 5.0.0 or higher
- Studio version 4.0.0 or higher
- Taste version 4.0.0 or higher
If you're using a third-party theme, then check your theme's documentation to see if your theme supports using focal points.
Add a focal point to an image
You can add a focal point to an image from your Files section, and from your theme editor. If you add a focal point on an image, and then use the image in multiple places, then they all use the same focal point.
You can only add a focal point to theme images. You can't add a focal point to product, blog or collection images.
Remove a focal point
Image formats
Shopify supports the following image formats:
- JPEG
- Progressive JPEG
- PNG
- GIF
- HEIC
- WebP
When to use JPEG images
JPEG images are ideal for photography and other still images with complex colors. The JPEG format has a palette with millions of colors. JPEG also has lossy compression, which can help to keep page loading times fast without a noticeable loss in image quality.
Use the JPEG format for the following kinds of images:
- products
- banners or slideshows
- pages and blog posts
When to use PNG images
PNG images are ideal for graphics and icons with flat colors and without gradients. The PNG format is also able to support transparency.
Use the PNG format for the following kinds of images:
- logos
- icons
- borders and trims
Automatic image compression and format selection
To keep load times fast, Shopify automatically compresses images when they're displayed on your online store. Compressing an image means reducing the file size to allow for faster page loading.
Additionally, Shopify automatically determines the best possible file format to use when delivering your images. For example, when we detect that a customers web browser supports modern image formats such as WebP and AV1 Image File Format (AVIF), Shopify will deliver your image in those formats.
To improve performance by reducing the file size, GIFs are automatically converted to the animated WebP format.
Upload limits
Image uploads to Shopify have restrictions in terms of both megapixels and file size (measured in megabytes). Megapixels are used to indicate how many millions of pixels make up an image. Megabytes are used to indicate how many millions of bytes of memory or disk space an image takes up.
Images uploaded to Shopify can't exceed either of the following limits:
- 20 megapixels
- 20 megabytes
To find your image's megapixels, you can use the following equation: (pixel width x pixel height)/1,000,000. For example, an image with a resolution of 4900x6930 would be 33.9 megapixels based on the equation: (4900x6930)/1,000,000 = 33.9 MP.
Color profiles
When you view an image on your online store, the colors in the image might look different from those in the original that you uploaded to Shopify. This can occur when an image has a color profile, which is a set of data stored in a file with a .ICC or .ICM extension. Color profiles are often embedded into images to help standardize the way that the colors appear on different devices. When images are displayed on your online store, their color profiles are removed.
Color profiles are removed for a few reasons:
- Not all devices are able to read
.ICCor.ICMcolor profiles, so keeping them intact can result in inconsistencies in image colors across devices. - When an uploaded image doesn't include a color profile, sRGB (the most common color profile used to display images on the web) is assumed by the web browser. This ensures that your images look the same across all major web browsers and devices.
- Color profiles can take up large amounts of disk space, which can result in heavy loading times.
Remove the color profile from an image
You can remove the color profile from your image by saving it without the color profile before you upload it to Shopify. This process varies depending on your image editing program.
Remove a color profile using Adobe Illustrator or Adobe Photoshop
To remove a color profile using Adobe Illustrator or Adobe Photoshop:
Click Edit > Assign Profile.
Select Don’t Color Manage This Document.
Click OK.
Remove a color profile using Adobe InDesign
To remove a color profile using Adobe InDesign:
Click Edit > Assign Profile.
For RGB Profile and CMYK Profile, select Discard (Use Current Working Space).
Click OK.
For more detailed information, you can view the Adobe documentation on color profiles.
Best practices for slideshows, image banners, and full-width images
Many Shopify themes feature large images or slideshows that scale to the height of your browser or adapt to your screen size.
If you use one of these themes or have a large slideshow or background image, then it's important to understand what types of images will look best.
Because large images can't fit on all devices, Shopify sometimes displays only part of the image depending on the device you're using. If your image slideshow contains a lot of large images, then you might find that parts of the images aren't visible.
Recommendations
To make sure that your images work well with your theme, here are some things to keep in mind:
Images that you use for slideshows or backgrounds shouldn't have text in them. If the text is a part of the image itself, then it might get moved around, cropped, or adjusted based on your theme. Use the theme editor to add text and links to your slideshows.
For images that you use in slideshows or as backgrounds, choose simple images so that any overlying text is easy to read.
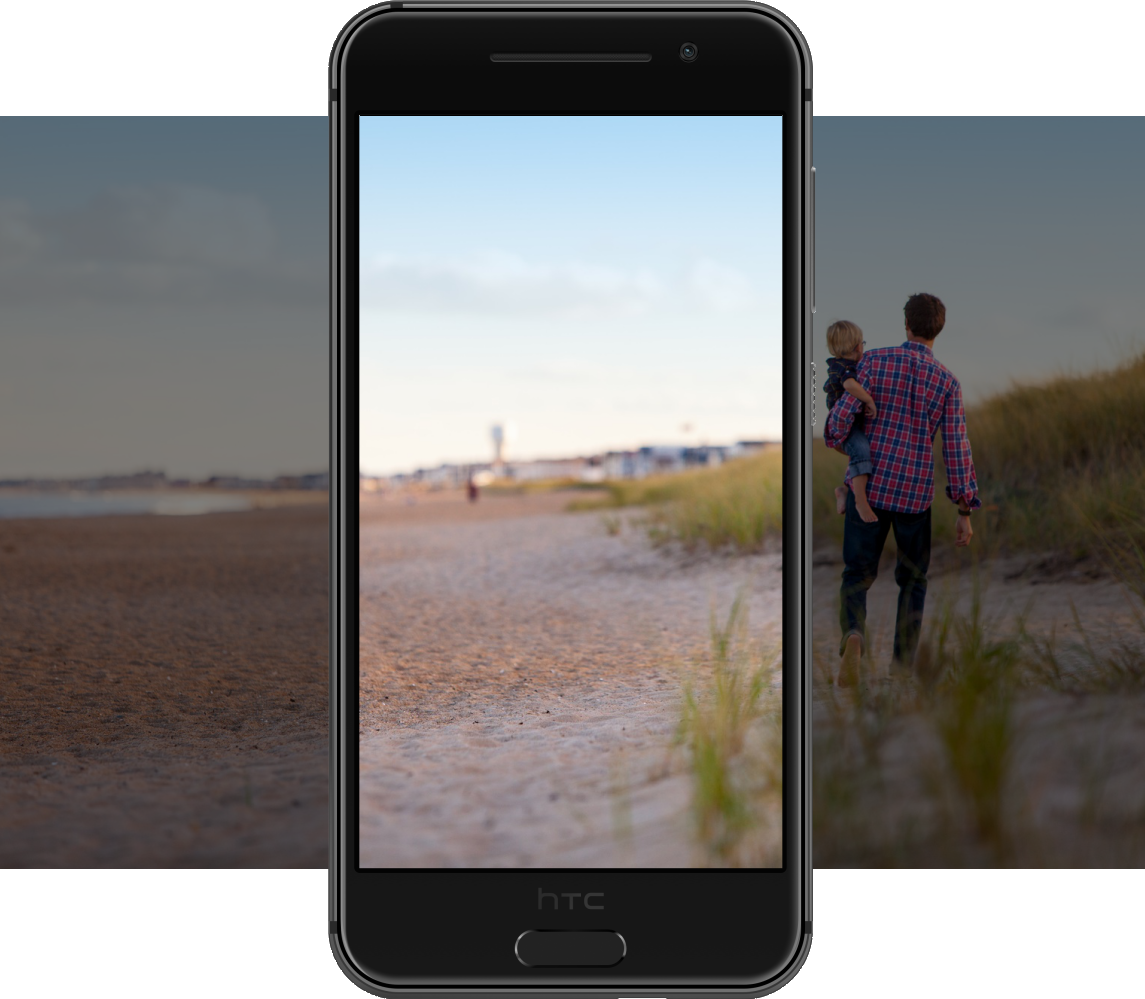
Wide images on tall screens
Wide images might be cropped on the left and right when the device used to view them has a tall screen (like a mobile phone or tablet). In the example below, if the people are the most important part of the image, then you can place a focal point on the right side of the image:
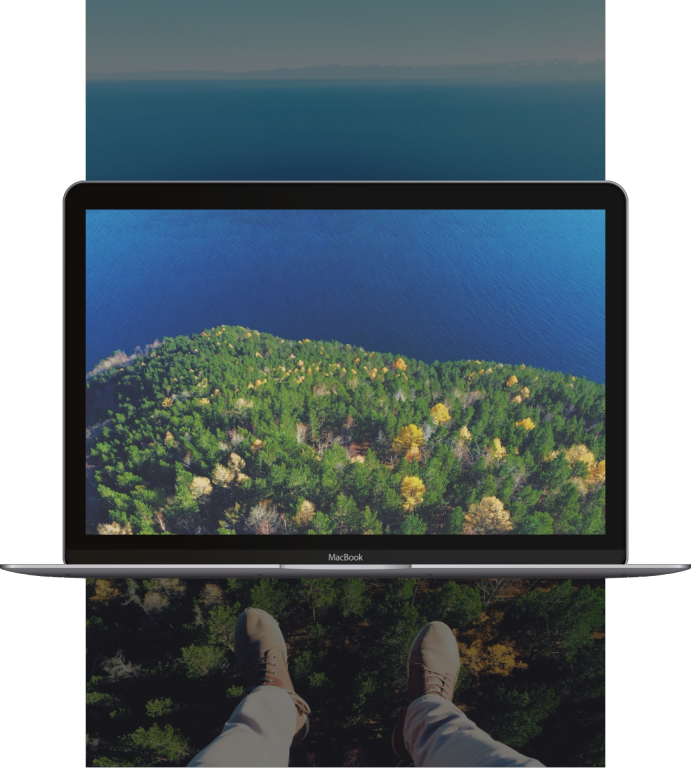
Tall images on wide screens
Tall images might be cropped on the top and bottom when the device used to view them has a wide screen (like a laptop or desktop). In the example below, if the shoes are the most important part of the image, then you can place the focal point on the bottom of the image to prevent it being cropped out: