Add a delivery date picker to your cart
You can include a calendar on your cart page that allows customers to specify a delivery date for their order.

On this page
Include jQuery in your theme.liquid
For this customization to work, some themes require that a script tag for jQuery is added to the theme.liquid layout file. If you use Boundless, Debut version 17.2.0 or newer, Express, Narrative, or Venture, then you might need to follow the next step:
In the Layout directory, click
theme.liquid
.Find the closing
</head>
tag in the code. On a new line above the closing</head>
tag, paste the following code:
{{ '//ajax.googleapis.com/ajax/libs/jquery/2.2.3/jquery.min.js' | script_tag }}
- Click Save.
Create a delivery date snippet
Desktop
- From your Shopify admin, go to Online Store > Themes.
- Find the theme you want to edit, click the … button to open the actions menu, and then click Edit code.
- In the Snippets directory, click Add a new snippet:
- Create the snippet:
- Name your snippet
delivery-date
. - Click Create snippet. The new snippet file will open in the code editor.
- Name your snippet
- In your new
delivery-date.liquid
snippet, paste the following code:
{{ '//code.jquery.com/ui/1.9.2/themes/base/jquery-ui.css' | stylesheet_tag }}
<script src="https://ajax.googleapis.com/ajax/libs/jqueryui/1.9.2/jquery-ui.min.js" defer="defer"></script>
<div style="width:300px; clear:both;">
<p>
<label for="date">Pick a delivery date:</label>
<input id="date" type="text" name="attributes[date]" value="{{ cart.attributes.date }}" />
<span style="display:block" class="instructions"> We do not deliver during the week-end.</span>
</p>
</div>
<script>
window.onload = function() {
if (window.jQuery) {
let $ = window.jQuery;
$(function() {
$("#date").datepicker({
minDate: +1,
maxDate: '+2M',
beforeShowDay: $.datepicker.noWeekends
});
});
}
}
</script>
- Click Save.
iPhone
- From the Shopify app, tap the … button.
- In the Sales channels section, tap Online Store.
- Tap Manage themes.
- Find the theme you want to edit, click the … button to open the actions menu, and then click Edit code.
- In the Snippets directory, click Add a new snippet:
- Create the snippet:
- Name your snippet
delivery-date
. - Click Create snippet. The new snippet file will open in the code editor.
- Name your snippet
- In your new
delivery-date.liquid
snippet, paste the following code:
{{ '//code.jquery.com/ui/1.9.2/themes/base/jquery-ui.css' | stylesheet_tag }}
<script src="https://ajax.googleapis.com/ajax/libs/jqueryui/1.9.2/jquery-ui.min.js" defer="defer"></script>
<div style="width:300px; clear:both;">
<p>
<label for="date">Pick a delivery date:</label>
<input id="date" type="text" name="attributes[date]" value="{{ cart.attributes.date }}" />
<span style="display:block" class="instructions"> We do not deliver during the week-end.</span>
</p>
</div>
<script>
window.onload = function() {
if (window.jQuery) {
let $ = window.jQuery;
$(function() {
$("#date").datepicker({
minDate: +1,
maxDate: '+2M',
beforeShowDay: $.datepicker.noWeekends
});
});
}
}
</script>
- Click Save.
Android
- From the Shopify app, tap the … button.
- In the Sales channels section, tap Online Store.
- Tap Manage themes.
- Find the theme you want to edit, click the … button to open the actions menu, and then click Edit code.
- In the Snippets directory, click Add a new snippet:
- Create the snippet:
- Name your snippet
delivery-date
. - Click Create snippet. The new snippet file will open in the code editor.
- Name your snippet
- In your new
delivery-date.liquid
snippet, paste the following code:
{{ '//code.jquery.com/ui/1.9.2/themes/base/jquery-ui.css' | stylesheet_tag }}
<script src="https://ajax.googleapis.com/ajax/libs/jqueryui/1.9.2/jquery-ui.min.js" defer="defer"></script>
<div style="width:300px; clear:both;">
<p>
<label for="date">Pick a delivery date:</label>
<input id="date" type="text" name="attributes[date]" value="{{ cart.attributes.date }}" />
<span style="display:block" class="instructions"> We do not deliver during the week-end.</span>
</p>
</div>
<script>
window.onload = function() {
if (window.jQuery) {
let $ = window.jQuery;
$(function() {
$("#date").datepicker({
minDate: +1,
maxDate: '+2M',
beforeShowDay: $.datepicker.noWeekends
});
});
}
}
</script>
- Click Save.
Include the snippet in your cart page
To include the delivery date snippet in your cart page:
In the Sections directory, click
cart-template.liquid
. If your theme doesn't have this file, then clickcart.liquid
in the Templates directory.Find the closing
</form>
tag in the code. On a new line above the closing</form>
tag, paste the following code:
{% render 'delivery-date' %}
- Click Save.
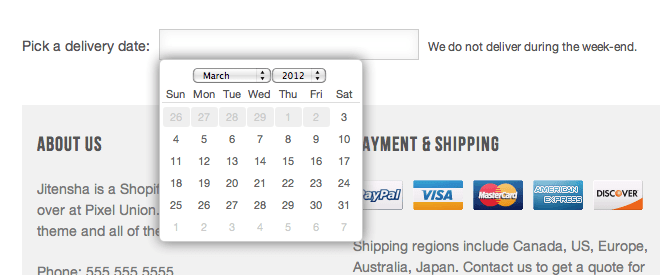
You now have a delivery date input field on your cart page. When you click inside the text field, a calendar will appear:

The date picker used in this customization is a widget from the jQuery UI library. This blog post explains how to disable specific dates in the date picker calendar.