POS Terminal (Countertop mode for POS Go)
When combined with POS Go Dock, POS Go transitions from a mobile POS to a dedicated countertop payment terminal called POS Terminal. The POS Terminal connects to another POS device with Wi-Fi or Ethernet.
On this page
- Requirements
- Network requirements for POS Terminal
- Docking the POS Go
- Removing the POS Go from the dock
- Network priority
- Activating customer display mode
- Accepting payments with POS Terminal
- Accessing settings on POS Terminal
- Customizing the standby screen on POS Terminal
- Displaying accepted card brands on POS Terminal
- Customizing the post-payment message on POS Terminal
- Troubleshooting
- Additional troubleshooting
- Frequently asked questions
Requirements
To use the POS Terminal, you need to meet the following requirements:
- have a POS Go device
- have a POS Dock
- your store is based in Australia, Canada, Ireland, the United Kingdom, the United States, Italy, New Zealand, Belguim, Denmark, Netherlands, Spain, Germany, or Finland
- have Shopify Payments activated as your store's payment provider
- your physical retail locations are based in the same country that your store is based in
- access to your network and the internet by using a WPA2 Wi-Fi network, or an Ethernet cable
- you are running POS version 8.16 or higher of the Shopify POS app on an iOS device
- POS Go and iOS device must both be logged into the same POS location and connected to the same network
Network requirements for POS Terminal
The POS Terminal can use Wi-Fi or a wired Ethernet connection to connect your network and the internet. If you use a router, then refer to your router’s manual and reconfigure the networking setup as required. For the POS Terminal to connect to your network, the following requirements must be met:
- Shopify POS and POS Go need to be connected to the same local network.
- The local network needs to have a functional Internet connection.
- Peer to Peer communication on the network must be available:
- In your router settings, turn off the option that says “block clients from reaching any private IP”. Or turn on the option that says “allow guests to view each other and access local network”.
- Ensure your Firewall settings allow Shopify domains and IP addresses.
- Contact your network administrator if you believe P2P communication might be deactivated on your local network.
- Ports must be open. Port numbers are used in the internet protocols to specify different services. They're part of the addressing information in the network and they help to direct network messages to the correct application on a device. The following ports must be open:
- 4443
- 8080
- 27000
- 27001
- The POS app needs local network permission on iOS. The Shopify POS iOS app requests certain permissions when first installed on the device. The “Local network” permission is required to establish a connection with POS Go. From the Settings app, tap Shopify POS in the list. Tapping Shopify POS opens a screen that displays the Local Network permission toggle.
- UPnP (Universal Plug-n-Play) router setting should be activated (optional). The UPnP setting on the router allows devices on the network to discover each other. Ideally, this should be activated so that POS can find the paired POS Go on the network to automatically repair connections when possible.
Docking the POS Go
To use customer display mode, the POS Go must be docked in the POS Go Dock.
Before you place POS Go into the dock, you need to set up the POS Go.
Steps:
- If the POS Go Case is on the dock, then remove it.
- Plug the POS Go Dock into a power source that supports USB-A.
- Optional: If you're using wired connectivity for data instead of Wi-Fi, then plug one end of an Ethernet cable into the Ethernet port on the dock and the other into your router.
- Insert the POS Go into the dock. The screen displays a QR code and instructions for you to complete the setup.
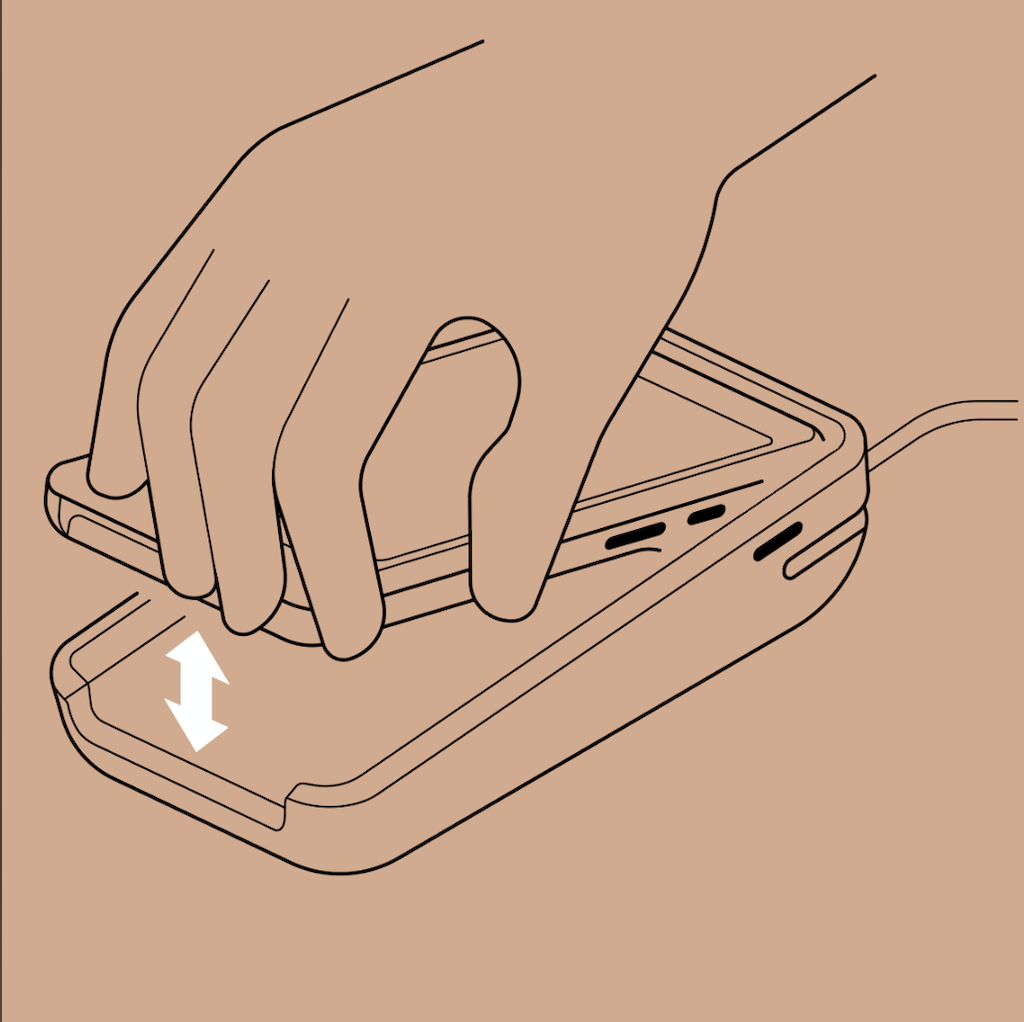
Removing the POS Go from the dock
To remove the POS Go from the dock, pull the POS Go upwards with force from the dock.
Network priority
The POS Terminal prioritizes connecting through Ethernet where possible. If you previously configured the POS Terminal for Wi-Fi, then the POS Terminal switches to using an Ethernet connection when connected to the dock with a plugged-in Ethernet cable. If you remove POS Go from the dock, then it switches back to the Wi-Fi connection.
Activating customer display mode
POS Terminal can be used as a customer facing display with cart information and payment status when it's docked.
Steps:
- To activate customer display mode, insert POS Go into the dock.
- Connect to your Wi-Fi.
- Login to the store and location where you're selling in person.
- Tap Let's go. A QR code displays on the screen. If the QR code isn't displayed, then swipe from right to left and tap Reset connection to POS.
- In your POS device settings, ensure your device is connected to the same Wi-Fi as your POS Go.
- On your POS app, login to the same store and location as your POS Go. Set up the POS Go:
- Tap More > Settings > Set up hardware.
- Select Card reader > POS Terminal.
- Review the setup prompts and tap Next step to move through them.
- Scan the QR code displayed on the POS Go with your tablet or smartphone camera to complete the setup.
- When successfully connected, your POS device displays a message that it's Connected to POS Terminal.
- Tap Done.
Accepting payments with POS Terminal
When in customer display mode, the POS Terminal becomes the default device for credit and debit transactions.
Steps:
- On your POS device, add items to the cart in the POS app and tap Checkout.
- POS Terminal’s buyer-facing display prompts the customer to tap, swipe, or insert their card. If the customer wants to pay with another method, then select their preferred option in the POS app.
- If you have tips activated, then choose Credit/Debit for card payments for POS Go from the available payment methods to prompt for card payment.
- When Shopify POS displays a Payment approved message, the transaction is complete.
Accessing settings on POS Terminal
The settings panel on the POS Terminal displays the information about your connection and allows you to make the following changes to the setup:
- Change your network settings.
- Initiate a reconnection to the POS device via a QR code.
- View your network status and make changes to the network settings.
To access the settings panel, swipe from right to left starting at the edge of the screen on the POS Terminal.
Customizing the standby screen on POS Terminal
You can select an image that displays on the standby screen for POS Terminal.
Steps:
- From your Shopify admin, navigate to Point of Sale > Settings.
- In the Devices section, select Customer displays.
- Select Image and the display editor opens.
- Click Add image and select an image.
- When an image is selected, click Save. The new display image automatically displays on all POS Terminal devices in all locations.
Displaying accepted card brands on POS Terminal
You can display accepted payment methods on the standby screen.
Steps:
- From your Shopify admin, navigate to Point of Sale > Settings.
- In the Devices section, select Customer displays.
- Select Payment options.
- Check or uncheck the Show accepted physical and digital payments options box.
- Click Save. The accepted payment methods automatically display on all POS Terminal devices in all locations.
Customizing the post-payment message on POS Terminal
You can add a custom post-payment message to display on the POS Terminal when a transaction has been completed.
Steps:
- From your Shopify admin, navigate to Point of Sale > Settings.
- In the Devices section, select Customer displays.
- Select Post payment message.
- In the text box, type a custom message.
- Click Save. The custom message automatically displays on all POS Terminal devices in all locations.
Troubleshooting
If the connection fails, then the POS Terminal continues to display the “Welcome” screen. If you experience any connection issues between POS Terminal and the POS app, then try the following troubleshooting steps to reconnect them:
- Make sure you’re running the latest version of the POS app on your POS device. Version 8.16 or later is required.
- Make sure both devices are connected to the same network.
- If both POS Terminal and your tablet are connected with Wi-Fi, then they must be on the same Wi-Fi network.
- If POS Terminal is connected with Ethernet, then it must be connected to the same network as the POS device via your router.
- Make sure you’re logged in to the same shop and location on both devices.
- Both devices unpair when your POS device locks, is rebooting, or you close the POS app on your POS device. Connection should re-establish automatically as long as the POS app is running and it's displayed on the screen.
- Ensure your Firewall settings allow Shopify domains and IPs.
- Reset your router.
You can also try temporarily connecting both devices to a different network, such as a Wi-Fi hotspot on a smartphone. If the connection succeeds on a different network, then this indicates that the network might not be set up to allow POS and POS Terminal to communicate with each other. Ensure your network meets the networking requirements.
Additional troubleshooting
- My POS lost connection to POS Terminal and there’s no QR code showing.
- The list of items is too long to be displayed on the POS Terminal display.
- Couldn't connect to POS Go due to the error "The network was blocked by a DNS error.".
- I undocked my POS Go and had to log in to my store again.
My POS lost connection to POS Terminal and there’s no QR code showing
On the POS Terminal, swipe from right to left to reveal the setting panel, then tap Reset connection to POS to force the QR code to display on the screen.
The list of items is too long to be displayed on the POS Terminal display
Use one finger to scroll the list up and down to display all items in the cart.
Couldn't connect to POS Go due to the error "The network was blocked by a DNS error"
If you encounter the error that "The network was blocked by a DNS error", then your DNS provider likely blocks local IP resolution. Change your network settings to use one of the following known DNS providers that don't block local IP resolution:
- Changing DNS on the router. This method avoids changing the DNS settings on each device. Example instructions on changing the DNS settings on your router are available here.
- Change DNS on the device. On iPads, this can be done by heading to Settings > Wi-Fi and then tapping on the i button next to the Wi-Fi network you want to configure. Under DNS, tap Configure DNS and choose Manual. Tap Add Server and add each of the following servers one-by-one and then tap Save after you have added the servers:
- 1.1.1.1
- 1.0.0.1
- 8.8.8.8
- 8.8.4.4
I undocked my POS Go and had to log in to my store again
This is by design. When you undock your POS Go, it converts to a reader instead of mobile point of sale. You can log in to POS again, but docking logs you out again.
Frequently asked questions
- What payment methods can I accept with POS Terminal?
- Will my payment rates, payouts, or reporting be affected?
- Can I use POS Terminal without an Ethernet connection?
- How do I use the POS Go barcode scanner when it is docked?
- Can I run the POS app natively on POS Go when it is docked?
- Is POS Terminal secure?
- Can I still use other card readers with my POS?
- Do I have to plug in the USB cable?
What payment methods can I accept with POS Terminal?
POS Terminal accepts the following major credit cards:
- Visa
- Mastercard
- AMEX
- Discover
- Diner’s Club
- Interac (Canada)
POS Terminal can process payments from tap, chip, or swipe cards, and digital wallets, such as Apple Pay and Google Pay.
Will my payment rates, payouts, or reporting be affected?
No. Payments on POS Terminal are still processed through Shopify Payments, which means rates, payouts, and reporting all remain the same.
Can I use POS Terminal without an Ethernet connection?
Yes. If your store isn't equipped for Ethernet, then you can use POS Terminal with a Wi-Fi connection. This option still provides increased reliability with POS Terminal connected to your tablet over Wi-Fi rather than Bluetooth.
How do I use the POS Go barcode scanner when it's docked?
When POS Go is docked, the barcode scanner can't be used. Docking the device transforms it into a dedicated payment terminal for a countertop setup. This means only customer-facing utilities are available.
Can I run the POS app natively on POS Go when it's docked?
No. When POS Go is docked, only customer-facing utilities are available. When removed from the dock, customer display mode deactivates and you can then log in to your store and use it as a mobile POS device.
Is POS Terminal secure?
Yes. POS Terminal adheres to industry standards for security in payment processing. All Shopify card readers are PCI compliant and follow EMV best practices, meaning cardholder data is secure and payments are encrypted.
When POS Go is docked, store data and POS utilities cannot be accessed. Removing from the dock deactivates the customer display mode and requires a staff login to access Shopify POS.
Can I still use other card readers with my POS?
Yes. You can have multiple card readers paired to your POS, including POS Terminal, Tap & Chip, and WisePad 3. At checkout, you’re prompted to select which card reader you want to use to take payment.
Do I have to plug in the USB cable?
Plugging in the USB cable isn't required but is strongly recommended to ensure that your POS Terminal remains fully charged and ready to accept payments at any time.