Edit notification templates
Your store has many notification templates. Notifications are triggered by events, such as a new order being placed, or an order being fulfilled. They're sent to you, your staff, or your customers, depending on the event as well as your order notification settings.
You can customize your email notifications by adding a logo or changing the color scheme for all templates at the same time. You can also edit the content of email notifications individually.
For information about SMS templates, refer to SMS notifications.
On this page
Add a logo to your email templates
Choose colors for your email templates
Changing the language of your email templates
The default language that your email templates display in depends on your theme's language and any edits that you've made to the templates:
- If you've made no changes to your email templates, then when you change your theme's language, the email template language also changes.
- If you've made changes to both the body and title of your email templates, then changing your theme's language doesn't change the language of the email templates.
- If you've made changes only to the title of your email templates, then changing your theme's language doesn't change the language of the email templates.
- If you've made changes only to the body of your email templates, then changing your theme's language changes the title to the new language but doesn't change the language of the body of your email templates.
Customize specific email templates
Steps:
Test your changes
After you've customized a notification template, you can preview the changes in the Shopify admin or send it by email to review how it would display to your customers.
Steps:
- To preview your notification, go to Actions > Preview.
- If you're satisfied with the changes, then close the preview window and click Save.
- To send the notification as a test email, click Actions > Send test email. The email is sent to the account that you used to log into the Shopify admin.
Add a tax registration number to an invoice
In some countries and regions, you might need to include your tax registration number on customer invoices or other notices. In Australia, Canada, and India, businesses that charge the goods and services tax (GST) might need to include their registration number. In the European Union, you might need to include your value added tax (VAT) identification number.
Check with your tax accountant or a government authority to find out whether you need to include the number.
To display your number on an email notification, follow these steps:
- Open the specific email template you want to edit.
- In the Email body (HTML) area, enter your registration or identification number in an appropriate location. Include HTML to make sure that the output is formatted correctly.
- Optional: To verify that your customizations display correctly, preview your changes.
- Click Save.
In the following example, the store owner added their address and tax number after their store logo in the Order confirmation notification.
  <table class="row">
    <tr>
      <td class="shop-name_cell">
        {%- if shop.email_logo_url %}
          <img src="{{shop.email_logo_url}}" alt="{{ shop.name }}" width="{{ shop.email_logo_width }}">
          <p>150 Elgin St, Ottawa  K2P 1L4  GST# 123456789</p>
        {%- else %}
          <h1 class="shop-name_text">
            <a href="{{shop.url}}">{{ shop.name }}</a>
          </h1>
        {%- endif %}
Alternatively, you can purchase and download an invoice app from the Shopify App Store. An invoice app enables you to include tax number on invoices.
Add a duties line to the Order confirmation and Order refund templates
If you collect duty and import taxes, then verify that your notification emails contain a duties line so that your customers have a record of paying that fee.
If you use the default templates for the Order confirmation and Order refund email templates, then your emails are automatically updated to include a duties line item. You don't need to make any changes.
If you customized your Order confirmation and Order refund email templates, then you can add the following code to your email templates to add a duties line.
{% if current_total_duties %}

<tr class="subtotal-line">
 <td class="subtotal-line__title">
   <p>
     <span>Duties</span>
   </p>
 </td>
 <td class="subtotal-line__value">
   <strong>{{ current_total_duties | money }}</strong>
 </td>
</tr>

{% endif %}
Add payment terms to order invoices
Payment terms specify the date that payment for an order is due to be paid.
If you customized your Order invoice email template, then you can add the following code to your email templates to add a payment due dates, including due on fulfillment.
{% assign due_date = payment_terms.next_payment.due_at | default: nil %}

{% if payment_terms.type == 'receipt' and due_date == nil %}
   {% assign due_date = 'now' %}
{% endif %}

{% if payment_terms.type == 'fulfillment' and payment_terms.next_payment.due_at == nil % }
  <h2> Payment of {{ order.total_outstanding | money }} is due on fulfillment </h2>
{% else %}
  <h2>Payment of {{ order.total_outstanding | money }} is due {{ due_date | date: format: 'date' }}</h2>
{% endif %}
To display the name of the payment term on your email template, follow these steps:
1. Find the following section if it exists:
{% if shipping_address or billing_address or shipping_method %}2. Replace it with the following:
{% if shipping_address or billing_address or shipping_method or payment_terms %}3. In the Email body (HTML) area, enter your payment terms name in an appropriate location.
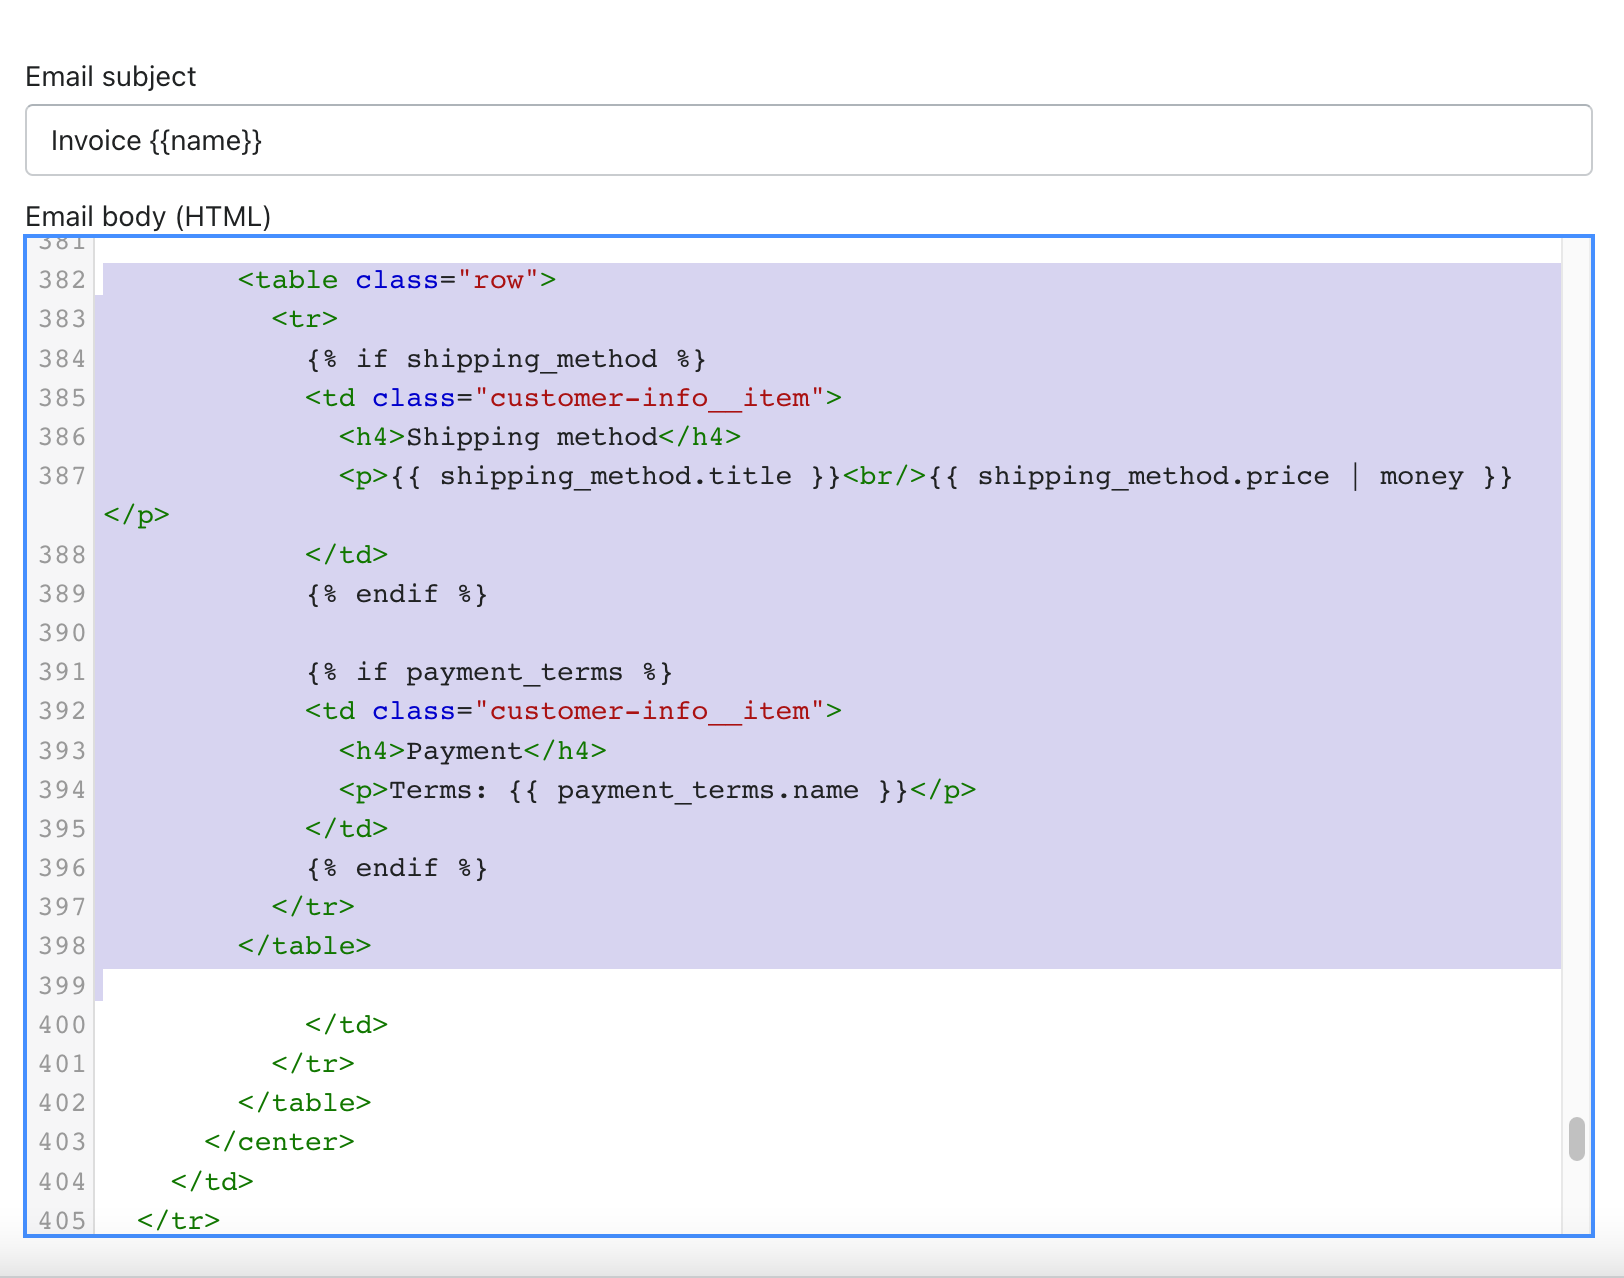
  {% if payment_terms %}
    <td class="customer-info__item">
      <h4>Payment</h4>
      <p> Terms: {{ payment_terms.name }} </p>
    </td>
  {% endif %}
4. Click Save.
In the following example, the store owner added their payment terms in the customer information section after shipping_method.
For more details, refer to the Liquid reference for payment_terms.
Add a custom message to notifications
You can add a custom message to several notifications, including:
- abandoned checkout
- contact customer
- customer activation
- draft order invoice
Steps:
- Enter a custom message in the text field.
- Click Review email.
- Verify the message is showing correctly, and click Back to make any changes.
- Click Send notification when you are ready.
Style email templates using inline CSS
You can use in-line CSS to style your email templates by overriding the default stylesheet which is: <link rel="stylesheet" type="text/css" href="/assets/notifications/styles.css">. The template editor inlines any style tags in the template automatically. It preserves media queries to help make responsive emails easy to create. External stylesheets and stylesheets uploaded with theme assets can't be inlined, so it’s recommended that CSS styling be included in a <style> tag in the <head> of your templates.
Automatic conversion of plain text emails
Your HTML email templates are transformed into plain text for email clients that require this version to be displayed, such as Mail for Apple Watch.