Receipt printers
To print paper receipts, your retail setup needs to include the following items:
- Shopify POS on a compatible device
- a supported receipt printer
On this page
Supported printer models
Supported receipt printer models are:
Take care with model names
If you buy the LAN receipt printer, then you might notice that the name is shown on the front of the printer as TSP100. This is no cause for concern, as the number isn't the name of the individual model, but of that whole range of Star Micronics printers.
If you want to confirm the exact model number of the printer that you have, then look for a label that's typically fixed to the underside of the printer. This label shows the:
- model range (TSP100)
- serial number
- power rating
- model number
Connect the printer cables
Two cables with slightly different connectors are supplied with a retail custom kit from Shopify. One cable connects the printer to the cash drawer, and the other connects the printer to your router. Take care to use the correct cable in each case.
Receipt printer to cash drawer:
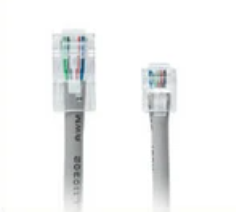
Receipt printer to router:
Set a printer as the default for receipt printing
When you connect a printer, it's automatically set as the default printer for receipt printing. If the default printer is unavailable, then you can't print a receipt. If you have more than one printer, then you can change the default printer from Shopify POS.
Steps:
From Shopify POS, tap ≡, and then tap Manage connected hardware.
Under Receipt printers, tap the printer that you want to set as the default.
Enable the Default receipt printer option.
Print a test receipt
After you've set up your receipt printer, a brief diagnostic report prints. After this, you should print a test receipt to confirm that everything is working.
Steps:
From Shopify POS, tap ≡, and then tap Manage connected hardware.
Tap the printer that you want to test.
Tap Test receipt printer.