Scheduled time
The Scheduled time trigger starts a workflow at a time and date that you specify, with options to do the following:
- repeat the workflow on a specific schedule
- stop repeating the workflow when certain criteria are met
Unlike most other triggers that are available for Shopify Flow, the Scheduled time trigger starts a workflow based on criteria that you set when you create the workflow, rather than based on an event that occurs in your store or in an app.
There are three different ways to use the Scheduled time trigger:
- to create a workflow that starts at a specific date and time and occurs once
- to create a workflow that starts at a specific date and time and repeats on a schedule
- to create a workflow that starts at a specific date and time and repeats on a schedule until specific criteria are met
You can create multiple schedules and use any combination of these approaches.
On this page
- Considerations for using the Scheduled time trigger
- Create a workflow that runs at a specific date and time
- Create a workflow that runs repeatedly on a schedule
- Create a workflow that stops repeating when specific criteria are met
- Get actions
- Scheduled time variables
- Actions
- Example
- Testing the Scheduled time trigger
Considerations for using the Scheduled time trigger
- A workflow must have at least one occurrence in the future. If a workflow is created that both starts and ends in the past, you can't activate the workflow.
- For repeating workflows, the longest interval possible between occurrences is one year. The smallest possible interval is 10 minutes. For small time intervals, if a workflow takes longer to run than the interval, then you might get inconsistent results, depending upon the query used and the actions in the workflow.
Create a workflow that runs at a specific date and time
- Create a new workflow, and then select the Scheduled time trigger.
- Optional: Select the time zone to use. By default, this is set to your store's time zone.
- Enter a Start date and a Start time.
- Optional: To add an additional schedule for the workflow, click Add schedule.
Create a workflow that runs repeatedly on a schedule
- Create a workflow that starts with the Scheduled time trigger.
- After you set the start time and date, click Add repeat rule.
- Select the amount of time to pass before the workflow is run again. This amount must be a whole number. Decimals are not supported.
- Set the time period from the options Days, Weeks, or Months.
- If you select Weeks, then click the day of the week that the workflow to run.
- If you select Months, then select the day of the month for the workflow to run.
- Optional: To set criteria that will stop the workflow from repeating, click Add end rule.
Create a workflow that stops repeating when specific criteria are met
- Create a workflow that starts with the Scheduled time trigger and a Repeat rule.
- Click Add end rule.
- Do one of the following:
- To stop the workflow after it has run a set amount of times, select After number of occurrences, and then enter the number in the Count section.
- To stop the workflow at a specific time, select On a date and time, and then enter an End date and an End time.
Get actions
Most workflows start due to an event, and automatically include data that is related to that event. For example, when a workflow is started by the Order created trigger, the workflow starts when a new order is placed. The workflow automatically has the information on the order that caused the workflow to run, and performs actions on that workflow.
In a workflow that uses the Scheduled time trigger, the workflow starts at a time that you've specified, rather than as a result of an event. Because there is no specific event in your store or from an app that starts the workflow, there is no data automatically included. To create a workflow that takes actions on orders or products, you can use the following actions to bring that data into your workflow:
Scheduled time variables
When you start a workflow with the Scheduled time trigger, conditions and actions in that workflow that accept liquid variables have an additional variable available. The Scheduled at variable returns the time and date when the workflow is scheduled to run.
Actions
The following actions can be used in workflows that start with the Scheduled time trigger.
- Create redirect URL
- Delete redirect URLs
- Get collection data
- Get draft order data
- Get draft order data
- Get order data
- Get product data
- Remove shop metafield
- Send email
- Send HTTP request
- Update shop metafield
- Wait
Example
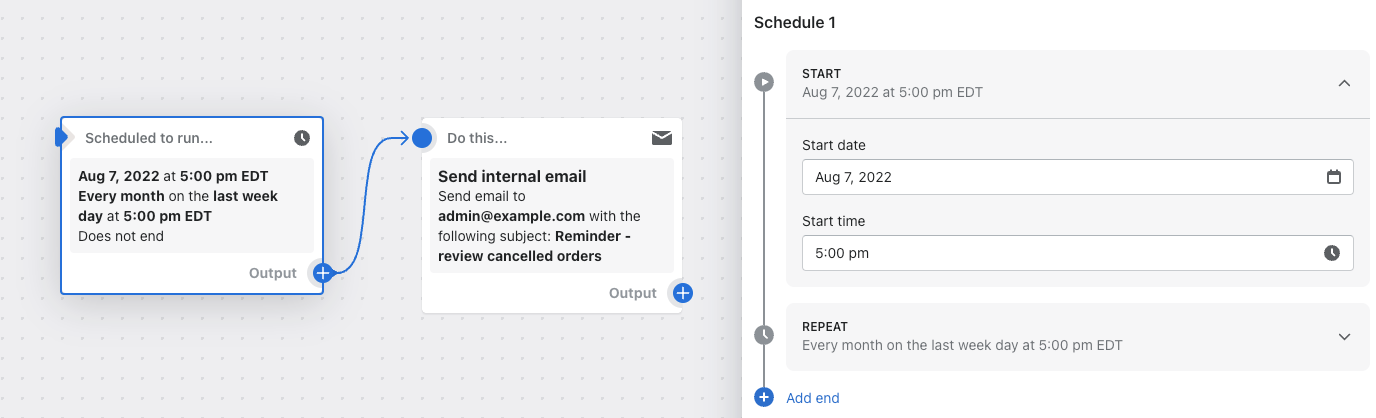
In this example workflow, an email is sent at 9:00 am on the last weekday every month.
Testing the Scheduled time trigger
To test a workflow that starts with this trigger, set the first workflow to run shortly after you turn on the workflow. After you're confident your workflow works as intended, edit your workflow to update the start date and time.