向购物车页面添加配送日期选择器
已于 Jul 27, 2024 打印了此页面。若要查看当前版本,请访问 https://help.shopify.com/zh-CN/manual/online-store/themes/themes-by-shopify/vintage-themes/customizing-vintage-themes/add-date-picker。
您可以在购物车页面上包含一个日历,使客户能够指定其订单的配送日期。
在 theme.liquid 中包含 jQuery
若要使此自定义正常工作,某些模板需要将 jQuery 的脚本标记添加到 theme.liquid 布局文件中。如果您使用 Boundless、Debut 版本 17.2.0 或更高版本、Express、Narrative 或 Venture,您可能需要按照如下步骤操作:
在 Layout 目录中,点击
theme.liquid。查找代码中的结束
</head>标记。在结束</head>标记上方的新行中,粘贴以下代码:
{{ '//ajax.googleapis.com/ajax/libs/jquery/2.2.3/jquery.min.js' | script_tag }}- 点击保存。
创建配送日期代码片段
- 在 Shopify 后台中,转至在线商店 > 模板。
- 找到要编辑的模板,点击 ... 按钮打开操作菜单,然后点击编辑代码。
- 在 Snippets 目录中,点击添加新代码片段。
-
创建代码片段:
- 将代码片段命名为
delivery-date。 - 点击创建代码片段。新的代码片段文件将在代码编辑器中打开。
- 将代码片段命名为
在新的
delivery-date.liquid代码片段中,粘贴以下代码:
{{ '//code.jquery.com/ui/1.9.2/themes/base/jquery-ui.css' | stylesheet_tag }}
<script src="https://ajax.googleapis.com/ajax/libs/jqueryui/1.9.2/jquery-ui.min.js" defer="defer"></script>

<div style="width:300px; clear:both;">
  <p>
    <label for="date">Pick a delivery date:</label>
    <input id="date" type="text" name="attributes[date]" value="{{ cart.attributes.date }}" />
    <span style="display:block" class="instructions"> We do not deliver during the week-end.</span>
  </p>
</div>

<script>
  window.onload = function() {
      if (window.jQuery) {
        let $ = window.jQuery;

        $(function() {
          $("#date").datepicker({
          minDate: +1,
          maxDate: '+2M',
          beforeShowDay: $.datepicker.noWeekends
        });
      });
    }
  }
</script>- 点击保存。
- 在 Shopify 应用中,点击 … 按钮。
- 在销售渠道部分,轻触在线商店。
- 轻触管理模板。
- 找到要编辑的模板,点击 ... 按钮打开操作菜单,然后点击编辑代码。
- 在 Snippets 目录中,点击添加新代码片段。
-
创建代码片段:
- 将代码片段命名为
delivery-date。 - 点击创建代码片段。新的代码片段文件将在代码编辑器中打开。
- 将代码片段命名为
在新的
delivery-date.liquid代码片段中,粘贴以下代码:
{{ '//code.jquery.com/ui/1.9.2/themes/base/jquery-ui.css' | stylesheet_tag }}
<script src="https://ajax.googleapis.com/ajax/libs/jqueryui/1.9.2/jquery-ui.min.js" defer="defer"></script>

<div style="width:300px; clear:both;">
  <p>
    <label for="date">Pick a delivery date:</label>
    <input id="date" type="text" name="attributes[date]" value="{{ cart.attributes.date }}" />
    <span style="display:block" class="instructions"> We do not deliver during the week-end.</span>
  </p>
</div>

<script>
  window.onload = function() {
      if (window.jQuery) {
        let $ = window.jQuery;

        $(function() {
          $("#date").datepicker({
          minDate: +1,
          maxDate: '+2M',
          beforeShowDay: $.datepicker.noWeekends
        });
      });
    }
  }
</script>- 点击保存。
在购物车页面中包含代码片段
若要在购物车页面中包含配送日期代码片段,请执行以下操作:
在 Sections 目录中,点击
cart-template.liquid。如果您的模板中没有此文件,则点击 Templates 目录中的cart.liquid。查找代码中的结束
</form>标记。在结束</form>标记上方的新行中,粘贴以下代码:
{% render 'delivery-date' %}- 点击保存。
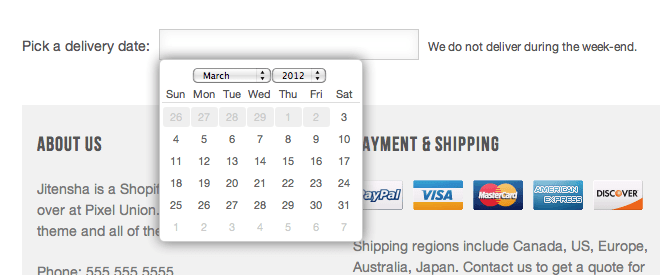
您的购物车页面中现在将有一个配送日期输入字段。当您点击文本字段时,将出现日历:
此自定义设置中使用的日期选择器是 jQuery UI 库中的小组件。此博客文章介绍如何在日期选择器日历中禁用特定日期。