カートに配達日ピッカーを追加する
このページはJul 27, 2024に印刷されています。最新のバージョンについては、https://help.shopify.com/ja/manual/online-store/themes/customizing-themes/add-date-pickerをご覧ください。
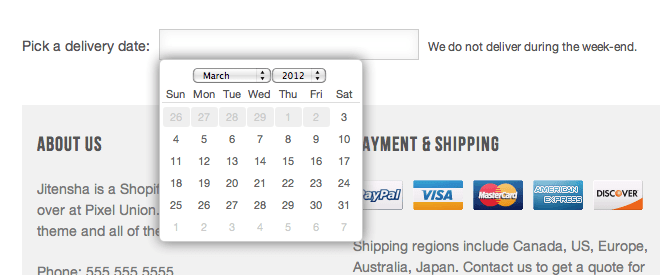
お客様が注文の配達日を指定できるようにするカレンダーをカートページに追加できます。
theme.liquidにjQueryを追加する
このカスタマイズを機能させるには、一部のテーマで、jQueryのスクリプトタグをtheme.liquidレイアウトファイルに追加する必要があります。無料のShopify Online Store 2.0のテーマを使用している場合、以下のステップに従う必要があります。
レイアウトディレクトリーで、
theme.liquidをクリックします。コードで
</head>終了タグを探します。</head>終了タグの上の新しい行に、次のコードを貼り付けます。
{{ '//ajax.googleapis.com/ajax/libs/jquery/2.2.3/jquery.min.js' | script_tag }}- [保存] をクリックします。
配達日のスニペットを作成する
配達日ピッカーのスニペットを作成するには、次の手順を実行します。
- 管理画面から [オンラインストア] > [テーマ] に移動します。
- 編集するテーマを見つけて、[...] ボタンをクリックしてアクションメニューを開き、[コードを編集する] をクリックします。
- [スニペット] ディレクトリで、[新しいスニペットを追加する] をクリックします。
-
次の手順でスニペットを作成します。
- スニペットに
delivery-dateと名付けます。 - [スニペットを作成する] をクリックします。コードエディタで新しいスニペットファイルが開きます。
- スニペットに
新しい
delivery-date.liquidスニペットで、次のコードを貼り付けます。
{{ '//code.jquery.com/ui/1.9.2/themes/base/jquery-ui.css' | stylesheet_tag }}
<script src="https://ajax.googleapis.com/ajax/libs/jqueryui/1.9.2/jquery-ui.min.js" defer="defer"></script>

<div style="width:300px; clear:both;">
  <p>
    <label for="date">Pick a delivery date:</label>
    <input id="date" type="text" name="attributes[date]" value="{{ cart.attributes.date }}" />
    <span style="display:block" class="instructions"> We do not deliver during the weekend.</span>
  </p>
</div>

<script>
  window.onload = function() {
      if (window.jQuery) {
        let $ = window.jQuery;

        $(function() {
          $("#date").datepicker({
          minDate: +1,
          maxDate: '+2M',
          beforeShowDay: $.datepicker.noWeekends
        });
      });
    }
  }
</script>- [保存] をクリックします。
- Shopifyアプリで [...] ボタンをタップします。
- 販売チャネルセクションで、[オンラインストア] をタップします。
- [テーマを管理する] をタップします。
- 編集するテーマを見つけて、[...] ボタンをクリックしてアクションメニューを開き、[コードを編集する] をクリックします。
- [スニペット] ディレクトリで、[新しいスニペットを追加する] をクリックします。
-
次の手順でスニペットを作成します。
- スニペットに
delivery-dateと名付けます。 - [スニペットを作成する] をクリックします。コードエディタで新しいスニペットファイルが開きます。
- スニペットに
新しい
delivery-date.liquidスニペットで、次のコードを貼り付けます。
{{ '//code.jquery.com/ui/1.9.2/themes/base/jquery-ui.css' | stylesheet_tag }}
<script src="https://ajax.googleapis.com/ajax/libs/jqueryui/1.9.2/jquery-ui.min.js" defer="defer"></script>

<div style="width:300px; clear:both;">
  <p>
    <label for="date">Pick a delivery date:</label>
    <input id="date" type="text" name="attributes[date]" value="{{ cart.attributes.date }}" />
    <span style="display:block" class="instructions"> We do not deliver during the weekend.</span>
  </p>
</div>

<script>
  window.onload = function() {
      if (window.jQuery) {
        let $ = window.jQuery;

        $(function() {
          $("#date").datepicker({
          minDate: +1,
          maxDate: '+2M',
          beforeShowDay: $.datepicker.noWeekends
        });
      });
    }
  }
</script>- [保存] をクリックします。
カートページにスニペットを追加する
カートページに配達日のスニペットを含めるには、次の手順を実行します。
セクションディレクトリで、[
main-cart-items.liquid] をクリックします。コードで
</form>終了タグを探します。</form>終了タグの上の新しい行に、次のコードを貼り付けます。
{% render 'delivery-date' %}- [保存] をクリックします。
カートページに配達日入力フィールドが表示されるようになりました。テキストフィールド内をクリックすると、次のカレンダーが表示されます。
このカスタマイズで使用される日付ピッカーは、jQuery UIライブラリーからのウィジェットです。