고객이 옵션을 선택하게 합니다
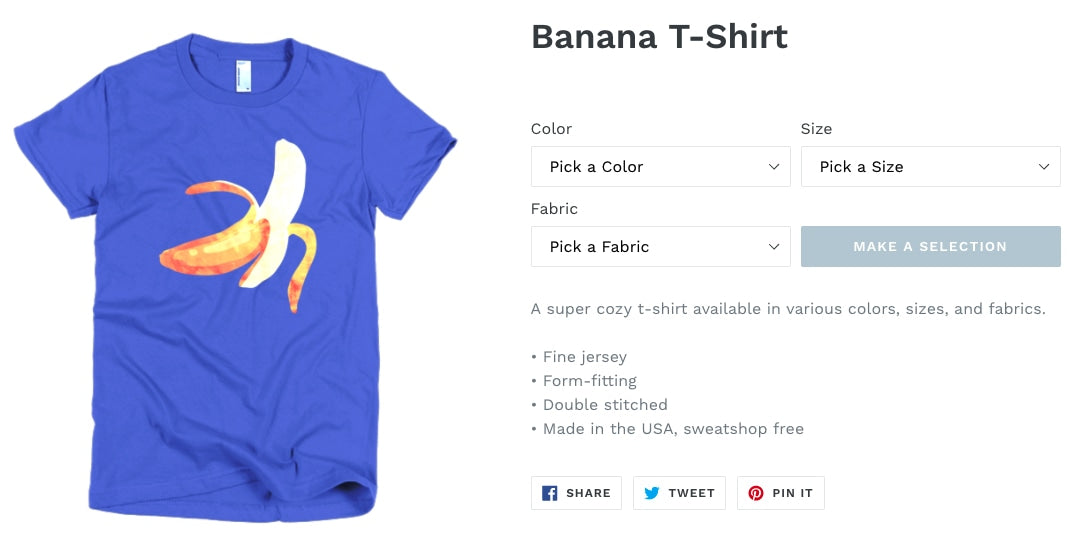
고객이 온라인 스토어의 제품 페이지를 방문하면 기본적으로 사용 가능한 첫 번째 이형 상품이 선택됩니다. 고객이 옵션을 선택하게 합니다 사용자 지정을 사용하여 사용 가능한 첫 번째 이형 상품의 자동 선택을 비활성화할 수 있습니다. 이렇게 하면 고객에게 이형 상품이 표시되기 전에 수동으로 이형 상품을 선택하라는 메시지가 표시됩니다.
고객이 옵션을 선택하게 합니다 사용자 지정을 사용하는 경우 고객이 이형 상품을 선택할 때까지 테마에 제품 가격이 표시되지 않을 수 있습니다. 이형 상품이 있는 제품은 추천 가격이 없으며 표시되는 가격은 선택한 이형 상품에 따라 결정됩니다.
섹션 지원 및 섹션 미지원 테마
이 페이지의 정보
섹션 구분된 테마의 단계
테마 선택
이 사용자 지정 단계는 테마에 따라 다릅니다. 테마 버튼을 먼저 클릭하고 다음 지침을 따릅니다.
Boundless용 단계
Boundless에 사용자 지정을 적용하려면 다음 단계를 따릅니다.
테마의 JavaScript 파일 편집
- Shopify Admin에서 온라인 스토어 > 테마로 이동합니다.
- 편집할 테마를 찾아 ... 버튼을 클릭하여 작업 메뉴를 연 다음 코드 편집을 클릭합니다.
-
자산 디렉토리에서
theme.js또는theme.js.liquid을(를) 클릭합니다. -
initVariantSelectors코드를 찾습니다. 그 아래에서 다음 코드를 찾습니다.
// Clean up variant labels if the Shopify-defined
// defaults are the only ones left
this.simplifyVariantLabels(this.productSingleObject, this.$container);
아래 새 행에 다음 코드를 추가합니다.
if (typeof(productOptions) != "undefined") {
  for (i = 0; i < productOptions.length; i++) {
    const vowels = ['a', 'e', 'i', 'o', 'u'];
    const firstOptionLetter = productOptions[i][i][0].toLowerCase();
    let indef = 'a';

    if (vowels.includes(firstOptionLetter)) {
      indef = 'an';
    };

    const select = document.querySelectorAll('.single-option-selector')[i];
    const options = select.querySelectorAll('option');

    if (options.length > 1) {
      let option = new Option('Pick ' + indef + ' ' + productOptions[i][i], '');

      select.add(option, select.firstChild);
      select.selectedIndex = 0;
    }
  }
}
이는 다음과 같이 보여야 합니다.
// Clean up variant labels if the Shopify-defined
// defaults are the only ones left
this.simplifyVariantLabels(this.productSingleObject, this.$container);

if (typeof(productOptions) != "undefined") {
  for (i = 0; i < productOptions.length; i++) {
    const vowels = ['a', 'e', 'i', 'o', 'u'];
    const firstOptionLetter = productOptions[i][i][0].toLowerCase();
    let indef = 'a';

    if (vowels.includes(firstOptionLetter)) {
      indef = 'an';
    };

    const select = document.querySelectorAll('.single-option-selector')[i];
    const options = select.querySelectorAll('option');

    if (options.length > 1) {
      let option = new Option('Pick ' + indef + ' ' + productOptions[i][i], '');

      select.add(option, select.firstChild);
      select.selectedIndex = 0;
    }
  }
}- 다음 코드 행을 찾습니다.
$(selectors.addToCartText).html(theme.strings.soldOut);이 코드 행에 있는 인스턴스 2개는 모두 productVariantCallback 함수에서 찾을 수 있습니다. 두 번째 인스턴스만 다음으로 교체합니다.
$(selectors.addToCartText).html('Make a Selection');- 저장을 클릭합니다.
제품 페이지 템플릿 편집
제품 페이지 템플릿을 편집하려면:
-
섹션 디렉토리에서
product-template.liquid을(를) 클릭합니다. - 다음 코드를 찾습니다.
{% assign current_variant = product.selected_or_first_available_variant %}다음으로 교체합니다.
{% assign current_variant = product.selected_variant %}- 다음 코드를 찾아 삭제합니다.
{% if variant == product.selected_or_first_available_variant %} selected="selected" {% endif %}-
{% schema %}코드를 찾습니다. 아래의 코드를 해당 코드 위의 행에 붙여넣습니다.
{% if current_variant == blank %}
  <script>
    var productOptions = [];

    {% for option in product.options -%}
      var optionObj = {};
      optionObj[{{ forloop.index0 }}] = "{{ product.options[forloop.index0] }}";
      productOptions.push(optionObj);
    {%- endfor %}
  </script>
{% endif %}
이는 다음과 같이 보여야 합니다.
{% if current_variant == blank %}
  <script>
    var productOptions = [];

    {% for option in product.options -%}
      var optionObj = {};
      optionObj[{{ forloop.index0 }}] = "{{ product.options[forloop.index0] }}";
      productOptions.push(optionObj);
    {%- endfor %}
  </script>
{% endif %}

{% schema %}- 저장을 클릭합니다.
카트에 추가 버튼 언어 설정 변경
카트에 추가 버튼의 언어 설정을 변경하여 고객이 제품을 선택하기 전 제품이 사용할 수 없음으로 표시되지 않도록 할 수 있습니다.
단계:
- Shopify Admin에서 온라인 스토어 > 테마로 이동합니다.
- 편집할 테마를 찾은 다음 ... > 기본 테마 콘텐츠 편집을 클릭합니다.
- 품목 필터링 검색 창에서 사용할 수 없음을 입력하여 사용할 수 없음 번역을 표시합니다.
- 사용할 수 없음 텍스트를 선택으로 교체합니다.
- 저장을 클릭합니다.
Debut용 단계
Debut에 사용자 지정을 적용하려면 다음 단계를 따릅니다.
테마의 JavaScript 파일 편집
- Shopify Admin에서 온라인 스토어 > 테마로 이동합니다.
- 편집할 테마를 찾아 ... 버튼을 클릭하여 작업 메뉴를 연 다음 코드 편집을 클릭합니다.
-
자산 디렉토리에서
theme.js또는theme.js.liquid을(를) 클릭합니다. - 파일 맨 아래에 다음 코드를 추가합니다.
(function() {
  if (typeof(productOptions) != "undefined") {
    for (i = 0; i < productOptions.length; i++) {
      const vowels = ['a', 'e', 'i', 'o', 'u'];
      const firstOptionLetter = productOptions[i][i][0].toLowerCase();
      let indef = 'a';

      if (vowels.includes(firstOptionLetter)) {
        indef = 'an';
      };

      const select = document.querySelectorAll('.single-option-selector')[i];
      const options = select.querySelectorAll('option');

      if (options.length > 1) {
        let option = new Option('Pick ' + indef + ' ' + productOptions[i][i], '');

        select.add(option, select.firstChild);
        select.selectedIndex = 0;
      }
    }
  }
})();-
_updatePrice: function(variant)코드를 찾습니다. 다음 코드를
if (
  variant.price === this.currentVariant.price &&
  variant.compare_at_price === this.currentVariant.compare_at_price &&
  variant.unit_price === this.currentVariant.unit_price
) {
  return;
}
다음으로 교체합니다.
/* if (
  variant.price === this.currentVariant.price &&
  variant.compare_at_price === this.currentVariant.compare_at_price &&
  variant.unit_price === this.currentVariant.unit_price
) {
  return;
} */
위의 코드를 찾을 수 없는 경우 다음 코드를 찾습니다.
if (
  variant.price === this.currentVariant.price &&
  variant.compare_at_price === this.currentVariant.compare_at_price
) {
  return;
}
다음으로 교체합니다.
/* if (
  variant.price === this.currentVariant.price &&
  variant.compare_at_price === this.currentVariant.compare_at_price
) {
  return;
} */- 코드 찾기
this.currentVariant = variant;
아래에 다음 코드를 추가합니다.
this._updatePaymentButton(variant);결과는 다음과 같아야 합니다.
this.currentVariant = variant;
this._updatePaymentButton(variant);-
_updateImages: function(variant)코드를 찾습니다. 다음 코드를
var currentVariantImage = this.currentVariant.featured_image || {};다음으로 교체합니다.
if (this.currentVariant != undefined) {
  var currentVariantImage = this.currentVariant.featured_image || {};
}- 바로 아래에서 다음 코드를 찾습니다.
if (
  !variant.featured_image ||
  variantImage.src === currentVariantImage.src
) {
  return;
}
다음으로 교체합니다.
/* if (
  !variant.featured_image ||
  variantImage.src === currentVariantImage.src
) {
  return;
} */-
_updateSKU: function(variant)코드를 찾습니다. 다음 코드를
if (variant.sku === this.currentVariant.sku) {
  return;
}
다음으로 교체합니다.
if (this.currentVariant != undefined ) {
  if (variant.sku === this.currentVariant.sku) {
    return;
  }
}-
_initVariants: function() {코드를 찾습니다. 다음 코드를
if (this.storeAvailability && this.variants.currentVariant.available) {
  this.storeAvailability.updateContent(this.variants.currentVariant.id);
}
다음으로 교체합니다.
/* if (this.storeAvailability && this.variants.currentVariant.available) {
  this.storeAvailability.updateContent(this.variants.currentVariant.id);
} */- 다음 코드를 찾습니다.
_updateSKU: function(variant) {
  if (this.currentVariant != undefined ) {
    if (variant.sku === this.currentVariant.sku) {
      return;
    }
  }

  this.container.dispatchEvent(
    new CustomEvent('variantSKUChange', {
      detail: {
        variant: variant
      },
      bubbles: true,
      cancelable: true
    })
  );
},
위의 코드 아래의 새 행에 다음 코드를 추가합니다.
_updatePaymentButton: function(variant) {
  if (this.currentVariant != undefined) {
    const paymentButton = document.querySelector('.payment-button');

    if (paymentButton) {
      paymentButton.removeAttribute('class', 'visually-hidden');
     }
  } else {
    document.querySelector('.payment-button').setAttribute('class', 'visually-hidden');
  }
},
이는 다음과 같이 보여야 합니다.
_updateSKU: function(variant) {
  if (this.currentVariant != undefined ) {
    if (variant.sku === this.currentVariant.sku) {
      return;
    }
  }

  this.container.dispatchEvent(
    new CustomEvent('variantSKUChange', {
      detail: {
        variant: variant
      },
      bubbles: true,
      cancelable: true
    })
  );
},

_updatePaymentButton: function(variant) {
  if (this.currentVariant != undefined) {
    const paymentButton = document.querySelector('.payment-button');

    if (paymentButton) {
      paymentButton.removeAttribute('class', 'visually-hidden');
     }
  } else {
    document.querySelector('.payment-button').setAttribute('class', 'visually-hidden');
  }
},- 저장을 클릭합니다.
제품 페이지 템플릿 편집
제품 페이지 템플릿을 편집하려면:
-
섹션 디렉토리에서
product-template.liquid을(를) 클릭합니다. - 다음 코드를 찾습니다.
{%- assign current_variant = product.selected_or_first_available_variant -%}다음으로 교체합니다.
{%- if product.variants.size > 1 -%}
  {%- assign current_variant = product.selected_variant -%}
{%- else %}
  {%- assign current_variant = product.first_available_variant -%}
{%- endif %}- 다음 코드를 찾아 삭제합니다.
{% if variant == product.selected_or_first_available_variant %} selected="selected" {% endif %}위의 코드를 찾을 수 없는 경우 다음 코드를 찾아 삭제합니다.
{%- if variant == current_variant %} selected="selected" {%- endif -%}- 다음 코드를 찾습니다.
{%- assign featured_image = product.selected_or_first_available_variant.featured_image | default: product.featured_image -%}다음으로 교체합니다.
{%- assign featured_image = current_variant.featured_image | default: product.featured_image -%}위의 코드를 찾을 수 없는 경우 다음 코드를 찾습니다.
{%- assign featured_media = product.selected_or_first_available_variant.featured_media | default: product.featured_media -%}다음으로 교체합니다.
{%- assign featured_media = current_variant.featured_media | default: product.featured_media -%}- 다음 코드를 찾습니다.
{% unless current_variant.available %}
  {{ 'products.product.sold_out' | t }}
{% else %}
  {{ 'products.product.add_to_cart' | t }}
{% endunless %}
다음으로 교체합니다.
{% if current_variant == blank %}
  {{ 'products.product.unavailable' | t }}
{% elsif current_variant.available %}
  {{ 'products.product.add_to_cart' | t }}
{% else %}
  {{ 'products.product.sold_out' | t }}
{% endif %}- 다음 코드를 찾습니다.
{% if section.settings.enable_payment_button %}
  {{ form | payment_button }}
{% endif %}
다음으로 교체합니다.
<div class="payment-button {% if current_variant == blank %}visually-hidden {% endif %}">
  {% if section.settings.enable_payment_button %}
    {{ form | payment_button }}
  {% endif %}
</div>-
{% schema %}코드를 찾습니다. 아래의 코드를 해당 코드 위의 행에 붙여넣습니다.
{% if current_variant == blank %}
  <script>
    var productOptions = [];

    {% for option in product.options -%}
      var optionObj = {};
      optionObj[{{ forloop.index0 }}] = "{{ product.options[forloop.index0] }}";
      productOptions.push(optionObj);
    {%- endfor %}
  </script>
{% endif %}
이는 다음과 같이 보여야 합니다.
{% if current_variant == blank %}
  <script>
    var productOptions = [];

    {% for option in product.options -%}
      var optionObj = {};
      optionObj[{{ forloop.index0 }}] = "{{ product.options[forloop.index0] }}";
      productOptions.push(optionObj);
    {%- endfor %}
  </script>
{% endif %}

{% schema %}- 저장을 클릭합니다.
제품 가격 코드 조각 편집
제품 가격 코드 조각을 편집하려면 다음을 수행하십시오.
-
코드 조각 디렉토리에서
product-price.liquid를 클릭합니다. - 다음 코드를 찾습니다.
{%- liquid
  if variant.title
    assign compare_at_price = variant.compare_at_price
    assign price = variant.price
    assign available = variant.available
  else
    assign compare_at_price = 1999
    assign price = 1999
    assign available = true
  endif

  assign money_price = price | money
-%}
다음으로 교체합니다.
{%- liquid
  if variant.title
    assign compare_at_price = variant.compare_at_price
    assign price = variant.price
    assign available = variant.available
  elsif product.title
    assign compare_at_price = product.compare_at_price
    assign price = product.price
    assign available = product.available
  else
    assign compare_at_price = 1999
    assign price = 1999
    assign available = true
  endif

  assign money_price = price | money
-%}카트에 추가 버튼 언어 설정 변경
카트에 추가 버튼의 언어 설정을 변경하여 고객이 제품을 선택하기 전 제품이 사용할 수 없음으로 표시되지 않도록 할 수 있습니다.
단계:
- Shopify Admin에서 온라인 스토어 > 테마로 이동합니다.
- 편집할 테마를 찾은 다음 ... > 기본 테마 콘텐츠 편집을 클릭합니다.
- 품목 필터링 검색 창에서 사용할 수 없음을 입력하여 사용할 수 없음 번역을 표시합니다.
- 사용할 수 없음 텍스트를 선택으로 교체합니다.
- 저장을 클릭합니다.
Minimal용 단계
Minimal에 사용자 지정을 적용하려면 다음 단계를 따릅니다.
테마의 JavaScript 파일 편집
- Shopify Admin에서 온라인 스토어 > 테마로 이동합니다.
- 편집할 테마를 찾아 ... 버튼을 클릭하여 작업 메뉴를 연 다음 코드 편집을 클릭합니다.
-
자산 디렉토리에서
theme.js또는theme.js.liquid을(를) 클릭합니다. -
initProductVariant: function() {코드를 찾습니다. 그 아래에서 다음 코드를 찾습니다.
// Hide selectors if we only have 1 variant and its title contains 'Default'.
if (
  product.variants.length === 1 &&
  product.variants[0].title.toLowerCase().indexOf('default') !== -1
) {
  $('.selector-wrapper', this.$container).hide();
}
아래 새 행에 다음 코드를 추가합니다.
if (typeof(productOptions) != "undefined") {
  for (i = 0; i < productOptions.length; i++) {
    const vowels = ['a', 'e', 'i', 'o', 'u'];
    const firstOptionLetter = productOptions[i][i][0].toLowerCase();
    let indef = 'a';

    if (vowels.includes(firstOptionLetter)) {
      indef = 'an';
    };

    const select = document.querySelectorAll('.single-option-selector')[i];
    const options = select.querySelectorAll('option');

    if (options.length > 1) {
      let option = new Option('Pick ' + indef + ' ' + productOptions[i][i], '');

      select.add(option, select.firstChild);
      select.selectedIndex = 0;
    }
  }
}
이는 다음과 같이 보여야 합니다.
// Hide selectors if we only have 1 variant and its title contains 'Default'.
if (
  product.variants.length === 1 &&
  product.variants[0].title.toLowerCase().indexOf('default') !== -1
) {
  $('.selector-wrapper', this.$container).hide();
}

if (typeof(productOptions) != "undefined") {
  for (i = 0; i < productOptions.length; i++) {
    const vowels = ['a', 'e', 'i', 'o', 'u'];
    const firstOptionLetter = productOptions[i][i][0].toLowerCase();
    let indef = 'a';

    if (vowels.includes(firstOptionLetter)) {
      indef = 'an';
    };

    const select = document.querySelectorAll('.single-option-selector')[i];
    const options = select.querySelectorAll('option');

    if (options.length > 1) {
      let option = new Option('Pick ' + indef + ' ' + productOptions[i][i], '');

      select.add(option, select.firstChild);
      select.selectedIndex = 0;
    }
  }
}- 저장을 클릭합니다.
제품 페이지 템플릿 편집
제품 페이지 템플릿을 편집하려면:
-
섹션 디렉토리에서
product-template.liquid을(를) 클릭합니다. - 다음 코드를 찾습니다.
{% assign variant = product.selected_or_first_available_variant %}다음으로 교체합니다.
{% assign variant = product.selected_variant %}- 다음 코드를 찾아 삭제합니다.
{% if variant == product.selected_or_first_available_variant %} selected="selected" {% endif %}- 다음 코드의 모든 항목을 찾습니다.
{% assign featured_image = product.selected_or_first_available_variant.featured_image | default: product.featured_image %}다음으로 교체합니다.
{% assign featured_image = product.selected_variant.featured_image | default: product.featured_image %}-
{% schema %}코드를 찾습니다. 아래의 코드를 해당 코드 위의 행에 붙여넣습니다.
{% if current_variant == blank %}
  <script>
    var productOptions = [];

    {% for option in product.options -%}
      var optionObj = {};
      optionObj[{{ forloop.index0 }}] = "{{ product.options[forloop.index0] }}";
      productOptions.push(optionObj);
    {%- endfor %}
  </script>
{% endif %}
이는 다음과 같이 보여야 합니다.
{% if current_variant == blank %}
  <script>
    var productOptions = [];

    {% for option in product.options -%}
      var optionObj = {};
      optionObj[{{ forloop.index0 }}] = "{{ product.options[forloop.index0] }}";
      productOptions.push(optionObj);
    {%- endfor %}
  </script>
{% endif %}

{% schema %}- 저장을 클릭합니다.
카트에 추가 버튼 언어 설정 변경
카트에 추가 버튼의 언어 설정을 변경하여 고객이 제품을 선택하기 전 제품이 사용할 수 없음으로 표시되지 않도록 할 수 있습니다.
단계:
- Shopify Admin에서 온라인 스토어 > 테마로 이동합니다.
- 편집할 테마를 찾은 다음 ... > 기본 테마 콘텐츠 편집을 클릭합니다.
- 품목 필터링 검색 창에서 사용할 수 없음을 입력하여 사용할 수 없음 번역을 표시합니다.
- 사용할 수 없음 텍스트를 선택으로 교체합니다.
- 저장을 클릭합니다.
Narrative용 단계
Narrative에 사용자 지정을 적용하려면 다음 단계를 따릅니다.
테마의 JavaScript 파일 편집
- Shopify Admin에서 온라인 스토어 > 테마로 이동합니다.
- 편집할 테마를 찾아 ... 버튼을 클릭하여 작업 메뉴를 연 다음 코드 편집을 클릭합니다.
-
자산 디렉토리에서
custom.js을(를) 클릭합니다. - 파일 맨 아래에 다음 코드를 추가합니다.
(function() {
  if (typeof(productOptions) != "undefined") {
    for (i = 0; i < productOptions.length; i++) {
      const vowels = ['a', 'e', 'i', 'o', 'u'];
      const firstOptionLetter = productOptions[i][i][0].toLowerCase();
      let indef = 'a';

      if (vowels.includes(firstOptionLetter)) {
        indef = 'an';
      };

      const select = document.querySelectorAll('.single-option-selector')[i];
      const options = select.querySelectorAll('option');

      if (options.length > 1) {
        let option = new Option('Pick ' + indef + ' ' + productOptions[i][i], '');

        select.add(option, select.firstChild);
        select.selectedIndex = 0;
      }
    }
  }
})();- 저장을 클릭합니다.
제품 페이지 템플릿 편집
제품 페이지 템플릿을 편집하려면:
-
섹션 디렉토리에서
product-template.liquid을(를) 클릭합니다. - 다음 코드를 찾습니다.
{%- assign current_variant = product.selected_or_first_available_variant -%}다음으로 교체합니다.
{%- if product.variants.size > 1 -%}
  {%- assign current_variant = product.selected_variant -%}
{%- else -%}
  {%- assign current_variant = product.first_available_variant -%}
{%- endif -%}-
{% schema %}코드를 찾습니다. 아래의 코드를 해당 코드 위의 행에 붙여넣습니다.
{% if current_variant == blank %}
  <script>
    var productOptions = [];

    {% for option in product.options -%}
      var optionObj = {};
      optionObj[{{ forloop.index0 }}] = "{{ product.options[forloop.index0] }}";
      productOptions.push(optionObj);
    {%- endfor %}
  </script>
{% endif %}
이는 다음과 같이 보여야 합니다.
{% if current_variant == blank %}
  <script>
    var productOptions = [];

    {% for option in product.options -%}
      var optionObj = {};
      optionObj[{{ forloop.index0 }}] = "{{ product.options[forloop.index0] }}";
      productOptions.push(optionObj);
    {%- endfor %}
  </script>
{% endif %}

{% schema %}- 저장을 클릭합니다.
카트에 추가 버튼 언어 설정 변경
카트에 추가 버튼의 언어 설정을 변경하여 고객이 제품을 선택하기 전 제품이 사용할 수 없음으로 표시되지 않도록 할 수 있습니다.
단계:
- Shopify Admin에서 온라인 스토어 > 테마로 이동합니다.
- 편집할 테마를 찾은 다음 ... > 기본 테마 콘텐츠 편집을 클릭합니다.
- 품목 필터링 검색 창에서 사용할 수 없음을 입력하여 사용할 수 없음 번역을 표시합니다.
- 사용할 수 없음 텍스트를 선택으로 교체합니다.
- 저장을 클릭합니다.
Simple용 단계
Simple에 사용자 지정을 적용하려면 다음 단계를 따릅니다.
테마의 JavaScript 파일 편집
- Shopify Admin에서 온라인 스토어 > 테마로 이동합니다.
- 편집할 테마를 찾아 ... 버튼을 클릭하여 작업 메뉴를 연 다음 코드 편집을 클릭합니다.
-
자산 디렉토리에서
theme.js또는theme.js.liquid을(를) 클릭합니다. -
initProductVariant: function() {코드를 찾습니다. 그 아래에서 다음 코드를 찾습니다.
// Clean up variant labels if the Shopify-defined
// defaults are the only ones left
Slate.simplifyVariantLabels(this.productSingleObject, this.$container);
아래 새 행에 다음 코드를 추가합니다.
if (typeof(productOptions) != "undefined") {
  for (i = 0; i < productOptions.length; i++) {
    const vowels = ['a', 'e', 'i', 'o', 'u'];
    const firstOptionLetter = productOptions[i][i][0].toLowerCase();
    let indef = 'a';

    if (vowels.includes(firstOptionLetter)) {
      indef = 'an';
    };

    const select = document.querySelectorAll('.single-option-selector')[i];
    const options = select.querySelectorAll('option');

    if (options.length > 1) {
      let option = new Option('Pick ' + indef + ' ' + productOptions[i][i], '');

      select.add(option, select.firstChild);
      select.selectedIndex = 0;
    }
  }
}
이는 다음과 같이 보여야 합니다.
// Clean up variant labels if the Shopify-defined
// defaults are the only ones left
Slate.simplifyVariantLabels(this.productSingleObject, this.$container);

if (typeof(productOptions) != "undefined") {
  for (i = 0; i < productOptions.length; i++) {
    const vowels = ['a', 'e', 'i', 'o', 'u'];
    const firstOptionLetter = productOptions[i][i][0].toLowerCase();
    let indef = 'a';

    if (vowels.includes(firstOptionLetter)) {
      indef = 'an';
    };

    const select = document.querySelectorAll('.single-option-selector')[i];
    const options = select.querySelectorAll('option');

    if (options.length > 1) {
      let option = new Option('Pick ' + indef + ' ' + productOptions[i][i], '');

      select.add(option, select.firstChild);
      select.selectedIndex = 0;
    }
  }
}- 저장을 클릭합니다.
제품 페이지 템플릿 편집
제품 페이지 템플릿을 편집하려면:
-
섹션 디렉토리에서
product-template.liquid을(를) 클릭합니다. - 다음 코드를 찾습니다.
{% assign current_variant = product.selected_or_first_available_variant %}다음으로 교체합니다.
{% assign current_variant = product.selected_variant %}- 다음 코드를 찾아 삭제합니다.
{% if variant == product.selected_or_first_available_variant %} selected="selected" {% endif %}-
{% schema %}코드를 찾습니다. 아래의 코드를 해당 코드 위의 행에 붙여넣습니다.
{% if current_variant == blank %}
  <script>
    var productOptions = [];

    {% for option in product.options -%}
      var optionObj = {};
      optionObj[{{ forloop.index0 }}] = "{{ product.options[forloop.index0] }}";
      productOptions.push(optionObj);
    {%- endfor %}
  </script>
{% endif %}
이는 다음과 같이 보여야 합니다.
{% if current_variant == blank %}
  <script>
    var productOptions = [];

    {% for option in product.options -%}
      var optionObj = {};
      optionObj[{{ forloop.index0 }}] = "{{ product.options[forloop.index0] }}";
      productOptions.push(optionObj);
    {%- endfor %}
  </script>
{% endif %}

{% schema %}- 저장을 클릭합니다.
카트에 추가 버튼 언어 설정 변경
카트에 추가 버튼의 언어 설정을 변경하여 고객이 제품을 선택하기 전 제품이 사용할 수 없음으로 표시되지 않도록 할 수 있습니다.
단계:
- Shopify Admin에서 온라인 스토어 > 테마로 이동합니다.
- 편집할 테마를 찾은 다음 ... > 기본 테마 콘텐츠 편집을 클릭합니다.
- 품목 필터링 검색 창에서 사용할 수 없음을 입력하여 사용할 수 없음 번역을 표시합니다.
- 사용할 수 없음 텍스트를 선택으로 교체합니다.
- 저장을 클릭합니다.
Supply용 단계
Supply에 사용자 지정을 적용하려면 다음 단계를 따릅니다.
테마의 JavaScript 파일 편집
- Shopify Admin에서 온라인 스토어 > 테마로 이동합니다.
- 편집할 테마를 찾아 ... 버튼을 클릭하여 작업 메뉴를 연 다음 코드 편집을 클릭합니다.
-
자산 디렉토리에서
theme.js또는theme.js.liquid을(를) 클릭합니다. -
initProductVariant: function() {코드를 찾습니다. 그 아래에서 다음 코드를 찾습니다.
// Clean up variant labels if the Shopify-defined
// defaults are the only ones left
this.simplifyVariantLabels(this.productSingleObject);
아래 새 행에 다음 코드를 추가합니다.
if (typeof(productOptions) != "undefined") {
  for (i = 0; i < productOptions.length; i++) {
    const vowels = ['a', 'e', 'i', 'o', 'u'];
    const firstOptionLetter = productOptions[i][i][0].toLowerCase();
    let indef = 'a';

    if (vowels.includes(firstOptionLetter)) {
      indef = 'an';
    };

    const select = document.querySelectorAll('.single-option-selector')[i];
    const options = select.querySelectorAll('option');

    if (options.length > 1) {
      let option = new Option('Pick ' + indef + ' ' + productOptions[i][i], '');

      select.add(option, select.firstChild);
      select.selectedIndex = 0;
    }
  }
}
이는 다음과 같이 보여야 합니다.
// Clean up variant labels if the Shopify-defined
// defaults are the only ones left
this.simplifyVariantLabels(this.productSingleObject);

if (typeof(productOptions) != "undefined") {
  for (i = 0; i < productOptions.length; i++) {
    const vowels = ['a', 'e', 'i', 'o', 'u'];
    const firstOptionLetter = productOptions[i][i][0].toLowerCase();
    let indef = 'a';

    if (vowels.includes(firstOptionLetter)) {
      indef = 'an';
    };

    const select = document.querySelectorAll('.single-option-selector')[i];
    const options = select.querySelectorAll('option');

    if (options.length > 1) {
      let option = new Option('Pick ' + indef + ' ' + productOptions[i][i], '');

      select.add(option, select.firstChild);
      select.selectedIndex = 0;
    }
  }
}- 저장을 클릭합니다.
제품 페이지 템플릿 편집
제품 페이지 템플릿을 편집하려면:
-
섹션 디렉토리에서
product-template.liquid을(를) 클릭합니다. - 다음 코드를 찾습니다.
{% assign variant = product.selected_or_first_available_variant %}다음으로 교체합니다.
{% assign variant = product.selected_variant %}- 다음 코드를 찾아 삭제합니다.
{% if variant == product.selected_or_first_available_variant %} selected="selected" {% endif %}- 다음 코드의 모든 항목을 찾습니다.
{% assign featured_image = product.selected_or_first_available_variant.featured_image | default: product.featured_image %}다음으로 교체합니다.
{% assign featured_image = product.selected_variant.featured_image | default: product.featured_image %}-
{% schema %}코드를 찾습니다. 아래의 코드를 해당 코드 위의 행에 붙여넣습니다.
{% if current_variant == blank %}
  <script>
    var productOptions = [];

    {% for option in product.options -%}
      var optionObj = {};
      optionObj[{{ forloop.index0 }}] = "{{ product.options[forloop.index0] }}";
      productOptions.push(optionObj);
    {%- endfor %}
  </script>
{% endif %}
이는 다음과 같이 보여야 합니다.
{% if current_variant == blank %}
  <script>
    var productOptions = [];

    {% for option in product.options -%}
      var optionObj = {};
      optionObj[{{ forloop.index0 }}] = "{{ product.options[forloop.index0] }}";
      productOptions.push(optionObj);
    {%- endfor %}
  </script>
{% endif %}

{% schema %}- 저장을 클릭합니다.
카트에 추가 버튼 언어 설정 변경
카트에 추가 버튼의 언어 설정을 변경하여 고객이 제품을 선택하기 전 제품이 사용할 수 없음으로 표시되지 않도록 할 수 있습니다.
단계:
- Shopify Admin에서 온라인 스토어 > 테마로 이동합니다.
- 편집할 테마를 찾은 다음 ... > 기본 테마 콘텐츠 편집을 클릭합니다.
- 품목 필터링 검색 창에서 사용할 수 없음을 입력하여 사용할 수 없음 번역을 표시합니다.
- 사용할 수 없음 텍스트를 선택으로 교체합니다.
- 저장을 클릭합니다.
Venture용 단계
Venture에 사용자 지정을 적용하려면 다음 단계를 따릅니다.
테마의 JavaScript 파일 편집
- Shopify Admin에서 온라인 스토어 > 테마로 이동합니다.
- 편집할 테마를 찾아 ... 버튼을 클릭하여 작업 메뉴를 연 다음 코드 편집을 클릭합니다.
-
자산 디렉토리에서
theme.js또는theme.js.liquid을(를) 클릭합니다. - 파일 맨 아래에 다음 코드를 추가합니다.
(function() {
  if (typeof(productOptions) != "undefined") {
    for (i = 0; i < productOptions.length; i++) {
      const vowels = ['a', 'e', 'i', 'o', 'u'];
      const firstOptionLetter = productOptions[i][i][0].toLowerCase();
      let indef = 'a';

      if (vowels.includes(firstOptionLetter)) {
        indef = 'an';
      };

      const select = document.querySelectorAll('.single-option-selector')[i];
      const options = select.querySelectorAll('option');

      if (options.length > 1) {
        let option = new Option('Pick ' + indef + ' ' + productOptions[i][i], '');

        select.add(option, select.firstChild);
        select.selectedIndex = 0;
      }
    }
  }
})();- 다음 코드를 찾습니다.
this.currentVariant = this._getVariantFromOptions();다음으로 교체합니다.
this.currentVariant = this._getVariantFromOptions() || {};-
_updatePrice: function(variant)코드를 찾습니다. 다음 코드를
if (
  variant.price === this.currentVariant.price &&
  variant.compare_at_price === this.currentVariant.compare_at_price
) {
  return;
}
다음으로 교체합니다.
/* if (
  variant.price === this.currentVariant.price &&
  variant.compare_at_price === this.currentVariant.compare_at_price
) {
  return;
} */- 저장을 클릭합니다.
제품 페이지 템플릿 편집
제품 페이지 템플릿을 편집하려면:
-
섹션 디렉토리에서
product-template.liquid을(를) 클릭합니다. - 다음 코드를 찾습니다.
{% assign current_variant = product.selected_or_first_available_variant %}다음으로 교체합니다.
{% if product.variants.size > 1 %}
  {% assign current_variant = product.selected_variant %}
{% else %}
  {% assign current_variant = product.first_available_variant %}
{% endif %}- 다음 코드를 찾아 삭제합니다.
{% if variant == product.selected_or_first_available_variant %} selected="selected" {% endif %}위의 코드를 찾을 수 없는 경우 이 코드를 찾아 삭제합니다.
{% if variant == current_variant %} selected="selected" {% endif %}- 다음 코드의 모든 항목을 찾습니다.
{% unless current_variant.available %}다음으로 교체합니다.
{% unless current_variant.available or product.variants.size == 1 and variant.available %}- 다음 코드를 찾습니다.
{% unless current_variant.available or product.variants.size == 1 and variant.available %}
  {{ 'products.product.sold_out' | t }}
{% else %}
  {{ 'products.product.add_to_cart' | t }}
{% endunless %}
다음으로 교체합니다.
{% if current_variant == blank %}
  {{ 'products.product.unavailable' | t }}
{% else %}
  {% unless current_variant.available or product.variants.size == 1 and variant.available %}
    {{ 'products.product.sold_out' | t }}
  {% else %}
    {{ 'products.product.add_to_cart' | t }}
  {% endunless %}
{% endif %}-
{% schema %}코드를 찾습니다. 아래의 코드를 해당 코드 위의 행에 붙여넣습니다.
{% if current_variant == blank %}
  <script>
    var productOptions = [];

    {% for option in product.options -%}
      var optionObj = {};
      optionObj[{{ forloop.index0 }}] = "{{ product.options[forloop.index0] }}";
      productOptions.push(optionObj);
    {%- endfor %}
  </script>
{% endif %}
이는 다음과 같이 보여야 합니다.
{% if current_variant == blank %}
  <script>
    var productOptions = [];

    {% for option in product.options -%}
      var optionObj = {};
      optionObj[{{ forloop.index0 }}] = "{{ product.options[forloop.index0] }}";
      productOptions.push(optionObj);
    {%- endfor %}
  </script>
{% endif %}

{% schema %}- 저장을 클릭합니다.
카트에 추가 버튼 언어 설정 변경
카트에 추가 버튼의 언어 설정을 변경하여 고객이 제품을 선택하기 전 제품이 사용할 수 없음으로 표시되지 않도록 할 수 있습니다.
단계:
- Shopify Admin에서 온라인 스토어 > 테마로 이동합니다.
- 편집할 테마를 찾은 다음 ... > 기본 테마 콘텐츠 편집을 클릭합니다.
- 품목 필터링 검색 창에서 사용할 수 없음을 입력하여 사용할 수 없음 번역을 표시합니다.
- 사용할 수 없음 텍스트를 선택으로 교체합니다.
- 저장을 클릭합니다.
섹션 구분되지 않은 테마의 단계
이형 상품 드롭다운 메뉴에 프롬프트 추가
- 코드 조각 디렉토리에서 새 코드 조각 추가를 클릭합니다.
- 새 코드 조각
pick-an-option의 이름을 지정합니다. - 새 코드 조각 파일에 GitHub에서 호스팅되는 코드입니다를 붙여넣습니다.
- 저장을 클릭합니다.
-
레이아웃 디렉토리에서
theme.liquid을(를) 클릭합니다. - 파일 아래쪽에서 닫는
</body>태그를 찾습니다. 닫는</body>태그 바로 위쪽 새 행에 다음 코드를 붙여넣습니다.
{% render 'pick-an-option' %}- 저장을 클릭합니다.
-
카트에 추가 양식을 포함한 파일을 찾습니다. 해당 파일에는
action특성이/cart/add에 설정되어 있습니다. 다음 네 가지 파일 중 하나에서 찾아볼 수 있습니다.-
템플릿 아래에 있는
product.liquid템플릿 -
레이아웃 아래에 있는
theme.liquid레이아웃 -
코드 조각 아래에 있는
product.liquid코드 조각 -
코드 조각 아래에 있는
single-product.liquid코드 조각
-
템플릿 아래에 있는
양식 내에서 이 코드를 찾습니다.
<option {% if variant == product.selected_or_first_available_variant %} selected="selected" {% endif %} data-sku="{{ variant.sku }}" value="{{ variant.id }}">{{ variant.title }} - {{ variant.price | money_with_currency }}</option>또는 양식 내에서 이 코드를 찾습니다.
<option {% if variant == current_variant %} selected="selected" {% endif %} data-sku="{{ variant.sku }}" value="{{ variant.id }}">{{ variant.title }} - {{ variant.price | money_with_currency }}</option>코드를 다음 코드 블록으로 교체합니다.
<option {% if forloop.length <= 1 and variant == product.selected_or_first_available_variant %} selected="selected" {% endif %} data-sku="{{ variant.sku }}" value="{{ variant.id }}">{{ variant.title }} - {{ variant.price | money_with_currency }}</option>Minimal, Pop 또는 Supply를 사용하는 경우 다음 코드의 모든 항목을 찾습니다.
{% assign featured_image = product.selected_or_first_available_variant.featured_image | default: product.featured_image %}코드를 다음 코드 블록으로 교체합니다.
{% assign featured_image = product.selected_variant.featured_image | default: product.featured_image %}기타 Shopify 빈티지 테마를 사용하는 경우 다음의 코드를 찾습니다.
{% assign current_variant = product.selected_or_first_available_variant %}코드를 다음 코드 블록으로 교체합니다.
{% assign current_variant = product.selected_variant %}저장을 클릭합니다.
카트에 추가 버튼 언어 설정 변경
카트에 추가 버튼의 언어 설정을 변경하여 고객이 제품을 선택하기 전 제품이 사용할 수 없음으로 표시되지 않도록 할 수 있습니다.
단계:
- Shopify Admin에서 온라인 스토어 > 테마로 이동합니다.
- 편집할 테마를 찾은 다음 ... > 기본 테마 콘텐츠 편집을 클릭합니다.
- 품목 필터링 검색 창에서 사용할 수 없음을 입력하여 사용할 수 없음 번역을 표시합니다.
- 사용할 수 없음 텍스트를 선택으로 교체합니다.
- 저장을 클릭합니다.