ให้ลูกค้าเลือกตัวเลือก
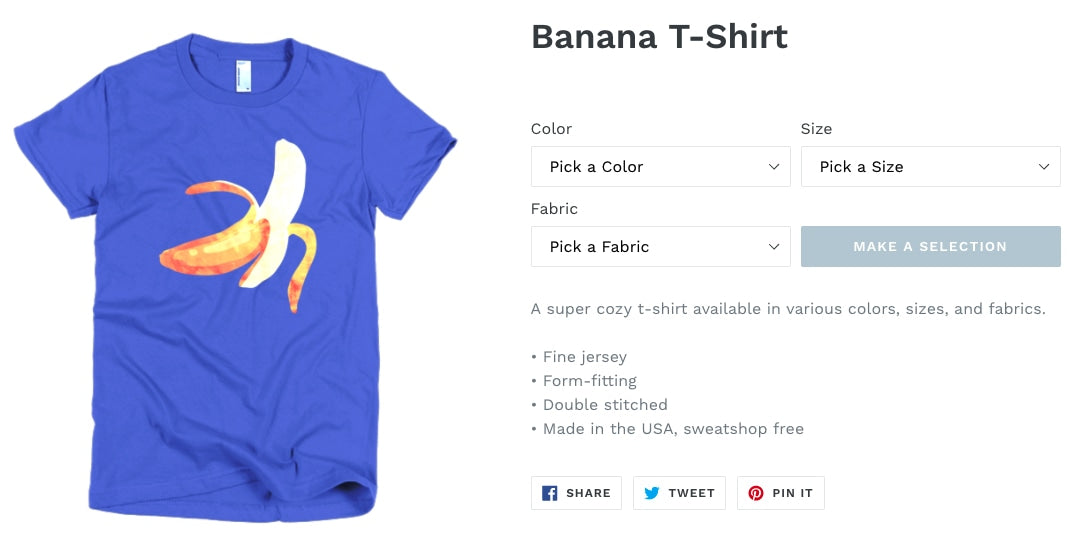
เมื่อลูกค้าเข้าชมหน้าสินค้าในร้านค้าออนไลน์ของคุณ ระบบจะเลือกตัวเลือกสินค้าแรกที่พร้อมจำหน่ายตามค่าเริ่มต้น คุณสามารถใช้การปรับแต่งให้ลูกค้าเลือกตัวเลือกเองเพื่อปิดใช้ระบบเลือกตัวเลือกสินค้าแรกโดยอัตโนมัติได้ การทำเช่นนี้จะทำให้ลูกค้าได้รับแจ้งให้เลือกตัวเลือกสินค้าด้วยตนเองก่อนที่จะมีการแสดงตัวเลือกสินค้า
หากคุณใช้การปรับแต่งให้ลูกค้าเลือกตัวเลือก ธีมของคุณอาจไม่แสดงราคาสินค้าจนกว่าลูกค้าจะเลือกตัวเลือกสินค้า สินค้าที่มีตัวเลือกสินค้าจะไม่มีราคาที่แนะนำไว้ และราคาที่แสดงจะกําหนดโดยตัวเลือกสินค้าที่เลือกไว้
ธีมที่แบ่งส่วนและธีมที่ไม่แบ่งส่วน
หมายเหตุ: ขั้นตอนสำหรับบทแนะนำการใช้งานนี้จะแตกต่างกันไป ขึ้นอยู่กับว่าคุณกำลังใช้ธีมที่แบ่งส่วน หรือไม่แบ่งส่วน อยู่ โดยธีมที่แบ่งส่วนจะให้คุณสามารถลากและวางวัตถุเพื่อจัดการเลย์เอาต์ของหน้าแรกได้ ในขณะที่ธีมที่ไม่แบ่งส่วนนั้นไม่สามารถทำได้
หากต้องการทราบว่าธีมของคุณรองรับส่วนหรือไม่ ให้ไปที่หน้าแก้ไขโค้ดของธีม หากมีไฟล์ในไดเรกทอรีส่วน หมายความว่าคุณกำลังใช้ธีมที่แบ่งส่วน ธีมที่ไม่แบ่งส่วนเปิดตัวก่อนเดือนตุลาคม 2016 และไม่มีไฟล์ในไดเรกทอรีส่วน
หากคุณใช้ธีมที่แบ่งส่วน ให้คลิกปุ่ม ธีมที่แบ่งส่วน แล้วดำเนินการตามคำแนะนำ หากคุณใช้ธีมที่ไม่แบ่งส่วนซึ่งเป็นรุ่นเก่า ให้คลิกปุ่ม ธีมที่ไม่แบ่งส่วน แล้วดำเนินการตามคำแนะนำ
ขั้นตอนต่างๆ สำหรับธีมที่แบ่งส่วน
เลือกธีมของคุณ
ขั้นตอนสำหรับการปรับแต่งนี้จะแตกต่างกันไปขึ้นอยู่กับธีมของคุณ คลิกปุ่มสำหรับธีมของคุณก่อนทำตามคำแนะนำด้านล่าง:
ขั้นตอนสำหรับ Boundless
ทำตามขั้นตอนต่อไปนี้เพื่อใช้งานการปรับแต่งกับ Boundless:
แก้ไขไฟล์ JavaScript ของธีม
- ในส่วนผู้ดูแล Shopify ให้ไปที่ร้านค้าออนไลน์ > ธีม
- ค้นหาธีมที่คุณต้องการแก้ไข แล้วคลิกปุ่ม … เพื่อเปิดเมนูดำเนินการ จากนั้นคลิก แก้ไขโค้ด
- ในไดเรกทอรีชิ้นงาน ให้คลิก
theme.jsหรือtheme.js.liquid -
ค้นหาโค้ด
initVariantSelectorsและค้นหาโค้ดต่อไปนี้ด้านล่างโค้ดดังกล่าว:
// Clean up variant labels if the Shopify-defined
// defaults are the only ones left
this.simplifyVariantLabels(this.productSingleObject, this.$container);
เพิ่มโค้ดต่อไปนี้ในบรรทัดใหม่ด้านล่าง:
if (typeof(productOptions) != "undefined") {
  for (i = 0; i < productOptions.length; i++) {
    const vowels = ['a', 'e', 'i', 'o', 'u'];
    const firstOptionLetter = productOptions[i][i][0].toLowerCase();
    let indef = 'a';

    if (vowels.includes(firstOptionLetter)) {
      indef = 'an';
    };

    const select = document.querySelectorAll('.single-option-selector')[i];
    const options = select.querySelectorAll('option');

    if (options.length > 1) {
      let option = new Option('Pick ' + indef + ' ' + productOptions[i][i], '');

      select.add(option, select.firstChild);
      select.selectedIndex = 0;
    }
  }
}
โค้ดควรมีลักษณะดังนี้:
// Clean up variant labels if the Shopify-defined
// defaults are the only ones left
this.simplifyVariantLabels(this.productSingleObject, this.$container);

if (typeof(productOptions) != "undefined") {
  for (i = 0; i < productOptions.length; i++) {
    const vowels = ['a', 'e', 'i', 'o', 'u'];
    const firstOptionLetter = productOptions[i][i][0].toLowerCase();
    let indef = 'a';

    if (vowels.includes(firstOptionLetter)) {
      indef = 'an';
    };

    const select = document.querySelectorAll('.single-option-selector')[i];
    const options = select.querySelectorAll('option');

    if (options.length > 1) {
      let option = new Option('Pick ' + indef + ' ' + productOptions[i][i], '');

      select.add(option, select.firstChild);
      select.selectedIndex = 0;
    }
  }
}- ค้นหาข้อความโค้ดต่อไปนี้:
$(selectors.addToCartText).html(theme.strings.soldOut);มีสองอินสแตนซ์ในข้อความโค้ดนี้ ซึ่งพบในฟังก์ชัน productVariantCallback ให้แทนที่เฉพาะอินสแตนซ์ที่สองด้วย:
$(selectors.addToCartText).html('Make a Selection');- คลิกที่ “บันทึก”
แก้ไขเทมเพลตหน้าสินค้าของคุณ
วิธีแก้ไขเทมเพลตหน้าสินค้าของคุณ:
- ในไดเรกทอรีส่วน ให้คลิก
product-template.liquid - ค้นหาโค้ดต่อไปนี้:
{% assign current_variant = product.selected_or_first_available_variant %}แทนที่ด้วย:
{% assign current_variant = product.selected_variant %}- ค้นหาโค้ดต่อไปนี้และลบโค้ดดังกล่าว:
{% if variant == product.selected_or_first_available_variant %} selected="selected" {% endif %}-
ค้นหาโค้ด
{% schema %}วางโค้ดข้างต้นลงในบรรทัดเหนือบรรทัดของโค้ดนี้:
{% if current_variant == blank %}
  <script>
    var productOptions = [];

    {% for option in product.options -%}
      var optionObj = {};
      optionObj[{{ forloop.index0 }}] = "{{ product.options[forloop.index0] }}";
      productOptions.push(optionObj);
    {%- endfor %}
  </script>
{% endif %}
โค้ดควรมีลักษณะดังนี้:
{% if current_variant == blank %}
  <script>
    var productOptions = [];

    {% for option in product.options -%}
      var optionObj = {};
      optionObj[{{ forloop.index0 }}] = "{{ product.options[forloop.index0] }}";
      productOptions.push(optionObj);
    {%- endfor %}
  </script>
{% endif %}

{% schema %}- คลิกที่ “บันทึก”
เปลี่ยนการตั้งค่าภาษาของปุ่มเพิ่มลงในตะกร้าสินค้า
สามารถเปลี่ยนการตั้งค่าภาษาของปุ่มเพิ่มลงในตะกร้าสินค้าได้ เพื่อไม่ให้สินค้าแสดงข้อความไม่พร้อมใช้งาน ก่อนที่ลูกค้าจะเลือกสินค้า
ขั้นตอน:
- ในส่วนผู้ดูแล Shopify ให้ไปที่ร้านค้าออนไลน์ > ธีม
- ค้นหาธีมที่คุณต้องการแก้ไข จากนั้นคลิก ... > แก้ไขเนื้อหาธีมเริ่มต้น
- ในแถบค้นหาตัวกรองรายการ ให้พิมพ์ไม่พร้อมใช้งาน เพื่อแสดงการแปลที่ไม่สามารถแปลได้
- แทนที่ข้อความไม่พร้อมใช้งานด้วยทำการเลือก
- คลิกที่ “บันทึก”
ขั้นตอนสำหรับ Debut
ทำตามขั้นตอนต่อไปนี้เพื่อใช้งานการปรับแต่งกับ Debut:
แก้ไขไฟล์ JavaScript ของธีม
- ในส่วนผู้ดูแล Shopify ให้ไปที่ร้านค้าออนไลน์ > ธีม
- ค้นหาธีมที่คุณต้องการแก้ไข แล้วคลิกปุ่ม … เพื่อเปิดเมนูดำเนินการ จากนั้นคลิก แก้ไขโค้ด
- ในไดเรกทอรีชิ้นงาน ให้คลิก
theme.jsหรือtheme.js.liquid - เพิ่มโค้ดต่อไปนี้ที่ด้านล่างของไฟล์:
(function() {
  if (typeof(productOptions) != "undefined") {
    for (i = 0; i < productOptions.length; i++) {
      const vowels = ['a', 'e', 'i', 'o', 'u'];
      const firstOptionLetter = productOptions[i][i][0].toLowerCase();
      let indef = 'a';

      if (vowels.includes(firstOptionLetter)) {
        indef = 'an';
      };

      const select = document.querySelectorAll('.single-option-selector')[i];
      const options = select.querySelectorAll('option');

      if (options.length > 1) {
        let option = new Option('Pick ' + indef + ' ' + productOptions[i][i], '');

        select.add(option, select.firstChild);
        select.selectedIndex = 0;
      }
    }
  }
})();-
ค้นหาโค้ด
_updatePrice: function(variant)แทนที่โค้ดต่อไปนี้:
if (
  variant.price === this.currentVariant.price &&
  variant.compare_at_price === this.currentVariant.compare_at_price &&
  variant.unit_price === this.currentVariant.unit_price
) {
  return;
}
ด้วย:
/* if (
  variant.price === this.currentVariant.price &&
  variant.compare_at_price === this.currentVariant.compare_at_price &&
  variant.unit_price === this.currentVariant.unit_price
) {
  return;
} */
หากคุณไม่พบโค้ดข้างต้น ให้ค้นหาโค้ดต่อไปนี้:
if (
  variant.price === this.currentVariant.price &&
  variant.compare_at_price === this.currentVariant.compare_at_price
) {
  return;
}
แทนที่ด้วย:
/* if (
  variant.price === this.currentVariant.price &&
  variant.compare_at_price === this.currentVariant.compare_at_price
) {
  return;
} */-
ค้นหาโค้ด
this.currentVariant = variant;
เพิ่มโค้ดต่อไปนี้ด้านล่าง:
this._updatePaymentButton(variant);ผลลัพธ์ควรมีลักษณะดังนี้:
this.currentVariant = variant;
this._updatePaymentButton(variant);-
ค้นหาโค้ด
_updateImages: function(variant)แทนที่โค้ดต่อไปนี้:
var currentVariantImage = this.currentVariant.featured_image || {};ด้วย:
if (this.currentVariant != undefined) {
  var currentVariantImage = this.currentVariant.featured_image || {};
}- ค้นหาโค้ดต่อไปนี้ด้านล่าง:
if (
  !variant.featured_image ||
  variantImage.src === currentVariantImage.src
) {
  return;
}
แทนที่ด้วย:
/* if (
  !variant.featured_image ||
  variantImage.src === currentVariantImage.src
) {
  return;
} */-
ค้นหาโค้ด
_updateSKU: function(variant)แทนที่โค้ดต่อไปนี้:
if (variant.sku === this.currentVariant.sku) {
  return;
}
ด้วย:
if (this.currentVariant != undefined ) {
  if (variant.sku === this.currentVariant.sku) {
    return;
  }
}-
ค้นหาโค้ด
_initVariants: function() {แทนที่โค้ดต่อไปนี้:
if (this.storeAvailability && this.variants.currentVariant.available) {
  this.storeAvailability.updateContent(this.variants.currentVariant.id);
}
ด้วย:
/* if (this.storeAvailability && this.variants.currentVariant.available) {
  this.storeAvailability.updateContent(this.variants.currentVariant.id);
} */- ค้นหาโค้ดต่อไปนี้:
_updateSKU: function(variant) {
  if (this.currentVariant != undefined ) {
    if (variant.sku === this.currentVariant.sku) {
      return;
    }
  }

  this.container.dispatchEvent(
    new CustomEvent('variantSKUChange', {
      detail: {
        variant: variant
      },
      bubbles: true,
      cancelable: true
    })
  );
},
เพิ่มโค้ดต่อไปนี้ในบรรทัดใหม่ด้านล่างโค้ดข้างต้น:
_updatePaymentButton: function(variant) {
  if (this.currentVariant != undefined) {
    const paymentButton = document.querySelector('.payment-button');

    if (paymentButton) {
      paymentButton.removeAttribute('class', 'visually-hidden');
     }
  } else {
    document.querySelector('.payment-button').setAttribute('class', 'visually-hidden');
  }
},
โค้ดควรมีลักษณะดังนี้:
_updateSKU: function(variant) {
  if (this.currentVariant != undefined ) {
    if (variant.sku === this.currentVariant.sku) {
      return;
    }
  }

  this.container.dispatchEvent(
    new CustomEvent('variantSKUChange', {
      detail: {
        variant: variant
      },
      bubbles: true,
      cancelable: true
    })
  );
},

_updatePaymentButton: function(variant) {
  if (this.currentVariant != undefined) {
    const paymentButton = document.querySelector('.payment-button');

    if (paymentButton) {
      paymentButton.removeAttribute('class', 'visually-hidden');
     }
  } else {
    document.querySelector('.payment-button').setAttribute('class', 'visually-hidden');
  }
},- คลิกที่ “บันทึก”
แก้ไขเทมเพลตหน้าสินค้าของคุณ
วิธีแก้ไขเทมเพลตหน้าสินค้าของคุณ:
- ในไดเรกทอรีส่วน ให้คลิก
product-template.liquid - ค้นหาโค้ดต่อไปนี้:
{%- assign current_variant = product.selected_or_first_available_variant -%}แทนที่ด้วย:
{%- if product.variants.size > 1 -%}
  {%- assign current_variant = product.selected_variant -%}
{%- else %}
  {%- assign current_variant = product.first_available_variant -%}
{%- endif %}- ค้นหาโค้ดต่อไปนี้และลบโค้ดดังกล่าว:
{% if variant == product.selected_or_first_available_variant %} selected="selected" {% endif %}หากคุณไม่พบโค้ดข้างต้น ให้ค้นหาโค้ดต่อไปนี้และลบโค้ดดังกล่าว
{%- if variant == current_variant %} selected="selected" {%- endif -%}- ค้นหาโค้ดต่อไปนี้:
{%- assign featured_image = product.selected_or_first_available_variant.featured_image | default: product.featured_image -%}แทนที่ด้วย:
{%- assign featured_image = current_variant.featured_image | default: product.featured_image -%}หากคุณไม่พบโค้ดข้างต้น ให้ค้นหาโค้ดต่อไปนี้
{%- assign featured_media = product.selected_or_first_available_variant.featured_media | default: product.featured_media -%}แทนที่ด้วย:
{%- assign featured_media = current_variant.featured_media | default: product.featured_media -%}- ค้นหาโค้ดต่อไปนี้:
{% unless current_variant.available %}
  {{ 'products.product.sold_out' | t }}
{% else %}
  {{ 'products.product.add_to_cart' | t }}
{% endunless %}
แทนที่ด้วย:
{% if current_variant == blank %}
  {{ 'products.product.unavailable' | t }}
{% elsif current_variant.available %}
  {{ 'products.product.add_to_cart' | t }}
{% else %}
  {{ 'products.product.sold_out' | t }}
{% endif %}- ค้นหาโค้ดต่อไปนี้:
{% if section.settings.enable_payment_button %}
  {{ form | payment_button }}
{% endif %}
แทนที่ด้วย:
<div class="payment-button {% if current_variant == blank %}visually-hidden {% endif %}">
  {% if section.settings.enable_payment_button %}
    {{ form | payment_button }}
  {% endif %}
</div>-
ค้นหาโค้ด
{% schema %}วางโค้ดข้างต้นลงในบรรทัดเหนือบรรทัดของโค้ดนี้:
{% if current_variant == blank %}
  <script>
    var productOptions = [];

    {% for option in product.options -%}
      var optionObj = {};
      optionObj[{{ forloop.index0 }}] = "{{ product.options[forloop.index0] }}";
      productOptions.push(optionObj);
    {%- endfor %}
  </script>
{% endif %}
โค้ดควรมีลักษณะดังนี้:
{% if current_variant == blank %}
  <script>
    var productOptions = [];

    {% for option in product.options -%}
      var optionObj = {};
      optionObj[{{ forloop.index0 }}] = "{{ product.options[forloop.index0] }}";
      productOptions.push(optionObj);
    {%- endfor %}
  </script>
{% endif %}

{% schema %}- คลิกที่ “บันทึก”
แก้ไขส่วนย่อยราคาสินค้าของคุณ
หากต้องการแก้ไขส่วนย่อยราคาสินค้า:
- ในไดเรกทอรี ส่วนย่อย ให้คลิกที่
product-price.liquid - ค้นหาโค้ดต่อไปนี้:
{%- liquid
  if variant.title
    assign compare_at_price = variant.compare_at_price
    assign price = variant.price
    assign available = variant.available
  else
    assign compare_at_price = 1999
    assign price = 1999
    assign available = true
  endif

  assign money_price = price | money
-%}
แทนที่ด้วย:
{%- liquid
  if variant.title
    assign compare_at_price = variant.compare_at_price
    assign price = variant.price
    assign available = variant.available
  elsif product.title
    assign compare_at_price = product.compare_at_price
    assign price = product.price
    assign available = product.available
  else
    assign compare_at_price = 1999
    assign price = 1999
    assign available = true
  endif

  assign money_price = price | money
-%}เปลี่ยนการตั้งค่าภาษาของปุ่มเพิ่มลงในตะกร้าสินค้า
สามารถเปลี่ยนการตั้งค่าภาษาของปุ่มเพิ่มลงในตะกร้าสินค้าได้ เพื่อไม่ให้สินค้าแสดงข้อความไม่พร้อมใช้งาน ก่อนที่ลูกค้าจะเลือกสินค้า
ขั้นตอน:
- ในส่วนผู้ดูแล Shopify ให้ไปที่ร้านค้าออนไลน์ > ธีม
- ค้นหาธีมที่คุณต้องการแก้ไข จากนั้นคลิก ... > แก้ไขเนื้อหาธีมเริ่มต้น
- ในแถบค้นหาตัวกรองรายการ ให้พิมพ์ไม่พร้อมใช้งาน เพื่อแสดงการแปลที่ไม่สามารถแปลได้
- แทนที่ข้อความไม่พร้อมใช้งานด้วยทำการเลือก
- คลิกที่ “บันทึก”
ขั้นตอนสำหรับ Minimal
ทำตามขั้นตอนต่อไปนี้เพื่อใช้งานการปรับแต่งกับ Minimal:
แก้ไขไฟล์ JavaScript ของธีม
- ในส่วนผู้ดูแล Shopify ให้ไปที่ร้านค้าออนไลน์ > ธีม
- ค้นหาธีมที่คุณต้องการแก้ไข แล้วคลิกปุ่ม … เพื่อเปิดเมนูดำเนินการ จากนั้นคลิก แก้ไขโค้ด
- ในไดเรกทอรีชิ้นงาน ให้คลิก
theme.jsหรือtheme.js.liquid -
ค้นหาโค้ด
initProductVariant: function() {และค้นหาโค้ดต่อไปนี้ด้านล่างโค้ดดังกล่าว:
// Hide selectors if we only have 1 variant and its title contains 'Default'.
if (
  product.variants.length === 1 &&
  product.variants[0].title.toLowerCase().indexOf('default') !== -1
) {
  $('.selector-wrapper', this.$container).hide();
}
เพิ่มโค้ดต่อไปนี้ในบรรทัดใหม่ด้านล่าง:
if (typeof(productOptions) != "undefined") {
  for (i = 0; i < productOptions.length; i++) {
    const vowels = ['a', 'e', 'i', 'o', 'u'];
    const firstOptionLetter = productOptions[i][i][0].toLowerCase();
    let indef = 'a';

    if (vowels.includes(firstOptionLetter)) {
      indef = 'an';
    };

    const select = document.querySelectorAll('.single-option-selector')[i];
    const options = select.querySelectorAll('option');

    if (options.length > 1) {
      let option = new Option('Pick ' + indef + ' ' + productOptions[i][i], '');

      select.add(option, select.firstChild);
      select.selectedIndex = 0;
    }
  }
}
โค้ดควรมีลักษณะดังนี้:
// Hide selectors if we only have 1 variant and its title contains 'Default'.
if (
  product.variants.length === 1 &&
  product.variants[0].title.toLowerCase().indexOf('default') !== -1
) {
  $('.selector-wrapper', this.$container).hide();
}

if (typeof(productOptions) != "undefined") {
  for (i = 0; i < productOptions.length; i++) {
    const vowels = ['a', 'e', 'i', 'o', 'u'];
    const firstOptionLetter = productOptions[i][i][0].toLowerCase();
    let indef = 'a';

    if (vowels.includes(firstOptionLetter)) {
      indef = 'an';
    };

    const select = document.querySelectorAll('.single-option-selector')[i];
    const options = select.querySelectorAll('option');

    if (options.length > 1) {
      let option = new Option('Pick ' + indef + ' ' + productOptions[i][i], '');

      select.add(option, select.firstChild);
      select.selectedIndex = 0;
    }
  }
}- คลิกที่ “บันทึก”
แก้ไขเทมเพลตหน้าสินค้าของคุณ
วิธีแก้ไขเทมเพลตหน้าสินค้าของคุณ:
- ในไดเรกทอรีส่วน ให้คลิก
product-template.liquid - ค้นหาโค้ดต่อไปนี้:
{% assign variant = product.selected_or_first_available_variant %}แทนที่ด้วย:
{% assign variant = product.selected_variant %}- ค้นหาโค้ดต่อไปนี้และลบโค้ดดังกล่าว:
{% if variant == product.selected_or_first_available_variant %} selected="selected" {% endif %}- ค้นหาโค้ดนี้ทั้งหมด:
{% assign featured_image = product.selected_or_first_available_variant.featured_image | default: product.featured_image %}แทนที่ด้วย:
{% assign featured_image = product.selected_variant.featured_image | default: product.featured_image %}-
ค้นหาโค้ด
{% schema %}วางโค้ดข้างต้นลงในบรรทัดเหนือบรรทัดของโค้ดนี้:
{% if current_variant == blank %}
  <script>
    var productOptions = [];

    {% for option in product.options -%}
      var optionObj = {};
      optionObj[{{ forloop.index0 }}] = "{{ product.options[forloop.index0] }}";
      productOptions.push(optionObj);
    {%- endfor %}
  </script>
{% endif %}
โค้ดควรมีลักษณะดังนี้:
{% if current_variant == blank %}
  <script>
    var productOptions = [];

    {% for option in product.options -%}
      var optionObj = {};
      optionObj[{{ forloop.index0 }}] = "{{ product.options[forloop.index0] }}";
      productOptions.push(optionObj);
    {%- endfor %}
  </script>
{% endif %}

{% schema %}- คลิกที่ “บันทึก”
เปลี่ยนการตั้งค่าภาษาของปุ่มเพิ่มลงในตะกร้าสินค้า
สามารถเปลี่ยนการตั้งค่าภาษาของปุ่มเพิ่มลงในตะกร้าสินค้าได้ เพื่อไม่ให้สินค้าแสดงข้อความไม่พร้อมใช้งาน ก่อนที่ลูกค้าจะเลือกสินค้า
ขั้นตอน:
- ในส่วนผู้ดูแล Shopify ให้ไปที่ร้านค้าออนไลน์ > ธีม
- ค้นหาธีมที่คุณต้องการแก้ไข จากนั้นคลิก ... > แก้ไขเนื้อหาธีมเริ่มต้น
- ในแถบค้นหาตัวกรองรายการ ให้พิมพ์ไม่พร้อมใช้งาน เพื่อแสดงการแปลที่ไม่สามารถแปลได้
- แทนที่ข้อความไม่พร้อมใช้งานด้วยทำการเลือก
- คลิกที่ “บันทึก”
ขั้นตอนสำหรับ Narrative
ทำตามขั้นตอนต่อไปนี้เพื่อใช้งานการปรับแต่งกับ Narrative:
แก้ไขไฟล์ JavaScript ของธีม
- ในส่วนผู้ดูแล Shopify ให้ไปที่ร้านค้าออนไลน์ > ธีม
- ค้นหาธีมที่คุณต้องการแก้ไข แล้วคลิกปุ่ม … เพื่อเปิดเมนูดำเนินการ จากนั้นคลิก แก้ไขโค้ด
- ในไดเรกทอรีชิ้นงาน ให้คลิก
custom.js - เพิ่มโค้ดต่อไปนี้ที่ด้านล่างของไฟล์:
(function() {
  if (typeof(productOptions) != "undefined") {
    for (i = 0; i < productOptions.length; i++) {
      const vowels = ['a', 'e', 'i', 'o', 'u'];
      const firstOptionLetter = productOptions[i][i][0].toLowerCase();
      let indef = 'a';

      if (vowels.includes(firstOptionLetter)) {
        indef = 'an';
      };

      const select = document.querySelectorAll('.single-option-selector')[i];
      const options = select.querySelectorAll('option');

      if (options.length > 1) {
        let option = new Option('Pick ' + indef + ' ' + productOptions[i][i], '');

        select.add(option, select.firstChild);
        select.selectedIndex = 0;
      }
    }
  }
})();- คลิกที่ “บันทึก”
แก้ไขเทมเพลตหน้าสินค้าของคุณ
วิธีแก้ไขเทมเพลตหน้าสินค้าของคุณ:
- ในไดเรกทอรีส่วน ให้คลิก
product-template.liquid - ค้นหาโค้ดต่อไปนี้:
{%- assign current_variant = product.selected_or_first_available_variant -%}แทนที่ด้วย:
{%- if product.variants.size > 1 -%}
  {%- assign current_variant = product.selected_variant -%}
{%- else -%}
  {%- assign current_variant = product.first_available_variant -%}
{%- endif -%}-
ค้นหาโค้ด
{% schema %}วางโค้ดข้างต้นลงในบรรทัดเหนือบรรทัดของโค้ดนี้:
{% if current_variant == blank %}
  <script>
    var productOptions = [];

    {% for option in product.options -%}
      var optionObj = {};
      optionObj[{{ forloop.index0 }}] = "{{ product.options[forloop.index0] }}";
      productOptions.push(optionObj);
    {%- endfor %}
  </script>
{% endif %}
โค้ดควรมีลักษณะดังนี้:
{% if current_variant == blank %}
  <script>
    var productOptions = [];

    {% for option in product.options -%}
      var optionObj = {};
      optionObj[{{ forloop.index0 }}] = "{{ product.options[forloop.index0] }}";
      productOptions.push(optionObj);
    {%- endfor %}
  </script>
{% endif %}

{% schema %}- คลิกที่ “บันทึก”
เปลี่ยนการตั้งค่าภาษาของปุ่มเพิ่มลงในตะกร้าสินค้า
สามารถเปลี่ยนการตั้งค่าภาษาของปุ่มเพิ่มลงในตะกร้าสินค้าได้ เพื่อไม่ให้สินค้าแสดงข้อความไม่พร้อมใช้งาน ก่อนที่ลูกค้าจะเลือกสินค้า
ขั้นตอน:
- ในส่วนผู้ดูแล Shopify ให้ไปที่ร้านค้าออนไลน์ > ธีม
- ค้นหาธีมที่คุณต้องการแก้ไข จากนั้นคลิก ... > แก้ไขเนื้อหาธีมเริ่มต้น
- ในแถบค้นหาตัวกรองรายการ ให้พิมพ์ไม่พร้อมใช้งาน เพื่อแสดงการแปลที่ไม่สามารถแปลได้
- แทนที่ข้อความไม่พร้อมใช้งานด้วยทำการเลือก
- คลิกที่ “บันทึก”
ขั้นตอนสำหรับ Simple
ทำตามขั้นตอนต่อไปนี้เพื่อใช้งานการปรับแต่งกับธีม Simple:
แก้ไขไฟล์ JavaScript ของธีม
- ในส่วนผู้ดูแล Shopify ให้ไปที่ร้านค้าออนไลน์ > ธีม
- ค้นหาธีมที่คุณต้องการแก้ไข แล้วคลิกปุ่ม … เพื่อเปิดเมนูดำเนินการ จากนั้นคลิก แก้ไขโค้ด
- ในไดเรกทอรีชิ้นงาน ให้คลิก
theme.jsหรือtheme.js.liquid -
ค้นหาโค้ด
initProductVariant: function() {และค้นหาโค้ดต่อไปนี้ด้านล่างโค้ดดังกล่าว:
// Clean up variant labels if the Shopify-defined
// defaults are the only ones left
Slate.simplifyVariantLabels(this.productSingleObject, this.$container);
เพิ่มโค้ดต่อไปนี้ในบรรทัดใหม่ด้านล่าง:
if (typeof(productOptions) != "undefined") {
  for (i = 0; i < productOptions.length; i++) {
    const vowels = ['a', 'e', 'i', 'o', 'u'];
    const firstOptionLetter = productOptions[i][i][0].toLowerCase();
    let indef = 'a';

    if (vowels.includes(firstOptionLetter)) {
      indef = 'an';
    };

    const select = document.querySelectorAll('.single-option-selector')[i];
    const options = select.querySelectorAll('option');

    if (options.length > 1) {
      let option = new Option('Pick ' + indef + ' ' + productOptions[i][i], '');

      select.add(option, select.firstChild);
      select.selectedIndex = 0;
    }
  }
}
โค้ดควรมีลักษณะดังนี้:
// Clean up variant labels if the Shopify-defined
// defaults are the only ones left
Slate.simplifyVariantLabels(this.productSingleObject, this.$container);

if (typeof(productOptions) != "undefined") {
  for (i = 0; i < productOptions.length; i++) {
    const vowels = ['a', 'e', 'i', 'o', 'u'];
    const firstOptionLetter = productOptions[i][i][0].toLowerCase();
    let indef = 'a';

    if (vowels.includes(firstOptionLetter)) {
      indef = 'an';
    };

    const select = document.querySelectorAll('.single-option-selector')[i];
    const options = select.querySelectorAll('option');

    if (options.length > 1) {
      let option = new Option('Pick ' + indef + ' ' + productOptions[i][i], '');

      select.add(option, select.firstChild);
      select.selectedIndex = 0;
    }
  }
}- คลิกที่ “บันทึก”
แก้ไขเทมเพลตหน้าสินค้าของคุณ
วิธีแก้ไขเทมเพลตหน้าสินค้าของคุณ:
- ในไดเรกทอรีส่วน ให้คลิก
product-template.liquid - ค้นหาโค้ดต่อไปนี้:
{% assign current_variant = product.selected_or_first_available_variant %}แทนที่ด้วย:
{% assign current_variant = product.selected_variant %}- ค้นหาโค้ดต่อไปนี้และลบโค้ดดังกล่าว:
{% if variant == product.selected_or_first_available_variant %} selected="selected" {% endif %}-
ค้นหาโค้ด
{% schema %}วางโค้ดข้างต้นลงในบรรทัดเหนือบรรทัดของโค้ดนี้:
{% if current_variant == blank %}
  <script>
    var productOptions = [];

    {% for option in product.options -%}
      var optionObj = {};
      optionObj[{{ forloop.index0 }}] = "{{ product.options[forloop.index0] }}";
      productOptions.push(optionObj);
    {%- endfor %}
  </script>
{% endif %}
โค้ดควรมีลักษณะดังนี้:
{% if current_variant == blank %}
  <script>
    var productOptions = [];

    {% for option in product.options -%}
      var optionObj = {};
      optionObj[{{ forloop.index0 }}] = "{{ product.options[forloop.index0] }}";
      productOptions.push(optionObj);
    {%- endfor %}
  </script>
{% endif %}

{% schema %}- คลิกที่ “บันทึก”
เปลี่ยนการตั้งค่าภาษาของปุ่มเพิ่มลงในตะกร้าสินค้า
สามารถเปลี่ยนการตั้งค่าภาษาของปุ่มเพิ่มลงในตะกร้าสินค้าได้ เพื่อไม่ให้สินค้าแสดงข้อความไม่พร้อมใช้งาน ก่อนที่ลูกค้าจะเลือกสินค้า
ขั้นตอน:
- ในส่วนผู้ดูแล Shopify ให้ไปที่ร้านค้าออนไลน์ > ธีม
- ค้นหาธีมที่คุณต้องการแก้ไข จากนั้นคลิก ... > แก้ไขเนื้อหาธีมเริ่มต้น
- ในแถบค้นหาตัวกรองรายการ ให้พิมพ์ไม่พร้อมใช้งาน เพื่อแสดงการแปลที่ไม่สามารถแปลได้
- แทนที่ข้อความไม่พร้อมใช้งานด้วยทำการเลือก
- คลิกที่ “บันทึก”
ขั้นตอนสำหรับ Supply
ทำตามขั้นตอนต่อไปนี้เพื่อใช้งานการปรับแต่งกับ Supply:
แก้ไขไฟล์ JavaScript ของธีม
- ในส่วนผู้ดูแล Shopify ให้ไปที่ร้านค้าออนไลน์ > ธีม
- ค้นหาธีมที่คุณต้องการแก้ไข แล้วคลิกปุ่ม … เพื่อเปิดเมนูดำเนินการ จากนั้นคลิก แก้ไขโค้ด
- ในไดเรกทอรีชิ้นงาน ให้คลิก
theme.jsหรือtheme.js.liquid -
ค้นหาโค้ด
initProductVariant: function() {และค้นหาโค้ดต่อไปนี้ด้านล่างโค้ดดังกล่าว:
// Clean up variant labels if the Shopify-defined
// defaults are the only ones left
this.simplifyVariantLabels(this.productSingleObject);
เพิ่มโค้ดต่อไปนี้ในบรรทัดใหม่ด้านล่าง:
if (typeof(productOptions) != "undefined") {
  for (i = 0; i < productOptions.length; i++) {
    const vowels = ['a', 'e', 'i', 'o', 'u'];
    const firstOptionLetter = productOptions[i][i][0].toLowerCase();
    let indef = 'a';

    if (vowels.includes(firstOptionLetter)) {
      indef = 'an';
    };

    const select = document.querySelectorAll('.single-option-selector')[i];
    const options = select.querySelectorAll('option');

    if (options.length > 1) {
      let option = new Option('Pick ' + indef + ' ' + productOptions[i][i], '');

      select.add(option, select.firstChild);
      select.selectedIndex = 0;
    }
  }
}
โค้ดควรมีลักษณะดังนี้:
// Clean up variant labels if the Shopify-defined
// defaults are the only ones left
this.simplifyVariantLabels(this.productSingleObject);

if (typeof(productOptions) != "undefined") {
  for (i = 0; i < productOptions.length; i++) {
    const vowels = ['a', 'e', 'i', 'o', 'u'];
    const firstOptionLetter = productOptions[i][i][0].toLowerCase();
    let indef = 'a';

    if (vowels.includes(firstOptionLetter)) {
      indef = 'an';
    };

    const select = document.querySelectorAll('.single-option-selector')[i];
    const options = select.querySelectorAll('option');

    if (options.length > 1) {
      let option = new Option('Pick ' + indef + ' ' + productOptions[i][i], '');

      select.add(option, select.firstChild);
      select.selectedIndex = 0;
    }
  }
}- คลิกที่ “บันทึก”
แก้ไขเทมเพลตหน้าสินค้าของคุณ
วิธีแก้ไขเทมเพลตหน้าสินค้าของคุณ:
- ในไดเรกทอรีส่วน ให้คลิก
product-template.liquid - ค้นหาโค้ดต่อไปนี้:
{% assign variant = product.selected_or_first_available_variant %}แทนที่ด้วย:
{% assign variant = product.selected_variant %}- ค้นหาโค้ดต่อไปนี้และลบโค้ดดังกล่าว:
{% if variant == product.selected_or_first_available_variant %} selected="selected" {% endif %}- ค้นหาโค้ดนี้ทั้งหมด:
{% assign featured_image = product.selected_or_first_available_variant.featured_image | default: product.featured_image %}แทนที่ด้วย:
{% assign featured_image = product.selected_variant.featured_image | default: product.featured_image %}-
ค้นหาโค้ด
{% schema %}วางโค้ดข้างต้นลงในบรรทัดเหนือบรรทัดของโค้ดนี้:
{% if current_variant == blank %}
  <script>
    var productOptions = [];

    {% for option in product.options -%}
      var optionObj = {};
      optionObj[{{ forloop.index0 }}] = "{{ product.options[forloop.index0] }}";
      productOptions.push(optionObj);
    {%- endfor %}
  </script>
{% endif %}
โค้ดควรมีลักษณะดังนี้:
{% if current_variant == blank %}
  <script>
    var productOptions = [];

    {% for option in product.options -%}
      var optionObj = {};
      optionObj[{{ forloop.index0 }}] = "{{ product.options[forloop.index0] }}";
      productOptions.push(optionObj);
    {%- endfor %}
  </script>
{% endif %}

{% schema %}- คลิกที่ “บันทึก”
เปลี่ยนการตั้งค่าภาษาของปุ่มเพิ่มลงในตะกร้าสินค้า
สามารถเปลี่ยนการตั้งค่าภาษาของปุ่มเพิ่มลงในตะกร้าสินค้าได้ เพื่อไม่ให้สินค้าแสดงข้อความไม่พร้อมใช้งาน ก่อนที่ลูกค้าจะเลือกสินค้า
ขั้นตอน:
- ในส่วนผู้ดูแล Shopify ให้ไปที่ร้านค้าออนไลน์ > ธีม
- ค้นหาธีมที่คุณต้องการแก้ไข จากนั้นคลิก ... > แก้ไขเนื้อหาธีมเริ่มต้น
- ในแถบค้นหาตัวกรองรายการ ให้พิมพ์ไม่พร้อมใช้งาน เพื่อแสดงการแปลที่ไม่สามารถแปลได้
- แทนที่ข้อความไม่พร้อมใช้งานด้วยทำการเลือก
- คลิกที่ “บันทึก”
ขั้นตอนสำหรับธีม Venture
ทำตามขั้นตอนต่อไปนี้เพื่อใช้งานการปรับแต่งกับธีม Venture:
แก้ไขไฟล์ JavaScript ของธีม
- ในส่วนผู้ดูแล Shopify ให้ไปที่ร้านค้าออนไลน์ > ธีม
- ค้นหาธีมที่คุณต้องการแก้ไข แล้วคลิกปุ่ม … เพื่อเปิดเมนูดำเนินการ จากนั้นคลิก แก้ไขโค้ด
- ในไดเรกทอรีชิ้นงาน ให้คลิก
theme.jsหรือtheme.js.liquid - เพิ่มโค้ดต่อไปนี้ที่ด้านล่างของไฟล์:
(function() {
  if (typeof(productOptions) != "undefined") {
    for (i = 0; i < productOptions.length; i++) {
      const vowels = ['a', 'e', 'i', 'o', 'u'];
      const firstOptionLetter = productOptions[i][i][0].toLowerCase();
      let indef = 'a';

      if (vowels.includes(firstOptionLetter)) {
        indef = 'an';
      };

      const select = document.querySelectorAll('.single-option-selector')[i];
      const options = select.querySelectorAll('option');

      if (options.length > 1) {
        let option = new Option('Pick ' + indef + ' ' + productOptions[i][i], '');

        select.add(option, select.firstChild);
        select.selectedIndex = 0;
      }
    }
  }
})();- ค้นหาโค้ดต่อไปนี้:
this.currentVariant = this._getVariantFromOptions();แทนที่ด้วย:
this.currentVariant = this._getVariantFromOptions() || {};-
ค้นหาโค้ด
_updatePrice: function(variant)แทนที่โค้ดต่อไปนี้:
if (
  variant.price === this.currentVariant.price &&
  variant.compare_at_price === this.currentVariant.compare_at_price
) {
  return;
}
ด้วย:
/* if (
  variant.price === this.currentVariant.price &&
  variant.compare_at_price === this.currentVariant.compare_at_price
) {
  return;
} */- คลิกที่ “บันทึก”
แก้ไขเทมเพลตหน้าสินค้าของคุณ
วิธีแก้ไขเทมเพลตหน้าสินค้าของคุณ:
- ในไดเรกทอรีส่วน ให้คลิก
product-template.liquid - ค้นหาโค้ดต่อไปนี้:
{% assign current_variant = product.selected_or_first_available_variant %}แทนที่ด้วย:
{% if product.variants.size > 1 %}
  {% assign current_variant = product.selected_variant %}
{% else %}
  {% assign current_variant = product.first_available_variant %}
{% endif %}- ค้นหาโค้ดต่อไปนี้และลบโค้ดดังกล่าว:
{% if variant == product.selected_or_first_available_variant %} selected="selected" {% endif %}หากคุณไม่พบโค้ดด้านบน ให้ค้นหาโค้ดนี้และลบโค้ดดังกล่าว:
{% if variant == current_variant %} selected="selected" {% endif %}- ค้นหาโค้ดนี้ทั้งหมด:
{% unless current_variant.available %}แทนที่ด้วย:
{% unless current_variant.available or product.variants.size == 1 and variant.available %}- ค้นหาโค้ดต่อไปนี้:
{% unless current_variant.available or product.variants.size == 1 and variant.available %}
  {{ 'products.product.sold_out' | t }}
{% else %}
  {{ 'products.product.add_to_cart' | t }}
{% endunless %}
แทนที่ด้วย:
{% if current_variant == blank %}
  {{ 'products.product.unavailable' | t }}
{% else %}
  {% unless current_variant.available or product.variants.size == 1 and variant.available %}
    {{ 'products.product.sold_out' | t }}
  {% else %}
    {{ 'products.product.add_to_cart' | t }}
  {% endunless %}
{% endif %}-
ค้นหาโค้ด
{% schema %}วางโค้ดข้างต้นลงในบรรทัดเหนือบรรทัดของโค้ดนี้:
{% if current_variant == blank %}
  <script>
    var productOptions = [];

    {% for option in product.options -%}
      var optionObj = {};
      optionObj[{{ forloop.index0 }}] = "{{ product.options[forloop.index0] }}";
      productOptions.push(optionObj);
    {%- endfor %}
  </script>
{% endif %}
โค้ดควรมีลักษณะดังนี้:
{% if current_variant == blank %}
  <script>
    var productOptions = [];

    {% for option in product.options -%}
      var optionObj = {};
      optionObj[{{ forloop.index0 }}] = "{{ product.options[forloop.index0] }}";
      productOptions.push(optionObj);
    {%- endfor %}
  </script>
{% endif %}

{% schema %}- คลิกที่ “บันทึก”
เปลี่ยนการตั้งค่าภาษาของปุ่มเพิ่มลงในตะกร้าสินค้า
สามารถเปลี่ยนการตั้งค่าภาษาของปุ่มเพิ่มลงในตะกร้าสินค้าได้ เพื่อไม่ให้สินค้าแสดงข้อความไม่พร้อมใช้งาน ก่อนที่ลูกค้าจะเลือกสินค้า
ขั้นตอน:
- ในส่วนผู้ดูแล Shopify ให้ไปที่ร้านค้าออนไลน์ > ธีม
- ค้นหาธีมที่คุณต้องการแก้ไข จากนั้นคลิก ... > แก้ไขเนื้อหาธีมเริ่มต้น
- ในแถบค้นหาตัวกรองรายการ ให้พิมพ์ไม่พร้อมใช้งาน เพื่อแสดงการแปลที่ไม่สามารถแปลได้
- แทนที่ข้อความไม่พร้อมใช้งานด้วยทำการเลือก
- คลิกที่ “บันทึก”
ขั้นตอนต่างๆ สำหรับธีมที่ไม่แบ่งส่วน
เพิ่มการแจ้งเตือนไปยังเมนูดรอปดาวน์ของตัวเลือกสินค้า
- ในไดเรกทอรีส่วนย่อย ให้คลิก เพิ่มส่วนย่อยใหม่
- ตั้งชื่อส่วนย่อย
pick-an-optionใหม่ของคุณ - ในไฟล์ส่วนย่อยใหม่ของคุณ ให้วางโค้ดนี้ที่โฮสต์โดย GitHub
- คลิกที่ “บันทึก”
- ในไดเรกทอรีเลย์เอาต์ ให้คลิก
theme.liquid -
ค้นหาแท็กปิด
</body>ใกล้กับด้านล่างของไฟล์ ในบรรทัดใหม่ด้านบนแท็กปิด</body>ให้วางโค้ดต่อไปนี้:
{% render 'pick-an-option' %}- คลิกที่ “บันทึก”
-
ค้นหาไฟล์ที่มีแบบฟอร์มเพิ่มลงในตะกร้าสินค้า ซึ่งจะมีการระบุที่มา
actionที่ตั้งไว้เป็น/cart/addโดยจะต้องเป็นหนึ่งในสี่ไฟล์เหล่านี้:- เทมเพลต
product.liquidใต้เทมเพลต - เลย์เอาต์
theme.liquidใต้เลย์เอาต์ - ส่วนย่อย
product.liquidใต้ส่วนย่อย - ส่วนย่อย
single-product.liquidใต้ส่วนย่อย
- เทมเพลต
ค้นหาโค้ดนี้ภายในแบบฟอร์ม:
<option {% if variant == product.selected_or_first_available_variant %} selected="selected" {% endif %} data-sku="{{ variant.sku }}" value="{{ variant.id }}">{{ variant.title }} - {{ variant.price | money_with_currency }}</option>หรือค้นหาโค้ดดังต่อไปนี้ภายในแบบฟอร์ม
<option {% if variant == current_variant %} selected="selected" {% endif %} data-sku="{{ variant.sku }}" value="{{ variant.id }}">{{ variant.title }} - {{ variant.price | money_with_currency }}</option>แทนที่รหัสด้วยโค้ดบล็อกต่อไปนี้
<option {% if forloop.length <= 1 and variant == product.selected_or_first_available_variant %} selected="selected" {% endif %} data-sku="{{ variant.sku }}" value="{{ variant.id }}">{{ variant.title }} - {{ variant.price | money_with_currency }}</option>หากคุณใช้ธีม Minimal, Pop หรือ Supply ให้ค้นหาโค้ดนี้ทั้งหมด:
{% assign featured_image = product.selected_or_first_available_variant.featured_image | default: product.featured_image %}แทนที่รหัสด้วยโค้ดบล็อกต่อไปนี้
{% assign featured_image = product.selected_variant.featured_image | default: product.featured_image %}หากคุณใช้ธีมวินเทจอื่นๆ ของ Shopify ให้ค้นหาโค้ดดังต่อไปนี้
{% assign current_variant = product.selected_or_first_available_variant %}แทนที่รหัสด้วยโค้ดบล็อกต่อไปนี้
{% assign current_variant = product.selected_variant %}คลิกที่ “บันทึก”
เปลี่ยนการตั้งค่าภาษาของปุ่มเพิ่มลงในตะกร้าสินค้า
สามารถเปลี่ยนการตั้งค่าภาษาของปุ่มเพิ่มลงในตะกร้าสินค้าได้ เพื่อไม่ให้สินค้าแสดงข้อความไม่พร้อมใช้งาน ก่อนที่ลูกค้าจะเลือกสินค้า
ขั้นตอน:
- ในส่วนผู้ดูแล Shopify ให้ไปที่ร้านค้าออนไลน์ > ธีม
- ค้นหาธีมที่คุณต้องการแก้ไข จากนั้นคลิก ... > แก้ไขเนื้อหาธีมเริ่มต้น
- ในแถบค้นหาตัวกรองรายการ ให้พิมพ์ไม่พร้อมใช้งาน เพื่อแสดงการแปลที่ไม่สามารถแปลได้
- แทนที่ข้อความไม่พร้อมใช้งานด้วยทำการเลือก
- คลิกที่ “บันทึก”