讓顧客選擇選項
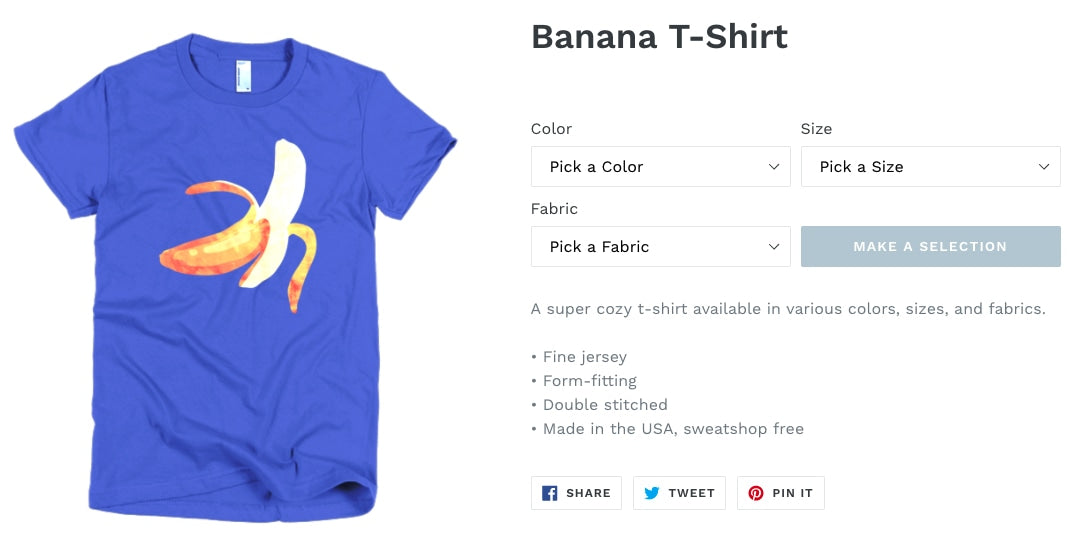
顧客造訪您網路商店的商品頁面時,系統會預設選取第一個可供貨的子類。您可以使用「讓顧客選擇選項」自訂功能來停用自動選取第一個可供貨的子類。如此一來,系統就會提示顧客先手動選取子類,然後才顯示子類。
如果您使用「讓顧客選擇選項」自訂功能,則在顧客選取子類之前,您的佈景主題可能不會顯示商品價格。具有子類的商品沒有特定價格,顯示的價格取決於所選取的子類。
區段式佈景主題和非區段式佈景主題
此頁面上
區段式佈景主題的步驟
選擇佈景主題
此自訂程序的步驟因佈景主題而異。按一下佈景主題的按鈕,然後依照以下指示操作:
Boundless 的步驟
請依照以下步驟,為 Boundless 套用自訂內容:
編輯您佈景主題的 JavaScipt 檔案
- 在 Shopify 管理介面 中,前往「線上商店」>「佈景主題」。
- 找到要編輯的佈景主題,按一下「...」按鈕以開啟動作選單,然後點擊「編輯程式碼」。
- 在「資產」目錄中,按一下
theme.js或theme.js.liquid。 -
找到程式碼
initVariantSelectors。請在其下方找到下列程式碼:
// Clean up variant labels if the Shopify-defined
// defaults are the only ones left
this.simplifyVariantLabels(this.productSingleObject, this.$container);
在下方新的一行,新增下列程式碼:
if (typeof(productOptions) != "undefined") {
  for (i = 0; i < productOptions.length; i++) {
    const vowels = ['a', 'e', 'i', 'o', 'u'];
    const firstOptionLetter = productOptions[i][i][0].toLowerCase();
    let indef = 'a';

    if (vowels.includes(firstOptionLetter)) {
      indef = 'an';
    };

    const select = document.querySelectorAll('.single-option-selector')[i];
    const options = select.querySelectorAll('option');

    if (options.length > 1) {
      let option = new Option('Pick ' + indef + ' ' + productOptions[i][i], '');

      select.add(option, select.firstChild);
      select.selectedIndex = 0;
    }
  }
}
其應類似下列所示:
// Clean up variant labels if the Shopify-defined
// defaults are the only ones left
this.simplifyVariantLabels(this.productSingleObject, this.$container);

if (typeof(productOptions) != "undefined") {
  for (i = 0; i < productOptions.length; i++) {
    const vowels = ['a', 'e', 'i', 'o', 'u'];
    const firstOptionLetter = productOptions[i][i][0].toLowerCase();
    let indef = 'a';

    if (vowels.includes(firstOptionLetter)) {
      indef = 'an';
    };

    const select = document.querySelectorAll('.single-option-selector')[i];
    const options = select.querySelectorAll('option');

    if (options.length > 1) {
      let option = new Option('Pick ' + indef + ' ' + productOptions[i][i], '');

      select.add(option, select.firstChild);
      select.selectedIndex = 0;
    }
  }
}- 找到以下程式碼行:
$(selectors.addToCartText).html(theme.strings.soldOut);這行程式碼有兩個實例,皆位於 productVariantCallback 函數中。請僅將第二個實例取代為:
$(selectors.addToCartText).html('Make a Selection');- 點擊「儲存」。
編輯產品頁面範本
若要編輯產品頁面範本:
- 在「區段」目錄中,按一下
product-template.liquid。 - 找到以下程式碼:
{% assign current_variant = product.selected_or_first_available_variant %}將其取代為:
{% assign current_variant = product.selected_variant %}- 找到下列程式碼,並將其刪除:
{% if variant == product.selected_or_first_available_variant %} selected="selected" {% endif %}-
找到程式碼
{% schema %}。在其上方新的一行,貼上下列程式碼:
{% if current_variant == blank %}
  <script>
    var productOptions = [];

    {% for option in product.options -%}
      var optionObj = {};
      optionObj[{{ forloop.index0 }}] = "{{ product.options[forloop.index0] }}";
      productOptions.push(optionObj);
    {%- endfor %}
  </script>
{% endif %}
其應類似下列所示:
{% if current_variant == blank %}
  <script>
    var productOptions = [];

    {% for option in product.options -%}
      var optionObj = {};
      optionObj[{{ forloop.index0 }}] = "{{ product.options[forloop.index0] }}";
      productOptions.push(optionObj);
    {%- endfor %}
  </script>
{% endif %}

{% schema %}- 點擊「儲存」。
變更「加入購物車」按鈕語言設定
您可以變更「加入購物車」按鈕的語言設定,讓商品在顧客未選取某項商品時不會顯示為「無法供貨」。
步驟如下:
- 在 Shopify 管理介面 中,前往「線上商店」>「佈景主題」。
- 找到要編輯的佈景主題,然後依序點擊「…」>「編輯預設佈景主題內容」。
- 在「篩選商品」搜尋列中,開始輸入 unavailable 以顯示「無法供貨」的翻譯。
- 以「選取項目」(Make a selection) 取代文字「無法供貨」。
- 點擊「儲存」。
Debut 的步驟
請依照以下步驟,為 Debut 套用自訂內容:
編輯您佈景主題的 JavaScipt 檔案
- 在 Shopify 管理介面 中,前往「線上商店」>「佈景主題」。
- 找到要編輯的佈景主題,按一下「...」按鈕以開啟動作選單,然後點擊「編輯程式碼」。
- 在「資產」目錄中,按一下
theme.js或theme.js.liquid。 - 將以下程式碼新增到檔案的底部:
(function() {
  if (typeof(productOptions) != "undefined") {
    for (i = 0; i < productOptions.length; i++) {
      const vowels = ['a', 'e', 'i', 'o', 'u'];
      const firstOptionLetter = productOptions[i][i][0].toLowerCase();
      let indef = 'a';

      if (vowels.includes(firstOptionLetter)) {
        indef = 'an';
      };

      const select = document.querySelectorAll('.single-option-selector')[i];
      const options = select.querySelectorAll('option');

      if (options.length > 1) {
        let option = new Option('Pick ' + indef + ' ' + productOptions[i][i], '');

        select.add(option, select.firstChild);
        select.selectedIndex = 0;
      }
    }
  }
})();-
找到程式碼
_updatePrice: function(variant)。取代以下程式碼:
if (
  variant.price === this.currentVariant.price &&
  variant.compare_at_price === this.currentVariant.compare_at_price &&
  variant.unit_price === this.currentVariant.unit_price
) {
  return;
}
使用:
/* if (
  variant.price === this.currentVariant.price &&
  variant.compare_at_price === this.currentVariant.compare_at_price &&
  variant.unit_price === this.currentVariant.unit_price
) {
  return;
} */
如果您無法找到上述程式碼,則請找到下列程式碼:
if (
  variant.price === this.currentVariant.price &&
  variant.compare_at_price === this.currentVariant.compare_at_price
) {
  return;
}
將其取代為:
/* if (
  variant.price === this.currentVariant.price &&
  variant.compare_at_price === this.currentVariant.compare_at_price
) {
  return;
} */-
找到程式碼。
this.currentVariant = variant;
請於下方新增下列程式碼:
this._updatePaymentButton(variant);結果應類似下列所示:
this.currentVariant = variant;
this._updatePaymentButton(variant);-
找到程式碼
_updateImages: function(variant)。取代以下程式碼:
var currentVariantImage = this.currentVariant.featured_image || {};使用:
if (this.currentVariant != undefined) {
  var currentVariantImage = this.currentVariant.featured_image || {};
}- 請於下方找到下列程式碼:
if (
  !variant.featured_image ||
  variantImage.src === currentVariantImage.src
) {
  return;
}
將其取代為:
/* if (
  !variant.featured_image ||
  variantImage.src === currentVariantImage.src
) {
  return;
} */-
找到程式碼
_updateSKU: function(variant)。取代以下程式碼:
if (variant.sku === this.currentVariant.sku) {
  return;
}
使用:
if (this.currentVariant != undefined ) {
  if (variant.sku === this.currentVariant.sku) {
    return;
  }
}-
找到程式碼
_initVariants: function() {。取代以下程式碼:
if (this.storeAvailability && this.variants.currentVariant.available) {
  this.storeAvailability.updateContent(this.variants.currentVariant.id);
}
使用:
/* if (this.storeAvailability && this.variants.currentVariant.available) {
  this.storeAvailability.updateContent(this.variants.currentVariant.id);
} */- 找到以下程式碼:
_updateSKU: function(variant) {
  if (this.currentVariant != undefined ) {
    if (variant.sku === this.currentVariant.sku) {
      return;
    }
  }

  this.container.dispatchEvent(
    new CustomEvent('variantSKUChange', {
      detail: {
        variant: variant
      },
      bubbles: true,
      cancelable: true
    })
  );
},
在上述程式碼下方新的一行,新增下列程式碼:
_updatePaymentButton: function(variant) {
  if (this.currentVariant != undefined) {
    const paymentButton = document.querySelector('.payment-button');

    if (paymentButton) {
      paymentButton.removeAttribute('class', 'visually-hidden');
     }
  } else {
    document.querySelector('.payment-button').setAttribute('class', 'visually-hidden');
  }
},
其應類似下列所示:
_updateSKU: function(variant) {
  if (this.currentVariant != undefined ) {
    if (variant.sku === this.currentVariant.sku) {
      return;
    }
  }

  this.container.dispatchEvent(
    new CustomEvent('variantSKUChange', {
      detail: {
        variant: variant
      },
      bubbles: true,
      cancelable: true
    })
  );
},

_updatePaymentButton: function(variant) {
  if (this.currentVariant != undefined) {
    const paymentButton = document.querySelector('.payment-button');

    if (paymentButton) {
      paymentButton.removeAttribute('class', 'visually-hidden');
     }
  } else {
    document.querySelector('.payment-button').setAttribute('class', 'visually-hidden');
  }
},- 點擊「儲存」。
編輯產品頁面範本
若要編輯產品頁面範本:
- 在「區段」目錄中,按一下
product-template.liquid。 - 找到以下程式碼:
{%- assign current_variant = product.selected_or_first_available_variant -%}將其取代為:
{%- if product.variants.size > 1 -%}
  {%- assign current_variant = product.selected_variant -%}
{%- else %}
  {%- assign current_variant = product.first_available_variant -%}
{%- endif %}- 找到下列程式碼,並將其刪除:
{% if variant == product.selected_or_first_available_variant %} selected="selected" {% endif %}如果您無法找到上述程式碼,則請找到下列程式碼並將其刪除:
{%- if variant == current_variant %} selected="selected" {%- endif -%}- 找到以下程式碼:
{%- assign featured_image = product.selected_or_first_available_variant.featured_image | default: product.featured_image -%}將其取代為:
{%- assign featured_image = current_variant.featured_image | default: product.featured_image -%}如果您無法找到上述程式碼,則請找到下列程式碼:
{%- assign featured_media = product.selected_or_first_available_variant.featured_media | default: product.featured_media -%}將其取代為:
{%- assign featured_media = current_variant.featured_media | default: product.featured_media -%}- 找到以下程式碼:
{% unless current_variant.available %}
  {{ 'products.product.sold_out' | t }}
{% else %}
  {{ 'products.product.add_to_cart' | t }}
{% endunless %}
將其取代為:
{% if current_variant == blank %}
  {{ 'products.product.unavailable' | t }}
{% elsif current_variant.available %}
  {{ 'products.product.add_to_cart' | t }}
{% else %}
  {{ 'products.product.sold_out' | t }}
{% endif %}- 找到以下程式碼:
{% if section.settings.enable_payment_button %}
  {{ form | payment_button }}
{% endif %}
將其取代為:
<div class="payment-button {% if current_variant == blank %}visually-hidden {% endif %}">
  {% if section.settings.enable_payment_button %}
    {{ form | payment_button }}
  {% endif %}
</div>-
找到程式碼
{% schema %}。在其上方新的一行,貼上下列程式碼:
{% if current_variant == blank %}
  <script>
    var productOptions = [];

    {% for option in product.options -%}
      var optionObj = {};
      optionObj[{{ forloop.index0 }}] = "{{ product.options[forloop.index0] }}";
      productOptions.push(optionObj);
    {%- endfor %}
  </script>
{% endif %}
其應類似下列所示:
{% if current_variant == blank %}
  <script>
    var productOptions = [];

    {% for option in product.options -%}
      var optionObj = {};
      optionObj[{{ forloop.index0 }}] = "{{ product.options[forloop.index0] }}";
      productOptions.push(optionObj);
    {%- endfor %}
  </script>
{% endif %}

{% schema %}- 點擊「儲存」。
編輯商品價格程式碼片段
編輯商品價格程式碼片段:
- 在「程式碼片段」目錄中,按一下「
product-price.liquid」。 - 找到以下程式碼:
{%- liquid
  if variant.title
    assign compare_at_price = variant.compare_at_price
    assign price = variant.price
    assign available = variant.available
  else
    assign compare_at_price = 1999
    assign price = 1999
    assign available = true
  endif

  assign money_price = price | money
-%}
將其取代為:
{%- liquid
  if variant.title
    assign compare_at_price = variant.compare_at_price
    assign price = variant.price
    assign available = variant.available
  elsif product.title
    assign compare_at_price = product.compare_at_price
    assign price = product.price
    assign available = product.available
  else
    assign compare_at_price = 1999
    assign price = 1999
    assign available = true
  endif

  assign money_price = price | money
-%}變更「加入購物車」按鈕語言設定
您可以變更「加入購物車」按鈕的語言設定,讓商品在顧客未選取某項商品時不會顯示為「無法供貨」。
步驟如下:
- 在 Shopify 管理介面 中,前往「線上商店」>「佈景主題」。
- 找到要編輯的佈景主題,然後依序點擊「…」>「編輯預設佈景主題內容」。
- 在「篩選商品」搜尋列中,開始輸入 unavailable 以顯示「無法供貨」的翻譯。
- 以「選取項目」(Make a selection) 取代文字「無法供貨」。
- 點擊「儲存」。
Minimal 的步驟
請依照以下步驟,為 Minimal 套用自訂內容:
編輯您佈景主題的 JavaScipt 檔案
- 在 Shopify 管理介面 中,前往「線上商店」>「佈景主題」。
- 找到要編輯的佈景主題,按一下「...」按鈕以開啟動作選單,然後點擊「編輯程式碼」。
- 在「資產」目錄中,按一下
theme.js或theme.js.liquid。 -
找到程式碼
initProductVariant: function() {。請在其下方找到下列程式碼:
// Hide selectors if we only have 1 variant and its title contains 'Default'.
if (
  product.variants.length === 1 &&
  product.variants[0].title.toLowerCase().indexOf('default') !== -1
) {
  $('.selector-wrapper', this.$container).hide();
}
在下方新的一行,新增下列程式碼:
if (typeof(productOptions) != "undefined") {
  for (i = 0; i < productOptions.length; i++) {
    const vowels = ['a', 'e', 'i', 'o', 'u'];
    const firstOptionLetter = productOptions[i][i][0].toLowerCase();
    let indef = 'a';

    if (vowels.includes(firstOptionLetter)) {
      indef = 'an';
    };

    const select = document.querySelectorAll('.single-option-selector')[i];
    const options = select.querySelectorAll('option');

    if (options.length > 1) {
      let option = new Option('Pick ' + indef + ' ' + productOptions[i][i], '');

      select.add(option, select.firstChild);
      select.selectedIndex = 0;
    }
  }
}
其應類似下列所示:
// Hide selectors if we only have 1 variant and its title contains 'Default'.
if (
  product.variants.length === 1 &&
  product.variants[0].title.toLowerCase().indexOf('default') !== -1
) {
  $('.selector-wrapper', this.$container).hide();
}

if (typeof(productOptions) != "undefined") {
  for (i = 0; i < productOptions.length; i++) {
    const vowels = ['a', 'e', 'i', 'o', 'u'];
    const firstOptionLetter = productOptions[i][i][0].toLowerCase();
    let indef = 'a';

    if (vowels.includes(firstOptionLetter)) {
      indef = 'an';
    };

    const select = document.querySelectorAll('.single-option-selector')[i];
    const options = select.querySelectorAll('option');

    if (options.length > 1) {
      let option = new Option('Pick ' + indef + ' ' + productOptions[i][i], '');

      select.add(option, select.firstChild);
      select.selectedIndex = 0;
    }
  }
}- 點擊「儲存」。
編輯產品頁面範本
若要編輯產品頁面範本:
- 在「區段」目錄中,按一下
product-template.liquid。 - 找到以下程式碼:
{% assign variant = product.selected_or_first_available_variant %}將其取代為:
{% assign variant = product.selected_variant %}- 找到下列程式碼,並將其刪除:
{% if variant == product.selected_or_first_available_variant %} selected="selected" {% endif %}- 找到這段程式碼出現的所有地方:
{% assign featured_image = product.selected_or_first_available_variant.featured_image | default: product.featured_image %}將其取代為:
{% assign featured_image = product.selected_variant.featured_image | default: product.featured_image %}-
找到程式碼
{% schema %}。在其上方新的一行,貼上下列程式碼:
{% if current_variant == blank %}
  <script>
    var productOptions = [];

    {% for option in product.options -%}
      var optionObj = {};
      optionObj[{{ forloop.index0 }}] = "{{ product.options[forloop.index0] }}";
      productOptions.push(optionObj);
    {%- endfor %}
  </script>
{% endif %}
其應類似下列所示:
{% if current_variant == blank %}
  <script>
    var productOptions = [];

    {% for option in product.options -%}
      var optionObj = {};
      optionObj[{{ forloop.index0 }}] = "{{ product.options[forloop.index0] }}";
      productOptions.push(optionObj);
    {%- endfor %}
  </script>
{% endif %}

{% schema %}- 點擊「儲存」。
變更「加入購物車」按鈕語言設定
您可以變更「加入購物車」按鈕的語言設定,讓商品在顧客未選取某項商品時不會顯示為「無法供貨」。
步驟如下:
- 在 Shopify 管理介面 中,前往「線上商店」>「佈景主題」。
- 找到要編輯的佈景主題,然後依序點擊「…」>「編輯預設佈景主題內容」。
- 在「篩選商品」搜尋列中,開始輸入 unavailable 以顯示「無法供貨」的翻譯。
- 以「選取項目」(Make a selection) 取代文字「無法供貨」。
- 點擊「儲存」。
Narrative 的步驟
請依照以下步驟,為 Narrative 套用自訂內容:
編輯您佈景主題的 JavaScipt 檔案
- 在 Shopify 管理介面 中,前往「線上商店」>「佈景主題」。
- 找到要編輯的佈景主題,按一下「...」按鈕以開啟動作選單,然後點擊「編輯程式碼」。
- 在「資產」目錄中,按一下
custom.js。 - 將以下程式碼新增到檔案的底部:
(function() {
  if (typeof(productOptions) != "undefined") {
    for (i = 0; i < productOptions.length; i++) {
      const vowels = ['a', 'e', 'i', 'o', 'u'];
      const firstOptionLetter = productOptions[i][i][0].toLowerCase();
      let indef = 'a';

      if (vowels.includes(firstOptionLetter)) {
        indef = 'an';
      };

      const select = document.querySelectorAll('.single-option-selector')[i];
      const options = select.querySelectorAll('option');

      if (options.length > 1) {
        let option = new Option('Pick ' + indef + ' ' + productOptions[i][i], '');

        select.add(option, select.firstChild);
        select.selectedIndex = 0;
      }
    }
  }
})();- 點擊「儲存」。
編輯產品頁面範本
若要編輯產品頁面範本:
- 在「區段」目錄中,按一下
product-template.liquid。 - 找到以下程式碼:
{%- assign current_variant = product.selected_or_first_available_variant -%}將其取代為:
{%- if product.variants.size > 1 -%}
  {%- assign current_variant = product.selected_variant -%}
{%- else -%}
  {%- assign current_variant = product.first_available_variant -%}
{%- endif -%}-
找到程式碼
{% schema %}。在其上方新的一行,貼上下列程式碼:
{% if current_variant == blank %}
  <script>
    var productOptions = [];

    {% for option in product.options -%}
      var optionObj = {};
      optionObj[{{ forloop.index0 }}] = "{{ product.options[forloop.index0] }}";
      productOptions.push(optionObj);
    {%- endfor %}
  </script>
{% endif %}
其應類似下列所示:
{% if current_variant == blank %}
  <script>
    var productOptions = [];

    {% for option in product.options -%}
      var optionObj = {};
      optionObj[{{ forloop.index0 }}] = "{{ product.options[forloop.index0] }}";
      productOptions.push(optionObj);
    {%- endfor %}
  </script>
{% endif %}

{% schema %}- 點擊「儲存」。
變更「加入購物車」按鈕語言設定
您可以變更「加入購物車」按鈕的語言設定,讓商品在顧客未選取某項商品時不會顯示為「無法供貨」。
步驟如下:
- 在 Shopify 管理介面 中,前往「線上商店」>「佈景主題」。
- 找到要編輯的佈景主題,然後依序點擊「…」>「編輯預設佈景主題內容」。
- 在「篩選商品」搜尋列中,開始輸入 unavailable 以顯示「無法供貨」的翻譯。
- 以「選取項目」(Make a selection) 取代文字「無法供貨」。
- 點擊「儲存」。
Simple 的步驟
請依照以下步驟,為 Simple 套用自訂內容:
編輯您佈景主題的 JavaScipt 檔案
- 在 Shopify 管理介面 中,前往「線上商店」>「佈景主題」。
- 找到要編輯的佈景主題,按一下「...」按鈕以開啟動作選單,然後點擊「編輯程式碼」。
- 在「資產」目錄中,按一下
theme.js或theme.js.liquid。 -
找到程式碼
initProductVariant: function() {。請在其下方找到下列程式碼:
// Clean up variant labels if the Shopify-defined
// defaults are the only ones left
Slate.simplifyVariantLabels(this.productSingleObject, this.$container);
在下方新的一行,新增下列程式碼:
if (typeof(productOptions) != "undefined") {
  for (i = 0; i < productOptions.length; i++) {
    const vowels = ['a', 'e', 'i', 'o', 'u'];
    const firstOptionLetter = productOptions[i][i][0].toLowerCase();
    let indef = 'a';

    if (vowels.includes(firstOptionLetter)) {
      indef = 'an';
    };

    const select = document.querySelectorAll('.single-option-selector')[i];
    const options = select.querySelectorAll('option');

    if (options.length > 1) {
      let option = new Option('Pick ' + indef + ' ' + productOptions[i][i], '');

      select.add(option, select.firstChild);
      select.selectedIndex = 0;
    }
  }
}
其應類似下列所示:
// Clean up variant labels if the Shopify-defined
// defaults are the only ones left
Slate.simplifyVariantLabels(this.productSingleObject, this.$container);

if (typeof(productOptions) != "undefined") {
  for (i = 0; i < productOptions.length; i++) {
    const vowels = ['a', 'e', 'i', 'o', 'u'];
    const firstOptionLetter = productOptions[i][i][0].toLowerCase();
    let indef = 'a';

    if (vowels.includes(firstOptionLetter)) {
      indef = 'an';
    };

    const select = document.querySelectorAll('.single-option-selector')[i];
    const options = select.querySelectorAll('option');

    if (options.length > 1) {
      let option = new Option('Pick ' + indef + ' ' + productOptions[i][i], '');

      select.add(option, select.firstChild);
      select.selectedIndex = 0;
    }
  }
}- 點擊「儲存」。
編輯產品頁面範本
若要編輯產品頁面範本:
- 在「區段」目錄中,按一下
product-template.liquid。 - 找到以下程式碼:
{% assign current_variant = product.selected_or_first_available_variant %}將其取代為:
{% assign current_variant = product.selected_variant %}- 找到下列程式碼,並將其刪除:
{% if variant == product.selected_or_first_available_variant %} selected="selected" {% endif %}-
找到程式碼
{% schema %}。在其上方新的一行,貼上下列程式碼:
{% if current_variant == blank %}
  <script>
    var productOptions = [];

    {% for option in product.options -%}
      var optionObj = {};
      optionObj[{{ forloop.index0 }}] = "{{ product.options[forloop.index0] }}";
      productOptions.push(optionObj);
    {%- endfor %}
  </script>
{% endif %}
其應類似下列所示:
{% if current_variant == blank %}
  <script>
    var productOptions = [];

    {% for option in product.options -%}
      var optionObj = {};
      optionObj[{{ forloop.index0 }}] = "{{ product.options[forloop.index0] }}";
      productOptions.push(optionObj);
    {%- endfor %}
  </script>
{% endif %}

{% schema %}- 點擊「儲存」。
變更「加入購物車」按鈕語言設定
您可以變更「加入購物車」按鈕的語言設定,讓商品在顧客未選取某項商品時不會顯示為「無法供貨」。
步驟如下:
- 在 Shopify 管理介面 中,前往「線上商店」>「佈景主題」。
- 找到要編輯的佈景主題,然後依序點擊「…」>「編輯預設佈景主題內容」。
- 在「篩選商品」搜尋列中,開始輸入 unavailable 以顯示「無法供貨」的翻譯。
- 以「選取項目」(Make a selection) 取代文字「無法供貨」。
- 點擊「儲存」。
Supply 的步驟
請依照以下步驟,為 Supply 套用自訂內容:
編輯您佈景主題的 JavaScipt 檔案
- 在 Shopify 管理介面 中,前往「線上商店」>「佈景主題」。
- 找到要編輯的佈景主題,按一下「...」按鈕以開啟動作選單,然後點擊「編輯程式碼」。
- 在「資產」目錄中,按一下
theme.js或theme.js.liquid。 -
找到程式碼
initProductVariant: function() {。請在其下方找到下列程式碼:
// Clean up variant labels if the Shopify-defined
// defaults are the only ones left
this.simplifyVariantLabels(this.productSingleObject);
在下方新的一行,新增下列程式碼:
if (typeof(productOptions) != "undefined") {
  for (i = 0; i < productOptions.length; i++) {
    const vowels = ['a', 'e', 'i', 'o', 'u'];
    const firstOptionLetter = productOptions[i][i][0].toLowerCase();
    let indef = 'a';

    if (vowels.includes(firstOptionLetter)) {
      indef = 'an';
    };

    const select = document.querySelectorAll('.single-option-selector')[i];
    const options = select.querySelectorAll('option');

    if (options.length > 1) {
      let option = new Option('Pick ' + indef + ' ' + productOptions[i][i], '');

      select.add(option, select.firstChild);
      select.selectedIndex = 0;
    }
  }
}
其應類似下列所示:
// Clean up variant labels if the Shopify-defined
// defaults are the only ones left
this.simplifyVariantLabels(this.productSingleObject);

if (typeof(productOptions) != "undefined") {
  for (i = 0; i < productOptions.length; i++) {
    const vowels = ['a', 'e', 'i', 'o', 'u'];
    const firstOptionLetter = productOptions[i][i][0].toLowerCase();
    let indef = 'a';

    if (vowels.includes(firstOptionLetter)) {
      indef = 'an';
    };

    const select = document.querySelectorAll('.single-option-selector')[i];
    const options = select.querySelectorAll('option');

    if (options.length > 1) {
      let option = new Option('Pick ' + indef + ' ' + productOptions[i][i], '');

      select.add(option, select.firstChild);
      select.selectedIndex = 0;
    }
  }
}- 點擊「儲存」。
編輯產品頁面範本
若要編輯產品頁面範本:
- 在「區段」目錄中,按一下
product-template.liquid。 - 找到以下程式碼:
{% assign variant = product.selected_or_first_available_variant %}將其取代為:
{% assign variant = product.selected_variant %}- 找到下列程式碼,並將其刪除:
{% if variant == product.selected_or_first_available_variant %} selected="selected" {% endif %}- 找到這段程式碼出現的所有地方:
{% assign featured_image = product.selected_or_first_available_variant.featured_image | default: product.featured_image %}將其取代為:
{% assign featured_image = product.selected_variant.featured_image | default: product.featured_image %}-
找到程式碼
{% schema %}。在其上方新的一行,貼上下列程式碼:
{% if current_variant == blank %}
  <script>
    var productOptions = [];

    {% for option in product.options -%}
      var optionObj = {};
      optionObj[{{ forloop.index0 }}] = "{{ product.options[forloop.index0] }}";
      productOptions.push(optionObj);
    {%- endfor %}
  </script>
{% endif %}
其應類似下列所示:
{% if current_variant == blank %}
  <script>
    var productOptions = [];

    {% for option in product.options -%}
      var optionObj = {};
      optionObj[{{ forloop.index0 }}] = "{{ product.options[forloop.index0] }}";
      productOptions.push(optionObj);
    {%- endfor %}
  </script>
{% endif %}

{% schema %}- 點擊「儲存」。
變更「加入購物車」按鈕語言設定
您可以變更「加入購物車」按鈕的語言設定,讓商品在顧客未選取某項商品時不會顯示為「無法供貨」。
步驟如下:
- 在 Shopify 管理介面 中,前往「線上商店」>「佈景主題」。
- 找到要編輯的佈景主題,然後依序點擊「…」>「編輯預設佈景主題內容」。
- 在「篩選商品」搜尋列中,開始輸入 unavailable 以顯示「無法供貨」的翻譯。
- 以「選取項目」(Make a selection) 取代文字「無法供貨」。
- 點擊「儲存」。
Venture 的步驟
請依照以下步驟,為 Venture 套用自訂內容:
編輯您佈景主題的 JavaScipt 檔案
- 在 Shopify 管理介面 中,前往「線上商店」>「佈景主題」。
- 找到要編輯的佈景主題,按一下「...」按鈕以開啟動作選單,然後點擊「編輯程式碼」。
- 在「資產」目錄中,按一下
theme.js或theme.js.liquid。 - 將以下程式碼新增到檔案的底部:
(function() {
  if (typeof(productOptions) != "undefined") {
    for (i = 0; i < productOptions.length; i++) {
      const vowels = ['a', 'e', 'i', 'o', 'u'];
      const firstOptionLetter = productOptions[i][i][0].toLowerCase();
      let indef = 'a';

      if (vowels.includes(firstOptionLetter)) {
        indef = 'an';
      };

      const select = document.querySelectorAll('.single-option-selector')[i];
      const options = select.querySelectorAll('option');

      if (options.length > 1) {
        let option = new Option('Pick ' + indef + ' ' + productOptions[i][i], '');

        select.add(option, select.firstChild);
        select.selectedIndex = 0;
      }
    }
  }
})();- 找到以下程式碼:
this.currentVariant = this._getVariantFromOptions();將其取代為:
this.currentVariant = this._getVariantFromOptions() || {};-
找到程式碼
_updatePrice: function(variant)。取代以下程式碼:
if (
  variant.price === this.currentVariant.price &&
  variant.compare_at_price === this.currentVariant.compare_at_price
) {
  return;
}
使用:
/* if (
  variant.price === this.currentVariant.price &&
  variant.compare_at_price === this.currentVariant.compare_at_price
) {
  return;
} */- 點擊「儲存」。
編輯產品頁面範本
若要編輯產品頁面範本:
- 在「區段」目錄中,按一下
product-template.liquid。 - 找到以下程式碼:
{% assign current_variant = product.selected_or_first_available_variant %}將其取代為:
{% if product.variants.size > 1 %}
  {% assign current_variant = product.selected_variant %}
{% else %}
  {% assign current_variant = product.first_available_variant %}
{% endif %}- 找到下列程式碼,並將其刪除:
{% if variant == product.selected_or_first_available_variant %} selected="selected" {% endif %}如果您無法找到上述程式碼,則請找到此程式碼並將其刪除:
{% if variant == current_variant %} selected="selected" {% endif %}- 找到這段程式碼出現的所有地方:
{% unless current_variant.available %}將其取代為:
{% unless current_variant.available or product.variants.size == 1 and variant.available %}- 找到以下程式碼:
{% unless current_variant.available or product.variants.size == 1 and variant.available %}
  {{ 'products.product.sold_out' | t }}
{% else %}
  {{ 'products.product.add_to_cart' | t }}
{% endunless %}
將其取代為:
{% if current_variant == blank %}
  {{ 'products.product.unavailable' | t }}
{% else %}
  {% unless current_variant.available or product.variants.size == 1 and variant.available %}
    {{ 'products.product.sold_out' | t }}
  {% else %}
    {{ 'products.product.add_to_cart' | t }}
  {% endunless %}
{% endif %}-
找到程式碼
{% schema %}。在其上方新的一行,貼上下列程式碼:
{% if current_variant == blank %}
  <script>
    var productOptions = [];

    {% for option in product.options -%}
      var optionObj = {};
      optionObj[{{ forloop.index0 }}] = "{{ product.options[forloop.index0] }}";
      productOptions.push(optionObj);
    {%- endfor %}
  </script>
{% endif %}
其應類似下列所示:
{% if current_variant == blank %}
  <script>
    var productOptions = [];

    {% for option in product.options -%}
      var optionObj = {};
      optionObj[{{ forloop.index0 }}] = "{{ product.options[forloop.index0] }}";
      productOptions.push(optionObj);
    {%- endfor %}
  </script>
{% endif %}

{% schema %}- 點擊「儲存」。
變更「加入購物車」按鈕語言設定
您可以變更「加入購物車」按鈕的語言設定,讓商品在顧客未選取某項商品時不會顯示為「無法供貨」。
步驟如下:
- 在 Shopify 管理介面 中,前往「線上商店」>「佈景主題」。
- 找到要編輯的佈景主題,然後依序點擊「…」>「編輯預設佈景主題內容」。
- 在「篩選商品」搜尋列中,開始輸入 unavailable 以顯示「無法供貨」的翻譯。
- 以「選取項目」(Make a selection) 取代文字「無法供貨」。
- 點擊「儲存」。
非區段式佈景主題的步驟
將提示新增至子類下拉式選單
- 在「程式碼片段」目錄中,按一下「新增程式碼片段」。
- 將新的程式碼片段命名為
pick-an-option。 - 在新的程式碼片段檔案,貼上這段託管在 GitHub 上託管的程式碼。
- 點擊「儲存」。
- 在「版面配置」目錄中,按一下
theme.liquid。 -
找到靠近檔案底部的
</body>結束標籤。在</body>結束標籤正上方開新一行,並貼上下列程式碼:
{% render 'pick-an-option' %}- 點擊「儲存」。
-
找到含有加入購物車表單的檔案。這會將
action屬性設定至/cart/add。 它應該會是下列四個檔案之一:-
「範本」底下的
product.liquid範本 -
「版面配置」底下的
theme.liquid版面配置 -
「程式碼片段」底下的
product.liquid程式碼片段 -
「程式碼片段」底下的
single-product.liquid程式碼片段
-
「範本」底下的
找到表單內的這段程式碼:
<option {% if variant == product.selected_or_first_available_variant %} selected="selected" {% endif %} data-sku="{{ variant.sku }}" value="{{ variant.id }}">{{ variant.title }} - {{ variant.price | money_with_currency }}</option>或者找到表單內的這段程式碼:
<option {% if variant == current_variant %} selected="selected" {% endif %} data-sku="{{ variant.sku }}" value="{{ variant.id }}">{{ variant.title }} - {{ variant.price | money_with_currency }}</option>使用下列程式碼區塊來取代程式碼:
<option {% if forloop.length <= 1 and variant == product.selected_or_first_available_variant %} selected="selected" {% endif %} data-sku="{{ variant.sku }}" value="{{ variant.id }}">{{ variant.title }} - {{ variant.price | money_with_currency }}</option>如果您使用的是 Minimal、Pop 或 Supply,請找到這段程式碼出現的所有地方:
{% assign featured_image = product.selected_or_first_available_variant.featured_image | default: product.featured_image %}使用下列程式碼區塊來取代程式碼:
{% assign featured_image = product.selected_variant.featured_image | default: product.featured_image %}若您使用其他 Shopify 舊版佈景主題,請尋找此段程式碼:
{% assign current_variant = product.selected_or_first_available_variant %}使用下列程式碼區塊來取代程式碼:
{% assign current_variant = product.selected_variant %}點擊「儲存」。
變更「加入購物車」按鈕語言設定
您可以變更「加入購物車」按鈕的語言設定,讓商品在顧客未選取某項商品時不會顯示為「無法供貨」。
步驟如下:
- 在 Shopify 管理介面 中,前往「線上商店」>「佈景主題」。
- 找到要編輯的佈景主題,然後依序點擊「…」>「編輯預設佈景主題內容」。
- 在「篩選商品」搜尋列中,開始輸入 unavailable 以顯示「無法供貨」的翻譯。
- 以「選取項目」(Make a selection) 取代文字「無法供貨」。
- 點擊「儲存」。