商品ページにサイズ表を追加する
お客様が購入前にサイズを知る必要があるアパレルアイテムを販売する場合、商品ページにカスタムサイズ表を追加できます。
サイズ表の参照が必要なすべての商品には、次のような [サイズ] オプションが必要です。 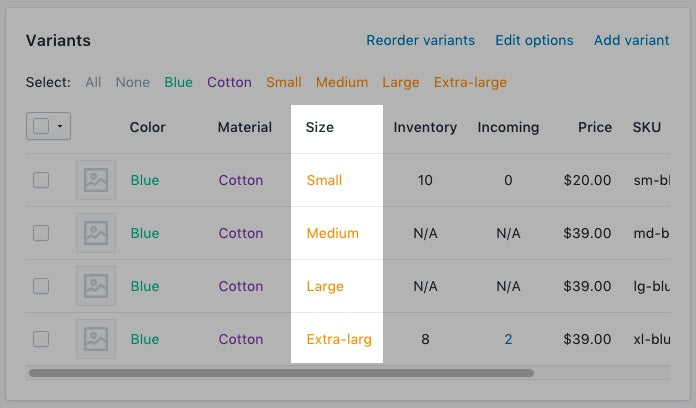
サイズ表のページを作成する
- 管理画面からオンラインストア > ページに移動します。
- ページの追加をクリック
-
ページタイトルを入力します。
- サイト全体に表示されるサイズ表を作成する場合、ページタイトルを
Size Chartと入力します。[検索結果のプレビュー] セクションでは、ページのURLが/size-chartで終わる必要があります。 - 特定の販売元からの商品にのみ表示される表を作成する場合、販売元の名前の後に
Size Chartを入力します。
たとえば、販売元がGreat Owlsの場合、ページタイトルをGreat Owls Size Chartと入力します。[検索結果のプレビュー] セクションでは、ページのURLが/great-owls-size-chartで終わる必要があります。 - 特定のタイプの商品にのみ表示される表を作成する場合、商品タイプの後に
Size Chartを入力します
たとえば、靴専用のサイズ表を表示する場合、ページタイトルをShoes Size Chartと入力します。[検索結果のプレビュー] セクションでは、ページのURLが/shoes-size-chartで終わる必要があります。
- サイト全体に表示されるサイズ表を作成する場合、ページタイトルを
[コンテンツ] ボックスでは、サイズ表の情報が記載された表を作成します。表をカスタマイズし、希望する表示となるようにします。

[公開 / 非公開] セクションでは、ページが [公開] に設定されていることを確認します。
[保存] をクリックします。
- Shopifyアプリで [...] ボタンをタップします。
- 販売チャネルセクションで、[オンラインストア] をタップします。
- [ページ] をタップします。
- ページの追加をクリック
-
ページタイトルを入力します。
- サイト全体に表示されるサイズ表を作成する場合、ページタイトルを
Size Chartと入力します。[検索結果のプレビュー] セクションでは、ページのURLが/size-chartで終わる必要があります。 - 特定の販売元からの商品にのみ表示される表を作成する場合、販売元の名前の後に
Size Chartを入力します。
たとえば、販売元がGreat Owlsの場合、ページタイトルをGreat Owls Size Chartと入力します。[検索結果のプレビュー] セクションでは、ページのURLが/great-owls-size-chartで終わる必要があります。 - 特定のタイプの商品にのみ表示される表を作成する場合、商品タイプの後に
Size Chartを入力します
たとえば、靴専用のサイズ表を表示する場合、ページタイトルをShoes Size Chartと入力します。[検索結果のプレビュー] セクションでは、ページのURLが/shoes-size-chartで終わる必要があります。
- サイト全体に表示されるサイズ表を作成する場合、ページタイトルを
[コンテンツ] ボックスでは、サイズ表の情報が記載された表を作成します。表をカスタマイズし、希望する表示となるようにします。
[公開 / 非公開] セクションでは、ページが [公開] に設定されていることを確認します。
[保存] をクリックします。
コードエディタに移動する
- 管理画面から [オンラインストア] > [テーマ] に移動します。
- 編集するテーマを見つけて、[...] ボタンをクリックしてアクションメニューを開き、[コードを編集する] をクリックします。
- Shopifyアプリで [...] ボタンをタップします。
- 販売チャネルセクションで、[オンラインストア] をタップします。
- [テーマを管理する] をタップします。
- 編集するテーマを見つけて、[...] ボタンをクリックしてアクションメニューを開き、[コードを編集する] をクリックします。
- Shopifyアプリで [...] ボタンをタップします。
- 販売チャネルセクションで、[オンラインストア] をタップします。
- [テーマを管理する] をタップします。
- 編集するテーマを見つけて、[...] ボタンをクリックしてアクションメニューを開き、[コードを編集する] をクリックします。
次のいずれかを選択してサイズ表のスニペットを作成する
サイズ表のスニペットを作成する
- スニペットディレクトリーで、[新しいスニペットを追加する] をクリックします。
スニペットに
size-chartと名付け、[スニペットを作成する] をクリックします。次のコードを
size-chartのスニペットにコピーします。
<div class="pop-up-modal">
<div class="pop-up-content">
<span class="close-button">×</span>
<span class="size-chart-content">{{ pages.size-chart.content }}</span>
</div>
</div>
<script>
const modal = document.querySelector('.pop-up-modal');
const trigger = document.querySelector('.trigger-pop-up');
const closeButton = document.querySelector('.close-button');
function toggleModal() {
modal.classList.toggle('show-pop-up');
}
function windowOnClick(event) {
if (event.target === modal) {
toggleModal();
}
}
trigger.addEventListener('click', toggleModal);
closeButton.addEventListener('click', toggleModal);
window.addEventListener('click', windowOnClick);
</script>
<style>
.pop-up-modal {
position: fixed;
left: 0;
top: 0;
width: 100%;
height: 100%;
background-color: rgba(0, 0, 0, 0.5);
opacity: 0;
display: none;
transform: scale(1.1);
transition: visibility 0s linear 0.25s, opacity 0.25s 0s, transform 0.25s;
overflow:auto;
}
.pop-up-content {
position: absolute;
top: 8%;
left: 50%;
transform: translate(-50%, 0);
background-color: white;
padding: 1rem 1.5rem;
width: auto;
border-radius: 0.5rem;
}
.pop-up-content table {
table-layout: auto;
}
.close-button {
float: right;
width: 1.5rem;
line-height: 1.5rem;
text-align: center;
cursor: pointer;
border-radius: 0.25rem;
background-color: lightgray;
}
.close-button:hover {
background-color: darkgray;
}
.show-pop-up {
z-index: 12;
opacity: 1;
display: block;
transform: scale(1);
transition: visibility 0s linear 0s, opacity 0.25s 0s, transform 0.25s;
}
.trigger-pop-up {
margin: 10px 0 10px 0;
width: 100%;
}
@media only screen and (max-width: 749px) {
.pop-up-content,
.size-chart-content table {
width: 100%;
}
.size-chart-content th,
.size-chart-content td {
padding: 10px;
}
}
</style>{% block "note" %} テーマ「Simple」と「Minimal」のCSSスタイルを変更する必要があります。{% endblock %}
テーマ「Simple」を使用している場合、次のコードを使用します。
<div class="pop-up-modal">
<div class="pop-up-content">
<span class="close-button">×</span>
<span class="size-chart-content">{{ pages.size-chart.content }}</span>
</div>
</div>
<script>
const modal = document.querySelector('.pop-up-modal');
const trigger = document.querySelector('.trigger-pop-up');
const closeButton = document.querySelector('.close-button');
function toggleModal() {
modal.classList.toggle('show-pop-up');
}
function windowOnClick(event) {
if (event.target === modal) {
toggleModal();
}
}
trigger.addEventListener('click', toggleModal);
closeButton.addEventListener('click', toggleModal);
window.addEventListener('click', windowOnClick);
</script>
<style>
.pop-up-modal {
position: fixed;
left: 0;
top: 0;
width: 100%;
height: 100%;
background-color: rgba(0, 0, 0, 0.5);
opacity: 0;
display: none;
transform: scale(1.1);
transition: visibility 0s linear 0.25s, opacity 0.25s 0s, transform 0.25s;
overflow:auto;
}
.pop-up-content {
position: absolute;
top: 8%;
left: 50%;
transform: translate(-50%, 0);
background-color: white;
padding: 1rem 1.5rem;
width: auto;
border-radius: 0.5rem;
}
.pop-up-content table {
table-layout: auto;
}
.close-button {
float: right;
width: 1.5rem;
line-height: 1.5rem;
text-align: center;
cursor: pointer;
border-radius: 0.25rem;
background-color: lightgray;
}
.close-button:hover {
background-color: darkgray;
}
.show-pop-up {
z-index: 12;
opacity: 1;
display: block;
transform: scale(1);
transition: visibility 0s linear 0s, opacity 0.25s 0s, transform 0.25s;
}
.trigger-pop-up {
margin: 10px 0 10px 8px;
width: 50%;
}
@media only screen and (max-width: 749px) {
.pop-up-content,
.size-chart-content table {
width: 100%;
}
.size-chart-content th,
.size-chart-content td {
padding: 10px;
}
.trigger-pop-up {
width: 100%;
}
}
</style>テーマ「Minimal」を使用している場合は、次のコードを使用します。
<div class="pop-up-modal">
<div class="pop-up-content">
<span class="close-button">×</span>
<span class="size-chart-content">{{ pages.size-chart.content }}</span>
</div>
</div>
<script>
const modal = document.querySelector('.pop-up-modal');
const trigger = document.querySelector('.trigger-pop-up');
const closeButton = document.querySelector('.close-button');
function toggleModal() {
modal.classList.toggle('show-pop-up');
}
function windowOnClick(event) {
if (event.target === modal) {
toggleModal();
}
}
trigger.addEventListener('click', toggleModal);
closeButton.addEventListener('click', toggleModal);
window.addEventListener('click', windowOnClick);
</script>
<style>
.pop-up-modal {
position: fixed;
left: 0;
top: 0;
width: 100%;
height: 100%;
background-color: rgba(0, 0, 0, 0.5);
opacity: 0;
display: none;
transform: scale(1.1);
transition: visibility 0s linear 0.25s, opacity 0.25s 0s, transform 0.25s;
overflow:auto;
}
.pop-up-content {
position: absolute;
top: 8%;
left: 50%;
transform: translate(-50%, 0);
background-color: white;
padding: 1rem 1.5rem;
width: auto;
border-radius: 0.5rem;
}
.pop-up-content table {
table-layout: auto;
}
.close-button {
float: right;
width: 1.5rem;
line-height: 1.5rem;
text-align: center;
cursor: pointer;
border-radius: 0.25rem;
background-color: lightgray;
}
.close-button:hover {
background-color: darkgray;
}
.show-pop-up {
z-index: 12;
opacity: 1;
display: block;
transform: scale(1);
transition: visibility 0s linear 0s, opacity 0.25s 0s, transform 0.25s;
}
.trigger-pop-up {
margin: 10px 0 10px 0;
width: 100%;
}
@media only screen and (max-width: 749px) {
.pop-up-content,
.size-chart-content table {
width: 100%;
}
.size-chart-content th,
.size-chart-content td {
padding: 10px;
}
}
@media only screen and (min-width: 750px) {
.trigger-pop-up {
width: 50%;
}
}
</style>theme.liquidにサイズ表のスニペットを追加する
-
[レイアウト] ディレクトリで、
theme.liquidファイルをクリックして開きます。 -
</body>終了タグを探します。</body>終了タグのすぐ上に、次のコードを貼り付けます。
{% if request.page_type == 'product' %}
    {% if product.options contains 'Size' %}
        {% render 'size-chart' %}
    {% endif %}
{% endif %}
[サイズ表] ボタンを追加する
-
[セクション] ディレクトリで、
product-template.liquidファイルがない場合、product-template.liquidファイルまたはproduct.liquidファイルをクリックして開きます。 - [カートに追加する] ボタンの上に、次のコードを貼り付けます。
{% if product.options contains 'Size' %}
    <a class="trigger-pop-up btn">See Size Chart</a>
{% endif %}「カートに追加する」ボタンは、通常、<button type="submit" name="add"に似たもので始まります。ストアの運営言語が英語ではない場合、See Size Chartを使用したいテキストと置き換えます。
サイズ表のスニペットを作成する
- スニペットディレクトリーで、[新しいスニペットを追加する] をクリックします。
スニペットに
size-chartと名付け、[スニペットを作成する] をクリックします。次のコードを
size-chartのスニペットにコピーします。
{% assign chart = product.type | handleize | append: "-size-chart" %} {% unless
pages[chart].empty? or pages[chart].content == blank %}
<div class="pop-up-modal">
<div class="pop-up-content">
<span class="close-button">×</span>
<span class="size-chart-content">{{ pages[chart].content }}</span>
</div>
</div>
{% endunless %}
<script>
const modal = document.querySelector('.pop-up-modal');
const trigger = document.querySelector('.trigger-pop-up');
const closeButton = document.querySelector('.close-button');
function toggleModal() {
modal.classList.toggle('show-pop-up');
}
function windowOnClick(event) {
if (event.target === modal) {
toggleModal();
}
}
trigger.addEventListener('click', toggleModal);
closeButton.addEventListener('click', toggleModal);
window.addEventListener('click', windowOnClick);
</script>
<style>
.pop-up-modal {
position: fixed;
left: 0;
top: 0;
width: 100%;
height: 100%;
background-color: rgba(0, 0, 0, 0.5);
opacity: 0;
display: none;
transform: scale(1.1);
transition: visibility 0s linear 0.25s, opacity 0.25s 0s, transform 0.25s;
overflow:auto;
}
.pop-up-content {
position: absolute;
top: 8%;
left: 50%;
transform: translate(-50%, 0);
background-color: white;
padding: 1rem 1.5rem;
width: auto;
border-radius: 0.5rem;
}
.pop-up-content table {
table-layout: auto;
}
.close-button {
float: right;
width: 1.5rem;
line-height: 1.5rem;
text-align: center;
cursor: pointer;
border-radius: 0.25rem;
background-color: lightgray;
}
.close-button:hover {
background-color: darkgray;
}
.show-pop-up {
z-index: 12;
opacity: 1;
display: block;
transform: scale(1);
transition: visibility 0s linear 0s, opacity 0.25s 0s, transform 0.25s;
}
.trigger-pop-up {
margin: 10px 0 10px 0;
width: 100%;
}
@media only screen and (max-width: 749px) {
.pop-up-content,
.size-chart-content table {
width: 100%;
}
.size-chart-content th,
.size-chart-content td {
padding: 10px;
}
}
</style>テーマ「Simple」を使用している場合、.trigger-pop-upから</style>の真上までを次のコードに置き換えてください。
.trigger-pop-up {
  margin: 10px 0 10px 8px;
  width: 50%;
}
@media only screen and (max-width: 749px) {
  .pop-up-content,
  .size-chart-content table {
    width: 100%;
  }
  .size-chart-content th,
  .size-chart-content td {
    padding: 10px;
  }
  .trigger-pop-up {
    width: 100%;
  }
}Minimalのテーマを使用している場合、</style>終了タグの上に次のコードを追加します。
@media only screen and (min-width: 750px) {
  .trigger-pop-up {
    width: 50%;
  }
}
theme.liquidにサイズ表のスニペットを追加する
-
[レイアウト] ディレクトリで、
theme.liquidファイルをクリックして開きます。 -
</body>終了タグを探します。</body>終了タグのすぐ上に、次のコードを貼り付けます。
{% if request.page_type == 'product' %}
    {% if product.options contains 'Size' %}
      {% assign chart = product.type | handleize | append: "-size-chart" %}
      {% unless pages[chart].empty? or pages[chart].content == blank %}
        {% render 'size-chart' %}
      {% endunless %}
    {% endif %}
  {% endif %}
[サイズ表] ボタンを追加する
-
[セクション] ディレクトリで、
product-template.liquidファイルがない場合、product-template.liquidファイルまたはproduct.liquidファイルをクリックして開きます。 - [カートに追加する] ボタンの上に、次のコードを貼り付けます。
{% if product.options contains 'Size' %}
      {% assign chart = product.type | handleize | append: "-size-chart" %}
      {% unless pages[chart].empty? or pages[chart].content == blank %}
        <a class="trigger-pop-up btn">See Size Chart</a>
      {% endunless %}
{% endif %}「カートに追加する」ボタンは、通常、<button type="submit" name="add"に似たもので始まります。ストアの運営言語が英語ではない場合、See Size Chartを使用したいテキストと置き換えます。
サイズ表のスニペットを作成する
- スニペットディレクトリーで、[新しいスニペットを追加する] をクリックします。
スニペットに
size-chartと名付け、[スニペットを作成する] をクリックします。次のコードを
size-chartのスニペットにコピーします。
{% assign chart = product.vendor | handleize | append: "-size-chart" %} {%
unless pages[chart].empty? or pages[chart].content == blank %}
<div class="pop-up-modal">
<div class="pop-up-content">
<span class="close-button">×</span>
<span class="size-chart-content">{{ pages[chart].content }}</span>
</div>
</div>
{% endunless %}
<script>
const modal = document.querySelector('.pop-up-modal');
const trigger = document.querySelector('.trigger-pop-up');
const closeButton = document.querySelector('.close-button');
function toggleModal() {
modal.classList.toggle('show-pop-up');
}
function windowOnClick(event) {
if (event.target === modal) {
toggleModal();
}
}
trigger.addEventListener('click', toggleModal);
closeButton.addEventListener('click', toggleModal);
window.addEventListener('click', windowOnClick);
</script>
<style>
.pop-up-modal {
position: fixed;
left: 0;
top: 0;
width: 100%;
height: 100%;
background-color: rgba(0, 0, 0, 0.5);
opacity: 0;
display: none;
transform: scale(1.1);
transition: visibility 0s linear 0.25s, opacity 0.25s 0s, transform 0.25s;
overflow:auto;
}
.pop-up-content {
position: absolute;
top: 8%;
left: 50%;
transform: translate(-50%, 0);
background-color: white;
padding: 1rem 1.5rem;
width: auto;
border-radius: 0.5rem;
}
.pop-up-content table {
table-layout: auto;
}
.close-button {
float: right;
width: 1.5rem;
line-height: 1.5rem;
text-align: center;
cursor: pointer;
border-radius: 0.25rem;
background-color: lightgray;
}
.close-button:hover {
background-color: darkgray;
}
.show-pop-up {
z-index: 12;
opacity: 1;
display: block;
transform: scale(1);
transition: visibility 0s linear 0s, opacity 0.25s 0s, transform 0.25s;
}
.trigger-pop-up {
margin: 10px 0 10px 0;
width: 100%;
}
@media only screen and (max-width: 749px) {
.pop-up-content,
.size-chart-content table {
width: 100%;
}
.size-chart-content th,
.size-chart-content td {
padding: 10px;
}
}
</style>テーマ「Simple」を使用している場合、.trigger-pop-upから</style>の真上までを次のコードに置き換えてください。
.trigger-pop-up {
  margin: 10px 0 10px 8px;
  width: 50%;
}
@media only screen and (max-width: 749px) {
  .pop-up-content,
  .size-chart-content table {
    width: 100%;
  }
  .size-chart-content th,
  .size-chart-content td {
    padding: 10px;
  }
  .trigger-pop-up {
    width: 100%;
  }
}Minimalのテーマを使用している場合、</style>終了タグの上に次のコードを追加します。
@media only screen and (min-width: 750px) {
  .trigger-pop-up {
    width: 50%;
  }
}
theme.liquidにサイズ表のスニペットを追加する
-
[レイアウト] ディレクトリで、
theme.liquidファイルをクリックして開きます。 -
</body>終了タグを探します。</body>終了タグのすぐ上に、次のコードを貼り付けます。
{% if request.page_type == 'product' %}
    {% if product.options contains 'Size' %}
      {% assign chart = product.vendor | handleize | append: "-size-chart" %}
      {% unless pages[chart].empty? or pages[chart].content == blank %}
        {% render 'size-chart' %}
      {% endunless %}
    {% endif %}
  {% endif %}
[サイズ表] ボタンを追加する
-
[セクション] ディレクトリで、
product-template.liquidファイルがない場合、product-template.liquidファイルまたはproduct.liquidファイルをクリックして開きます。 - [カートに追加する] ボタンの上に、次のコードを貼り付けます。
{% if product.options contains 'Size' %}
      {% assign chart = product.vendor | handleize | append: "-size-chart" %}
      {% unless pages[chart].empty? or pages[chart].content == blank %}
        <a class="trigger-pop-up btn">See Size Chart</a>
      {% endunless %}
{% endif %}「カートに追加する」ボタンは、通常、<button type="submit" name="add"に似たもので始まります。ストアの運営言語が英語ではない場合、See Size Chartを使用したいテキストと置き換えます。