Thêm bảng kích cỡ vào trang sản phẩm
Nếu bạn bán mặt hàng quần áo yêu cầu khách hàng phải biết kích cỡ của mình trước khi mua, bạn có thể thêm bảng kích cỡ tùy chỉnh vào trang sản phẩm.
Tất cả sản phẩm yêu cầu tham chiếu đến bảng kích cỡ phải có tùy chọn Kích cỡ: 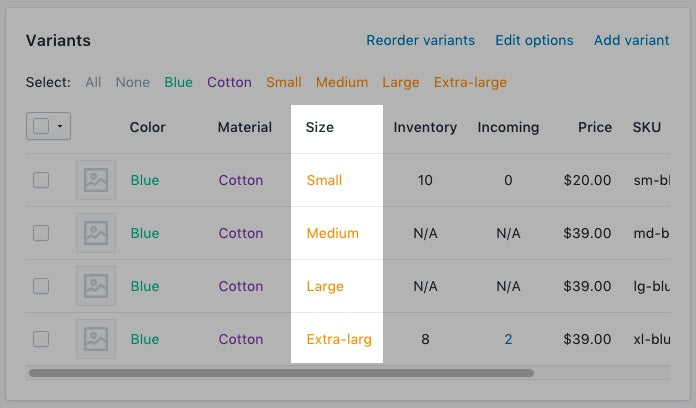
Trên trang này
Tạo trang bảng kích cỡ
- Trong trang quản trị Shopify, vào mục Cửa hàng trực tuyến > Trang.
- Nhấp vào Add page (Thêm trang).
-
Nhập tiêu đề trang.
- Nếu bạn muốn tạo bảng kích cỡ xuất hiện trên toàn trang web, hãy nhập
Size Chartcho tiêu đề trang. Trong mục Xem trước hồ sơ công cụ tìm kiếm*, URL của trang sẽ kết thúc bằng/size-chart. - Nếu bạn muốn tạo bảng kích cỡ chỉ xuất hiện trên sản phẩm từ một nhà cung cấp cụ thể, hãy nhập tên nhà cung cấp rồi nhập
Size Chart.
Ví dụ: Nếu nhà cung cấp của bạn có tên Great Owls, hãy nhậpGreat Owls Size Chartcho tiêu đề trang. Trong mục Xem trước hồ sơ công cụ tìm kiếm, URL của trang phải kết thúc bằng/great-owls-size-chart. - Nếu bạn muốn tạo bảng kích cỡ chỉ xuất hiện trên một loại sản phẩm cụ thể, hãy nhập loại sản phẩm rồi nhập
Size Chart.
Ví dụ: Nếu bạn muốn hiển thị bảng kích cỡ dành riêng cho giày, hãy nhậpShoes Size Chartcho tiêu đề trang. Trong mục Xem trước hồ sơ công cụ tìm kiếm, URL của trang phải kết thúc bằng/shoes-size-chart.
- Nếu bạn muốn tạo bảng kích cỡ xuất hiện trên toàn trang web, hãy nhập
Trong hộp Nội dung, tạo bảng chứa thông tin bảng kích cỡ của bạn. Tùy chỉnh bảng theo cách bạn muốn:

Trong mục Khả năng hiển thị, đảm bảo trang đã được đặt là Hiển thị.
Nhấp vào Save (Lưu).
- Trong ứng dụng Shopify, chạm vào nút ….
- Trong phần Sales channels (Kênh bán hàng), nhấn vào Cửa hàng trực tuyến.
- Chạm vào Trang.
- Nhấp vào Add page (Thêm trang).
-
Nhập tiêu đề trang.
- Nếu bạn muốn tạo bảng kích cỡ xuất hiện trên toàn trang web, hãy nhập
Size Chartcho tiêu đề trang. Trong mục Xem trước hồ sơ công cụ tìm kiếm*, URL của trang sẽ kết thúc bằng/size-chart. - Nếu bạn muốn tạo bảng kích cỡ chỉ xuất hiện trên sản phẩm từ một nhà cung cấp cụ thể, hãy nhập tên nhà cung cấp rồi nhập
Size Chart.
Ví dụ: Nếu nhà cung cấp của bạn có tên Great Owls, hãy nhậpGreat Owls Size Chartcho tiêu đề trang. Trong mục Xem trước hồ sơ công cụ tìm kiếm, URL của trang phải kết thúc bằng/great-owls-size-chart. - Nếu bạn muốn tạo bảng kích cỡ chỉ xuất hiện trên một loại sản phẩm cụ thể, hãy nhập loại sản phẩm rồi nhập
Size Chart.
Ví dụ: Nếu bạn muốn hiển thị bảng kích cỡ dành riêng cho giày, hãy nhậpShoes Size Chartcho tiêu đề trang. Trong mục Xem trước hồ sơ công cụ tìm kiếm, URL của trang phải kết thúc bằng/shoes-size-chart.
- Nếu bạn muốn tạo bảng kích cỡ xuất hiện trên toàn trang web, hãy nhập
Trong hộp Nội dung, tạo bảng chứa thông tin bảng kích cỡ của bạn. Tùy chỉnh bảng theo cách bạn muốn:
Trong mục Khả năng hiển thị, đảm bảo trang đã được đặt là Hiển thị.
Nhấp vào Save (Lưu).
Chuyển đến Trình chỉnh sửa mã
- Trên trang quản trị Shopify, vào mục Cửa hàng trực tuyến > Chủ đề.
- Tìm chủ đề bạn muốn chỉnh sửa, nhấp vào nút ... để mở menu thao tác, sau đó nhấp vào Chỉnh sửa mã.
- Trong ứng dụng Shopify, chạm vào nút ….
- Trong phần Sales channels (Kênh bán hàng), nhấn vào Cửa hàng trực tuyến.
- Nhấn vào Manage themes (Quản lý chủ đề).
- Tìm chủ đề bạn muốn chỉnh sửa, nhấp vào nút ... để mở menu thao tác, sau đó nhấp vào Chỉnh sửa mã.
- Trong ứng dụng Shopify, chạm vào nút ….
- Trong phần Sales channels (Kênh bán hàng), nhấn vào Cửa hàng trực tuyến.
- Nhấn vào Manage themes (Quản lý chủ đề).
- Tìm chủ đề bạn muốn chỉnh sửa, nhấp vào nút ... để mở menu thao tác, sau đó nhấp vào Chỉnh sửa mã.
Chọn một trong những nội dung sau và tạo đoạn mã bảng kích cỡ
Tạo đoạn mã bảng kích cỡ
- Trong thư mục Đoạn mã, nhấp vào Thêm đoạn mã mới.
Đặt tên cho đoạn mã
size-chartcủa bạn và nhấp vào Tạo đoạn mã:Sao chép nội dung sau vào đoạn mã
size-chartcủa bạn:
<div class="pop-up-modal">
<div class="pop-up-content">
<span class="close-button">×</span>
<span class="size-chart-content">{{ pages.size-chart.content }}</span>
</div>
</div>
<script>
const modal = document.querySelector('.pop-up-modal');
const trigger = document.querySelector('.trigger-pop-up');
const closeButton = document.querySelector('.close-button');
function toggleModal() {
modal.classList.toggle('show-pop-up');
}
function windowOnClick(event) {
if (event.target === modal) {
toggleModal();
}
}
trigger.addEventListener('click', toggleModal);
closeButton.addEventListener('click', toggleModal);
window.addEventListener('click', windowOnClick);
</script>
<style>
.pop-up-modal {
position: fixed;
left: 0;
top: 0;
width: 100%;
height: 100%;
background-color: rgba(0, 0, 0, 0.5);
opacity: 0;
display: none;
transform: scale(1.1);
transition: visibility 0s linear 0.25s, opacity 0.25s 0s, transform 0.25s;
overflow:auto;
}
.pop-up-content {
position: absolute;
top: 8%;
left: 50%;
transform: translate(-50%, 0);
background-color: white;
padding: 1rem 1.5rem;
width: auto;
border-radius: 0.5rem;
}
.pop-up-content table {
table-layout: auto;
}
.close-button {
float: right;
width: 1.5rem;
line-height: 1.5rem;
text-align: center;
cursor: pointer;
border-radius: 0.25rem;
background-color: lightgray;
}
.close-button:hover {
background-color: darkgray;
}
.show-pop-up {
z-index: 12;
opacity: 1;
display: block;
transform: scale(1);
transition: visibility 0s linear 0s, opacity 0.25s 0s, transform 0.25s;
}
.trigger-pop-up {
margin: 10px 0 10px 0;
width: 100%;
}
@media only screen and (max-width: 749px) {
.pop-up-content,
.size-chart-content table {
width: 100%;
}
.size-chart-content th,
.size-chart-content td {
padding: 10px;
}
}
</style>{% block "note" %} Bạn cần thực hiện một số thay đổi đối với kiểu CSS cho chủ đề Simple và chủ đề Minimal. {% endblock %}
Nếu bạn đang sử dụng chủ đề Simple, hãy dùng mã sau:
<div class="pop-up-modal">
<div class="pop-up-content">
<span class="close-button">×</span>
<span class="size-chart-content">{{ pages.size-chart.content }}</span>
</div>
</div>
<script>
const modal = document.querySelector('.pop-up-modal');
const trigger = document.querySelector('.trigger-pop-up');
const closeButton = document.querySelector('.close-button');
function toggleModal() {
modal.classList.toggle('show-pop-up');
}
function windowOnClick(event) {
if (event.target === modal) {
toggleModal();
}
}
trigger.addEventListener('click', toggleModal);
closeButton.addEventListener('click', toggleModal);
window.addEventListener('click', windowOnClick);
</script>
<style>
.pop-up-modal {
position: fixed;
left: 0;
top: 0;
width: 100%;
height: 100%;
background-color: rgba(0, 0, 0, 0.5);
opacity: 0;
display: none;
transform: scale(1.1);
transition: visibility 0s linear 0.25s, opacity 0.25s 0s, transform 0.25s;
overflow:auto;
}
.pop-up-content {
position: absolute;
top: 8%;
left: 50%;
transform: translate(-50%, 0);
background-color: white;
padding: 1rem 1.5rem;
width: auto;
border-radius: 0.5rem;
}
.pop-up-content table {
table-layout: auto;
}
.close-button {
float: right;
width: 1.5rem;
line-height: 1.5rem;
text-align: center;
cursor: pointer;
border-radius: 0.25rem;
background-color: lightgray;
}
.close-button:hover {
background-color: darkgray;
}
.show-pop-up {
z-index: 12;
opacity: 1;
display: block;
transform: scale(1);
transition: visibility 0s linear 0s, opacity 0.25s 0s, transform 0.25s;
}
.trigger-pop-up {
margin: 10px 0 10px 8px;
width: 50%;
}
@media only screen and (max-width: 749px) {
.pop-up-content,
.size-chart-content table {
width: 100%;
}
.size-chart-content th,
.size-chart-content td {
padding: 10px;
}
.trigger-pop-up {
width: 100%;
}
}
</style>Nếu bạn đang sử dụng chủ đề Minimal, hãy dùng mã sau:
<div class="pop-up-modal">
<div class="pop-up-content">
<span class="close-button">×</span>
<span class="size-chart-content">{{ pages.size-chart.content }}</span>
</div>
</div>
<script>
const modal = document.querySelector('.pop-up-modal');
const trigger = document.querySelector('.trigger-pop-up');
const closeButton = document.querySelector('.close-button');
function toggleModal() {
modal.classList.toggle('show-pop-up');
}
function windowOnClick(event) {
if (event.target === modal) {
toggleModal();
}
}
trigger.addEventListener('click', toggleModal);
closeButton.addEventListener('click', toggleModal);
window.addEventListener('click', windowOnClick);
</script>
<style>
.pop-up-modal {
position: fixed;
left: 0;
top: 0;
width: 100%;
height: 100%;
background-color: rgba(0, 0, 0, 0.5);
opacity: 0;
display: none;
transform: scale(1.1);
transition: visibility 0s linear 0.25s, opacity 0.25s 0s, transform 0.25s;
overflow:auto;
}
.pop-up-content {
position: absolute;
top: 8%;
left: 50%;
transform: translate(-50%, 0);
background-color: white;
padding: 1rem 1.5rem;
width: auto;
border-radius: 0.5rem;
}
.pop-up-content table {
table-layout: auto;
}
.close-button {
float: right;
width: 1.5rem;
line-height: 1.5rem;
text-align: center;
cursor: pointer;
border-radius: 0.25rem;
background-color: lightgray;
}
.close-button:hover {
background-color: darkgray;
}
.show-pop-up {
z-index: 12;
opacity: 1;
display: block;
transform: scale(1);
transition: visibility 0s linear 0s, opacity 0.25s 0s, transform 0.25s;
}
.trigger-pop-up {
margin: 10px 0 10px 0;
width: 100%;
}
@media only screen and (max-width: 749px) {
.pop-up-content,
.size-chart-content table {
width: 100%;
}
.size-chart-content th,
.size-chart-content td {
padding: 10px;
}
}
@media only screen and (min-width: 750px) {
.trigger-pop-up {
width: 50%;
}
}
</style>Thêm đoạn mã bảng kích cỡ vào theme.liquid
- Trong thư mục Bố cục, nhấp để mở tệp
theme.liquidcủa bạn. - Tìm thẻ có kết thúc là
</body>. Ngay phía trên thẻ có kết thúc là</body>, dán mã sau:
{% if request.page_type == 'product' %}
    {% if product.options contains 'Size' %}
        {% render 'size-chart' %}
    {% endif %}
{% endif %}
Thêm nút Bảng kích cỡ
- Trong thư mục Mục, nhấp để mở tệp
product-template.liquidhoặc tệpproduct.liquidnếu bạn không có tệpproduct-template.liquid. - Dán mã sau phía trên nút Thêm vào giỏ hàng:
{% if product.options contains 'Size' %}
    <a class="trigger-pop-up btn">See Size Chart</a>
{% endif %}
Nút Thêm vào giỏ hàng thường bắt đầu bằng <button type="submit" name="add". Nếu ngôn ngữ hoạt động của cửa hàng không phải tiếng Anh, hãy thay See Size Chart bằng văn bản bạn muốn sử dụng.
Tạo đoạn mã bảng kích cỡ
- Trong thư mục Đoạn mã, nhấp vào Thêm đoạn mã mới.
Đặt tên cho đoạn mã
size-chartcủa bạn và nhấp vào Tạo đoạn mã:Sao chép nội dung sau vào đoạn mã
size-chartcủa bạn:
{% assign chart = product.type | handleize | append: "-size-chart" %} {% unless
pages[chart].empty? or pages[chart].content == blank %}
<div class="pop-up-modal">
<div class="pop-up-content">
<span class="close-button">×</span>
<span class="size-chart-content">{{ pages[chart].content }}</span>
</div>
</div>
{% endunless %}
<script>
const modal = document.querySelector('.pop-up-modal');
const trigger = document.querySelector('.trigger-pop-up');
const closeButton = document.querySelector('.close-button');
function toggleModal() {
modal.classList.toggle('show-pop-up');
}
function windowOnClick(event) {
if (event.target === modal) {
toggleModal();
}
}
trigger.addEventListener('click', toggleModal);
closeButton.addEventListener('click', toggleModal);
window.addEventListener('click', windowOnClick);
</script>
<style>
.pop-up-modal {
position: fixed;
left: 0;
top: 0;
width: 100%;
height: 100%;
background-color: rgba(0, 0, 0, 0.5);
opacity: 0;
display: none;
transform: scale(1.1);
transition: visibility 0s linear 0.25s, opacity 0.25s 0s, transform 0.25s;
overflow:auto;
}
.pop-up-content {
position: absolute;
top: 8%;
left: 50%;
transform: translate(-50%, 0);
background-color: white;
padding: 1rem 1.5rem;
width: auto;
border-radius: 0.5rem;
}
.pop-up-content table {
table-layout: auto;
}
.close-button {
float: right;
width: 1.5rem;
line-height: 1.5rem;
text-align: center;
cursor: pointer;
border-radius: 0.25rem;
background-color: lightgray;
}
.close-button:hover {
background-color: darkgray;
}
.show-pop-up {
z-index: 12;
opacity: 1;
display: block;
transform: scale(1);
transition: visibility 0s linear 0s, opacity 0.25s 0s, transform 0.25s;
}
.trigger-pop-up {
margin: 10px 0 10px 0;
width: 100%;
}
@media only screen and (max-width: 749px) {
.pop-up-content,
.size-chart-content table {
width: 100%;
}
.size-chart-content th,
.size-chart-content td {
padding: 10px;
}
}
</style>Nếu bạn đang sử dụng chủ đề Simple, hãy thay thế .trigger-pop-up bằng </style> ngay phía trên với mã:
.trigger-pop-up {
  margin: 10px 0 10px 8px;
  width: 50%;
}
@media only screen and (max-width: 749px) {
  .pop-up-content,
  .size-chart-content table {
    width: 100%;
  }
  .size-chart-content th,
  .size-chart-content td {
    padding: 10px;
  }
  .trigger-pop-up {
    width: 100%;
  }
}
Nếu bạn đang dùng chủ đề Minimal, hãy thêm mã sau vào thẻ có kết thúc là </style>:
@media only screen and (min-width: 750px) {
  .trigger-pop-up {
    width: 50%;
  }
}
Thêm đoạn mã bảng kích cỡ vào theme.liquid
- Trong thư mục Bố cục, nhấp để mở tệp
theme.liquidcủa bạn. - Tìm thẻ có kết thúc là
</body>. Ngay phía trên thẻ có kết thúc là</body>, dán mã sau:
{% if request.page_type == 'product' %}
    {% if product.options contains 'Size' %}
      {% assign chart = product.type | handleize | append: "-size-chart" %}
      {% unless pages[chart].empty? or pages[chart].content == blank %}
        {% render 'size-chart' %}
      {% endunless %}
    {% endif %}
  {% endif %}
Thêm nút Bảng kích cỡ
- Trong thư mục Mục, nhấp để mở tệp
product-template.liquidhoặc tệpproduct.liquidnếu bạn không có tệpproduct-template.liquid. - Dán mã sau phía trên nút Thêm vào giỏ hàng:
{% if product.options contains 'Size' %}
      {% assign chart = product.type | handleize | append: "-size-chart" %}
      {% unless pages[chart].empty? or pages[chart].content == blank %}
        <a class="trigger-pop-up btn">See Size Chart</a>
      {% endunless %}
    {% endif %}
Nút Thêm vào giỏ hàng thường bắt đầu bằng <button type="submit" name="add". Nếu ngôn ngữ hoạt động của cửa hàng không phải tiếng Anh, hãy thay See Size Chart bằng văn bản bạn muốn sử dụng.
Tạo đoạn mã bảng kích cỡ
- Trong thư mục Đoạn mã, nhấp vào Thêm đoạn mã mới.
Đặt tên cho đoạn mã
size-chartcủa bạn và nhấp vào Tạo đoạn mã:Sao chép nội dung sau vào đoạn mã
size-chartcủa bạn:
{% assign chart = product.vendor | handleize | append: "-size-chart" %} {%
unless pages[chart].empty? or pages[chart].content == blank %}
<div class="pop-up-modal">
<div class="pop-up-content">
<span class="close-button">×</span>
<span class="size-chart-content">{{ pages[chart].content }}</span>
</div>
</div>
{% endunless %}
<script>
const modal = document.querySelector('.pop-up-modal');
const trigger = document.querySelector('.trigger-pop-up');
const closeButton = document.querySelector('.close-button');
function toggleModal() {
modal.classList.toggle('show-pop-up');
}
function windowOnClick(event) {
if (event.target === modal) {
toggleModal();
}
}
trigger.addEventListener('click', toggleModal);
closeButton.addEventListener('click', toggleModal);
window.addEventListener('click', windowOnClick);
</script>
<style>
.pop-up-modal {
position: fixed;
left: 0;
top: 0;
width: 100%;
height: 100%;
background-color: rgba(0, 0, 0, 0.5);
opacity: 0;
display: none;
transform: scale(1.1);
transition: visibility 0s linear 0.25s, opacity 0.25s 0s, transform 0.25s;
overflow:auto;
}
.pop-up-content {
position: absolute;
top: 8%;
left: 50%;
transform: translate(-50%, 0);
background-color: white;
padding: 1rem 1.5rem;
width: auto;
border-radius: 0.5rem;
}
.pop-up-content table {
table-layout: auto;
}
.close-button {
float: right;
width: 1.5rem;
line-height: 1.5rem;
text-align: center;
cursor: pointer;
border-radius: 0.25rem;
background-color: lightgray;
}
.close-button:hover {
background-color: darkgray;
}
.show-pop-up {
z-index: 12;
opacity: 1;
display: block;
transform: scale(1);
transition: visibility 0s linear 0s, opacity 0.25s 0s, transform 0.25s;
}
.trigger-pop-up {
margin: 10px 0 10px 0;
width: 100%;
}
@media only screen and (max-width: 749px) {
.pop-up-content,
.size-chart-content table {
width: 100%;
}
.size-chart-content th,
.size-chart-content td {
padding: 10px;
}
}
</style>Nếu bạn đang sử dụng chủ đề Simple, hãy thay thế .trigger-pop-up bằng </style> ngay phía trên với mã:
.trigger-pop-up {
  margin: 10px 0 10px 8px;
  width: 50%;
}
@media only screen and (max-width: 749px) {
  .pop-up-content,
  .size-chart-content table {
    width: 100%;
  }
  .size-chart-content th,
  .size-chart-content td {
    padding: 10px;
  }
  .trigger-pop-up {
    width: 100%;
  }
}
Nếu bạn đang dùng chủ đề Minimal, hãy thêm mã sau vào thẻ có kết thúc là </style>:
@media only screen and (min-width: 750px) {
  .trigger-pop-up {
    width: 50%;
  }
}
Thêm đoạn mã bảng kích cỡ vào theme.liquid
- Trong thư mục Bố cục, nhấp để mở tệp
theme.liquidcủa bạn. - Tìm thẻ có kết thúc là
</body>. Ngay phía trên thẻ có kết thúc là</body>, dán mã sau:
{% if request.page_type == 'product' %}
    {% if product.options contains 'Size' %}
      {% assign chart = product.vendor | handleize | append: "-size-chart" %}
      {% unless pages[chart].empty? or pages[chart].content == blank %}
        {% render 'size-chart' %}
      {% endunless %}
    {% endif %}
  {% endif %}
Thêm nút Bảng kích cỡ
- Trong thư mục Mục, nhấp để mở tệp
product-template.liquidhoặc tệpproduct.liquidnếu bạn không có tệpproduct-template.liquid. - Dán mã sau phía trên nút Thêm vào giỏ hàng:
{% if product.options contains 'Size' %}
      {% assign chart = product.vendor | handleize | append: "-size-chart" %}
      {% unless pages[chart].empty? or pages[chart].content == blank %}
        <a class="trigger-pop-up btn">See Size Chart</a>
      {% endunless %}
    {% endif %}
Nút Thêm vào giỏ hàng thường bắt đầu bằng <button type="submit" name="add". Nếu ngôn ngữ hoạt động của cửa hàng không phải tiếng Anh, hãy thay See Size Chart bằng văn bản bạn muốn sử dụng.