Agregar un botón Volver al inicio en páginas largas
Esta página fue impresa el Jul 26, 2024. Para acceder a la versión actual, por favor visita https://help.shopify.com/es/manual/online-store/themes/themes-by-shopify/vintage-themes/customizing-vintage-themes/add-back-to-top.
Si tienes páginas largas que requieren mucho desplazamiento, puedes agregar un botón Volver al inicio al tema.
En esta página
Crear un fragmento de volver al inicio
- Desde el panel de control de Shopify, ve a Tienda online > Temas.
- Busca el tema que desees editar, haz clic en el botón … para abrir el menú de acciones y, luego, haz clic en Editar código.
- En el directorio Fragmentos, haz clic en Agregar un nuevo fragmento.
- Asigna a tu fragmento el nombre
back-to-the-top, luego haz clic en Crear fragmento. Tu archivo del fragmento se abrirá en el editor de código. - Pega el siguiente código en tu archivo recién creado
back-to-the-top:
{% comment %}
Reduce below value if you need the back to the top button to appear higher up on the page.
That value is in pixels.
{% endcomment %}
{% assign vertical_offset_for_trigger = 300 %}
{% comment %}
Vertical offset from bottom of browser for the position of the button.
{% endcomment %}
{% assign position_from_bottom = '6em' %}
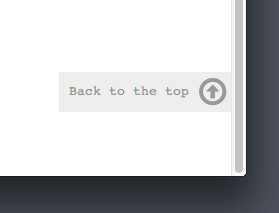
<a id="BackToTop" href="#" title="Back to the top" class="back-to-top hide">
<span>Back to the top</span> <i class="fa fa-arrow-circle-o-up fa-2x"></i>
</a>
{{ '//netdna.bootstrapcdn.com/font-awesome/4.0.3/css/font-awesome.min.css' | stylesheet_tag }}
<style>
.back-to-top {
position: fixed;
bottom: {{ position_from_bottom }};
right: 0px;
text-decoration: none;
color: #999;
background-color: #eee;
font-size: 16px;
padding: 0.3em;
-webkit-border-top-left-radius: 3px;
-webkit-border-bottom-left-radius: 3px;
-moz-border-radius-topleft: 3px;
-moz-border-radius-bottomleft: 3px;
border-top-left-radius: 3px;
border-bottom-left-radius: 3px;
z-index: 60000;
}
.back-to-top i {
vertical-align: middle;
}
.back-to-top span {
padding-left: 0.5em;
}
.back-to-top i + span {
padding-left: 0;
}
.back-to-top:hover {
text-decoration: none;
color: #555;
}
.hide {
display: none!important;
}
</style>
<script>
(function() {
function trackScroll() {
var scrolled = window.pageYOffset;
var coords = {{ vertical_offset_for_trigger }};
if (scrolled > coords) {
goTopBtn.classList.remove('hide');
}
if (scrolled < coords) {
goTopBtn.classList.add('hide');
}
}
function backToTop() {
if (window.pageYOffset > 0) {
window.scrollBy(0, -80);
setTimeout(backToTop, 0);
}
}
var goTopBtn = document.querySelector('.back-to-top');
window.addEventListener('scroll', trackScroll);
goTopBtn.addEventListener('click', backToTop);
})();
</script>- Haz clic en Guardar.
- En la aplicación de Shopify, toca el botón ….
- En la sección Canales de ventas, toca Tienda online.
- Toca Administrar temas.
- Busca el tema que desees editar, haz clic en el botón … para abrir el menú de acciones y, luego, haz clic en Editar código.
- En el directorio Fragmentos, haz clic en Agregar un nuevo fragmento.
- Asigna a tu fragmento el nombre
back-to-the-top, luego haz clic en Crear fragmento. Tu archivo del fragmento se abrirá en el editor de código. - Pega el siguiente código en tu archivo recién creado
back-to-the-top:
{% comment %}
  Reduce below value if you need the back to the top button to appear higher up on the page.
  That value is in pixels.
{% endcomment %}
{% assign vertical_offset_for_trigger = 300 %}

{% comment %}
  Vertical offset from bottom of browser for the position of the button.
{% endcomment %}
{% assign position_from_bottom = '6em' %}

<a id="BackToTop" href="#" title="Back to the top" class="back-to-top hide">
  <span>Back to the top</span> <i class="fa fa-arrow-circle-o-up fa-2x"></i>
</a>
{{ '//netdna.bootstrapcdn.com/font-awesome/4.0.3/css/font-awesome.min.css' | stylesheet_tag }}
<style>
  .back-to-top {
    position: fixed;
    bottom: {{ position_from_bottom }};
    right: 0px;
    text-decoration: none;
    color: #999;
    background-color: #eee;
    font-size: 16px;
    padding: 0.3em;
    -webkit-border-top-left-radius: 3px;
    -webkit-border-bottom-left-radius: 3px;
    -moz-border-radius-topleft: 3px;
    -moz-border-radius-bottomleft: 3px;
    border-top-left-radius: 3px;
    border-bottom-left-radius: 3px;
    z-index: 60000;
  }
  .back-to-top i {
    vertical-align: middle;
  }
  .back-to-top span {
    padding-left: 0.5em;
  }
  .back-to-top i + span {
    padding-left: 0;
  }
  .back-to-top:hover {
    text-decoration: none;
    color: #555;
  }
  .hide {
    display: none!important;
  }
</style>
<script>
    (function() {
    function trackScroll() {
        var scrolled = window.pageYOffset;
        var coords = {{ vertical_offset_for_trigger }};

        if (scrolled > coords) {
        goTopBtn.classList.remove('hide');
        }
        if (scrolled < coords) {
        goTopBtn.classList.add('hide');
        }
    }

    function backToTop() {
        if (window.pageYOffset > 0) {
        window.scrollBy(0, -80);
        setTimeout(backToTop, 0);
        }
    }

    var goTopBtn = document.querySelector('.back-to-top');

    window.addEventListener('scroll', trackScroll);
    goTopBtn.addEventListener('click', backToTop);
    })();
</script>- Haz clic en Guardar.
Incluir tu fragmento
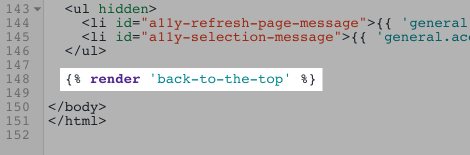
- En la carpeta Diseños, abre el archivo
theme.liquid. - Desplázate a la parte inferior del archivo. Justo arriba de la etiqueta de cierre
</body>, pega este código:
{% render 'back-to-the-top' %}Tu código debería verse así:
- Haz clic en Guardar.
Configurar el botón Volver al inicio (opcional)
Para personalizar el botón Volver al inicio, haz clic aquí y mira las primeras líneas de tu fragmento.
- Para cambiar la posición de tu botón respecto a la parte inferior del navegador, edita el valor
position_from_bottom:
{% assign position_from_bottom = '4em' %}- Para cambiar la distancia hacia abajo que necesita un cliente para desplazarse antes de que se muestre el botón, edita el valor
vertical_offset_for_trigger:
{% assign vertical_offset_for_trigger = 300 %}Tienda de demostración
Visita la tienda de demostración para ver un ejemplo de esta personalización.