Ajouter un bouton « Retourner en haut » sur les longues pages
Cette page a été imprimée le Jul 27, 2024. Pour la dernière version, allez à https://help.shopify.com/fr/manual/online-store/themes/themes-by-shopify/vintage-themes/customizing-vintage-themes/add-back-to-top.
Si certaines de vos pages sont longues et qu’il faut les faire défiler pendant longtemps, vous pouvez ajouter un bouton Retourner en haut à votre thème.
Sur cette page
Créer un extrait de retour en haut
- Dans l'interface administrateur Shopify, accédez à Boutique en ligne > Thèmes.
- Recherchez le thème que vous souhaitez modifier, cliquez sur le bouton … pour ouvrir le menu Actions, puis cliquez sur Modifier le code.
- Dans le répertoire Snippets (Extraits), cliquez sur Ajouter un nouveau snippet (Ajouter un nouvel extrait).
- Nommez votre extrait
back-to-the-top, puis cliquez sur Créer l'extrait. Votre fichier d’extrait s’ouvre alors dans l’éditeur de code. - Collez le code suivant dans le fichier
back-to-the-topque vous venez de créer :
{% comment %}
Reduce below value if you need the back to the top button to appear higher up on the page.
That value is in pixels.
{% endcomment %}
{% assign vertical_offset_for_trigger = 300 %}
{% comment %}
Vertical offset from bottom of browser for the position of the button.
{% endcomment %}
{% assign position_from_bottom = '6em' %}
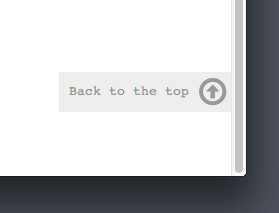
<a id="BackToTop" href="#" title="Back to the top" class="back-to-top hide">
<span>Back to the top</span> <i class="fa fa-arrow-circle-o-up fa-2x"></i>
</a>
{{ '//netdna.bootstrapcdn.com/font-awesome/4.0.3/css/font-awesome.min.css' | stylesheet_tag }}
<style>
.back-to-top {
position: fixed;
bottom: {{ position_from_bottom }};
right: 0px;
text-decoration: none;
color: #999;
background-color: #eee;
font-size: 16px;
padding: 0.3em;
-webkit-border-top-left-radius: 3px;
-webkit-border-bottom-left-radius: 3px;
-moz-border-radius-topleft: 3px;
-moz-border-radius-bottomleft: 3px;
border-top-left-radius: 3px;
border-bottom-left-radius: 3px;
z-index: 60000;
}
.back-to-top i {
vertical-align: middle;
}
.back-to-top span {
padding-left: 0.5em;
}
.back-to-top i + span {
padding-left: 0;
}
.back-to-top:hover {
text-decoration: none;
color: #555;
}
.hide {
display: none!important;
}
</style>
<script>
(function() {
function trackScroll() {
var scrolled = window.pageYOffset;
var coords = {{ vertical_offset_for_trigger }};
if (scrolled > coords) {
goTopBtn.classList.remove('hide');
}
if (scrolled < coords) {
goTopBtn.classList.add('hide');
}
}
function backToTop() {
if (window.pageYOffset > 0) {
window.scrollBy(0, -80);
setTimeout(backToTop, 0);
}
}
var goTopBtn = document.querySelector('.back-to-top');
window.addEventListener('scroll', trackScroll);
goTopBtn.addEventListener('click', backToTop);
})();
</script>- Cliquez sur Save (Enregistrer).
- Dans l’application Shopify, appuyez sur le bouton …
- Dans la section Canaux de vente, appuyez sur Online Store (Boutique en ligne).
- Appuyez sur Manage themes (Gérer les thèmes).
- Recherchez le thème que vous souhaitez modifier, cliquez sur le bouton … pour ouvrir le menu Actions, puis cliquez sur Modifier le code.
- Dans le répertoire Snippets (Extraits), cliquez sur Ajouter un nouveau snippet (Ajouter un nouvel extrait).
- Nommez votre extrait
back-to-the-top, puis cliquez sur Créer l'extrait. Votre fichier d’extrait s’ouvre alors dans l’éditeur de code. - Collez le code suivant dans le fichier
back-to-the-topque vous venez de créer :
{% comment %}
  Reduce below value if you need the back to the top button to appear higher up on the page.
  That value is in pixels.
{% endcomment %}
{% assign vertical_offset_for_trigger = 300 %}

{% comment %}
  Vertical offset from bottom of browser for the position of the button.
{% endcomment %}
{% assign position_from_bottom = '6em' %}

<a id="BackToTop" href="#" title="Back to the top" class="back-to-top hide">
  <span>Back to the top</span> <i class="fa fa-arrow-circle-o-up fa-2x"></i>
</a>
{{ '//netdna.bootstrapcdn.com/font-awesome/4.0.3/css/font-awesome.min.css' | stylesheet_tag }}
<style>
  .back-to-top {
    position: fixed;
    bottom: {{ position_from_bottom }};
    right: 0px;
    text-decoration: none;
    color: #999;
    background-color: #eee;
    font-size: 16px;
    padding: 0.3em;
    -webkit-border-top-left-radius: 3px;
    -webkit-border-bottom-left-radius: 3px;
    -moz-border-radius-topleft: 3px;
    -moz-border-radius-bottomleft: 3px;
    border-top-left-radius: 3px;
    border-bottom-left-radius: 3px;
    z-index: 60000;
  }
  .back-to-top i {
    vertical-align: middle;
  }
  .back-to-top span {
    padding-left: 0.5em;
  }
  .back-to-top i + span {
    padding-left: 0;
  }
  .back-to-top:hover {
    text-decoration: none;
    color: #555;
  }
  .hide {
    display: none!important;
  }
</style>
<script>
    (function() {
    function trackScroll() {
        var scrolled = window.pageYOffset;
        var coords = {{ vertical_offset_for_trigger }};

        if (scrolled > coords) {
        goTopBtn.classList.remove('hide');
        }
        if (scrolled < coords) {
        goTopBtn.classList.add('hide');
        }
    }

    function backToTop() {
        if (window.pageYOffset > 0) {
        window.scrollBy(0, -80);
        setTimeout(backToTop, 0);
        }
    }

    var goTopBtn = document.querySelector('.back-to-top');

    window.addEventListener('scroll', trackScroll);
    goTopBtn.addEventListener('click', backToTop);
    })();
</script>- Cliquez sur Save (Enregistrer).
Inclure votre extrait
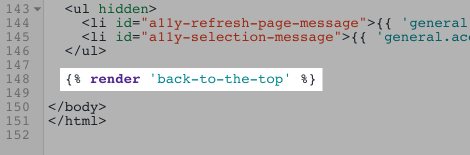
- Dans le dossier Mise en page, ouvrez le fichier
theme.liquid. - Faites défiler jusqu’en bas du fichier. Juste au-dessus de la balise de fermeture
</body>, collez le code suivant :
{% render 'back-to-the-top' %}Votre code doit ressembler à ceci :
- Cliquez sur Save (Enregistrer).
Configurer le bouton de retour en haut (facultatif)
Pour personnaliser le bouton de retour en haut, cliquez ici et examinez les premières lignes de votre extrait.
- Pour modifier la position de votre bouton par rapport au bas du navigateur, modifiez la valeur
position_from_bottom:
{% assign position_from_bottom = '4em' %}- Pour modifier la distance de défilement qu’un client doit parcourir avant que le bouton n'apparaisse, modifiez la valeur
vertical_offset_for_trigger:
{% assign vertical_offset_for_trigger = 300 %}Boutique de démonstration
Visitez la boutique de démonstration pour voir un exemple de cette personnalisation.