SKU-Nummern auf Produktseiten anzeigen
SKUs (Artikelnummern) sind Nummern, die in der Regel alphanumerisch sind und der Identifizierung von Produkten und Verfolgung des Inventars dienen. Wenn ein Shop SKUs verwendet, wird jeder einzelnen Produktvariante eine eindeutige Nummer zugewiesen. Du kannst SKU-Nummern für Varianten auf deinen Produktseiten anzeigen, indem du deinen Theme-Code bearbeitest:

Themes mit und ohne Abschnitte
Auf dieser Seite
Schritte für Themes mit Abschnitten
SKU-Nummern auf Produktseiten anzeigen
- Gehe im Shopify-Adminbereich zu Onlineshop > Themes.
- Suche das Theme, das du bearbeiten möchtest, klicke auf die Schaltfläche ..., um das Aktionsmenü zu öffnen, und klicke dann auf Code bearbeiten.
- Klicke im Verzeichnis Abschnitte auf
product.liquidoderproduct-template.liquid. - Suche nach dem folgenden Liquid-Tag:
{{ product.title }}Das ist der Code, mit dem deine Produkttitel auf der Produktseite gerendert werden.
- Füge in einer neuen Zeile unterhalb der Codezeile, die
{{ product.title }}enthält, den folgenden Code ein:
{% assign current_variant = product.selected_or_first_available_variant %}
<span class="variant-sku">{{ current_variant.sku }}</span>- Klicke auf Speichern.
Wähle dein Theme
Die nächsten Schritte für diese Anpassung variieren je nach deinem Theme. Klicke auf die Schaltfläche für dein Theme und befolge die Anweisungen.
Schritte für Boundless
- Klicke im Verzeichnis Assets auf
theme.js.liquid. -
Suche nach
variant.sku:- Wenn du
variant.skufindest, ist die Anpassung abgeschlossen. - Wenn du
variant.skunicht findest, fahre mit dem nächsten Schritt fort.
- Wenn du
Füge am Ende der Datei den folgenden Code ein:
document.addEventListener('DOMContentLoaded', () => {
  setTimeout(function() {
    const productJson = [...document.querySelectorAll('[id^=ProductJson-')];
    if (productJson.length > 0) {
      productJson.forEach((product) => {
        const sectionId = product.id.replace("ProductJson-", "shopify-section-");
        const variantSKU = document.querySelector('#' + sectionId + ' .variant-sku');
        const inputSelects = [...document.querySelectorAll('#' + sectionId + ' .single-option-selector')];
        const productInfo = JSON.parse(product.innerHTML);
        const inputValues = [];
        const optionValues = [];
        let count = 0;
        inputSelects.forEach((input) => {
          inputValues.push(input.value);
          optionValues.push(count);
          input.addEventListener('change', (evt) => {
            const currentValue = evt.currentTarget.value.toString();
            const changedIndex = inputSelects.indexOf(evt.target);
            inputValues[changedIndex] = currentValue;
            variantSKU.innerText = ' ';
            productInfo.variants.forEach((variant) => {
              if (JSON.stringify(variant.options) == JSON.stringify(inputValues)) {
                variantSKU.innerText = variant.sku;
              }
            });
          });
          count += 1;
        });
      });
    }
  }, 100);
});- Klicke auf Speichern.
Schritte für Brooklyn
- Klicke im Verzeichnis Assets auf
theme.js.liquid. -
Suche nach
variant.sku:- Wenn du
variant.skufindest, ist die Anpassung abgeschlossen. - Wenn du
variant.skunicht findest, fahre mit dem nächsten Schritt fort.
- Wenn du
Füge am Ende der Datei den folgenden Code ein:
document.addEventListener('DOMContentLoaded', () => {
  const productJson = [...document.querySelectorAll('[id^=ProductJson-')];
  if (productJson.length > 0) {
    productJson.forEach((product) => {
      const sectionId = product.id.replace("ProductJson-", "shopify-section-");
      const variantSKU = document.querySelector('#' + sectionId + ' .variant-sku');
      const productInfo = JSON.parse(product.innerHTML);
      const radioButtons = document.querySelector('.single-option-radio');
      let inputSelects;
      if (radioButtons !== null) {
        inputSelects = [...document.querySelectorAll('#' + sectionId + ' .single-option-radio')];
      } else {
        inputSelects = [...document.querySelectorAll('#' + sectionId + ' .single-option-selector__radio')];
      }
      const inputValues = [];
      const optionValues = [];
      let count = 0;
      inputSelects.forEach((input) => {
        if (radioButtons !== null) {
          inputValues.push(input.firstElementChild.value);
        } else {
          inputValues.push(input.value);
        }
        optionValues.push(count);
        input.addEventListener('change', (evt) => {
          const currentValue = evt.target.value.toString();
          const changedIndex = inputSelects.indexOf(evt.currentTarget);
          inputValues[changedIndex] = currentValue;
          variantSKU.innerText = ' ';
          productInfo.variants.forEach((variant) => {
            if (JSON.stringify(variant.options) == JSON.stringify(inputValues)) {
              variantSKU.innerText = variant.sku;
            }
          });
        });
      count += 1;
      });
    });
  }
});- Klicke auf Speichern.
Schritte für Debut
- Klicke im Verzeichnis Assets auf
theme.js. -
Suche nach
variant.sku:- Wenn du
variant.skufindest, ist die Anpassung abgeschlossen. - Wenn du
variant.skunicht findest, fahre mit dem nächsten Schritt fort.
- Wenn du
Füge am Ende der Datei den folgenden Code ein:
document.addEventListener('DOMContentLoaded', () => {
  const productJson = [...document.querySelectorAll('[id^=ProductJson-')];
  if (productJson.length > 0) {
    productJson.forEach((product) => {
      const sectionId = product.id.replace("ProductJson-", "shopify-section-");
      const variantSKU = document.querySelector('#' + sectionId + ' .variant-sku');
      const inputSelects = [...document.querySelectorAll('#' + sectionId + ' .single-option-selector')];
      const productInfo = JSON.parse(product.innerHTML);
      const inputValues = [];
      const optionValues = [];
      let count = 0;
      inputSelects.forEach((input) => {
        inputValues.push(input.value);
        optionValues.push(count);
        input.addEventListener('change', (evt) => {
          const currentValue = evt.currentTarget.value.toString();
          const changedIndex = inputSelects.indexOf(evt.target);
          inputValues[changedIndex] = currentValue;
          variantSKU.innerText = ' ';
          productInfo.variants.forEach((variant) => {
            if (JSON.stringify(variant.options) == JSON.stringify(inputValues)) {
              variantSKU.innerText = variant.sku;
            }
          });
        });
        count += 1;
      });
    });
  }
});- Klicke auf Speichern.
Schritte für Express
- Klicke in der Übersicht Layout auf
theme.liquid. -
Suche nach dem abschließenden Tag
</body>. - Füge in der Zeile direkt über dem abschließenden Tag
</body>den folgenden Code ein:
<script>
document.addEventListener('DOMContentLoaded', () => {
  const productJson = [...document.querySelectorAll('[data-product-json]')];
  if (productJson.length > 0) {
    productJson.forEach((product) => {
      const sectionId = "shopify-section-" + product.closest('[data-section-id]').dataset.sectionId;
      const variantSKU = document.querySelector('#' + sectionId + ' .variant-sku');
      const inputSelects = [...document.querySelectorAll('#' + sectionId + ' .form__input--select')];
      const productInfo = JSON.parse(product.innerHTML);
      const inputValues = [];
      const optionValues = [];
      let count = 0;
      inputSelects.forEach((input) => {
        inputValues.push(input.value);
        optionValues.push(count);
        input.addEventListener('change', (evt) => {
          const currentValue = evt.currentTarget.value.toString();
          const changedIndex = inputSelects.indexOf(evt.target);
          inputValues[changedIndex] = currentValue;
          variantSKU.innerText = ' ';
          productInfo.variants.forEach((variant) => {
            if (JSON.stringify(variant.options) == JSON.stringify(inputValues)) {
              variantSKU.innerText = variant.sku;
            }
          });
        });
        count += 1;
      });
    });
  }
});
</script>- Klicke auf Speichern.
Schritte für Minimal
- Klicke im Verzeichnis Assets auf
theme.js. -
Suche nach
variant.sku:- Wenn du
variant.skufindest, ist die Anpassung abgeschlossen. - Wenn du
variant.skunicht findest, fahre mit dem nächsten Schritt fort.
- Wenn du
Füge am Ende der Datei den folgenden Code ein:
document.addEventListener('DOMContentLoaded', () => {
  const productJson = [...document.querySelectorAll('[id^=ProductJson-')];
  if (productJson.length > 0) {
    productJson.forEach((product) => {
      const sectionId = product.id.replace("ProductJson-", "shopify-section-");
      const variantSKU = document.querySelector('#' + sectionId + ' .variant-sku');
      const inputSelects = [...document.querySelectorAll('#' + sectionId + ' .single-option-selector')];
      const productInfo = JSON.parse(product.innerHTML);
      const inputValues = [];
      const optionValues = [];
      let count = 0;
      inputSelects.forEach((input) => {
        inputValues.push(input.value);
        optionValues.push(count);
        input.addEventListener('change', (evt) => {
          const currentValue = evt.currentTarget.value.toString();
          const changedIndex = inputSelects.indexOf(evt.target);
          inputValues[changedIndex] = currentValue;
          variantSKU.innerText = ' ';
          productInfo.variants.forEach((variant) => {
            if (JSON.stringify(variant.options) == JSON.stringify(inputValues)) {
              variantSKU.innerText = variant.sku;
            }
          });
        });
        count += 1;
      });
    });
  }
});- Klicke auf Speichern.
Schritte für Narrative
- Klicke im Verzeichnis Assets auf
custom.js. - Füge am Ende der Datei den folgenden Code ein:
document.addEventListener('DOMContentLoaded', () => {
  const productJson = [...document.querySelectorAll('[data-product-json]')];
  if (productJson.length > 0) {
    productJson.forEach((product) => {
      const sectionId = "shopify-section-" + product.closest('[data-section-id]').dataset.sectionId;
      const variantSKU = document.querySelector('#' + sectionId + ' .variant-sku');
      const inputSelects = [...document.querySelectorAll('#' + sectionId + ' .single-option-selector')];
      const productInfo = JSON.parse(product.innerHTML);
      const inputValues = [];
      const optionValues = [];
      let count = 0;
      inputSelects.forEach((input) => {
        inputValues.push(input.value);
        optionValues.push(count);
        input.addEventListener('change', (evt) => {
          const currentValue = evt.currentTarget.value.toString();
          const changedIndex = inputSelects.indexOf(evt.target);
          inputValues[changedIndex] = currentValue;
          variantSKU.innerText = ' ';
          productInfo.variants.forEach((variant) => {
            if (JSON.stringify(variant.options) == JSON.stringify(inputValues)) {
              variantSKU.innerText = variant.sku;
            }
          });
        });
        count += 1;
      });
    });
  }
});- Klicke auf Speichern.
Schritte für Simple
- Klicke im Verzeichnis Assets auf
theme.js.liquid. -
Suche nach
variant.sku:- Wenn du
variant.skufindest, ist die Anpassung abgeschlossen. - Wenn du
variant.skunicht findest, fahre mit dem nächsten Schritt fort.
- Wenn du
Füge am Ende der Datei den folgenden Code ein:
document.addEventListener('DOMContentLoaded', () => {
  const productJson = [...document.querySelectorAll('[id^=ProductJson-')];
  if (productJson.length > 0) {
    productJson.forEach((product) => {
      const sectionId = product.id.replace("ProductJson-", "shopify-section-");
      const variantSKU = document.querySelector('#' + sectionId + ' .variant-sku');
      const inputSelects = [...document.querySelectorAll('#' + sectionId + ' .single-option-selector')];
      const productInfo = JSON.parse(product.innerHTML);
      const inputValues = [];
      const optionValues = [];
      let count = 0;
      inputSelects.forEach((input) => {
        inputValues.push(input.value);
        optionValues.push(count);
        input.addEventListener('change', (evt) => {
          const currentValue = evt.currentTarget.value.toString();
          const changedIndex = inputSelects.indexOf(evt.target);
          inputValues[changedIndex] = currentValue;
          variantSKU.innerText = ' ';
          productInfo.variants.forEach((variant) => {
            if (JSON.stringify(variant.options) == JSON.stringify(inputValues)) {
              variantSKU.innerText = variant.sku;
            }
          });
        });
        count += 1;
      });
    });
  }
});- Klicke auf Speichern.
Schritte für Supply
- Klicke im Verzeichnis Assets auf
theme.js.liquid. -
Suche nach
variant.sku:- Wenn du
variant.skufindest, ist die Anpassung abgeschlossen. - Wenn du
variant.skunicht findest, fahre mit dem nächsten Schritt fort.
- Wenn du
Füge am Ende der Datei den folgenden Code ein:
document.addEventListener('DOMContentLoaded', () => {
  const productJson = [...document.querySelectorAll('[id^=ProductJson-')];
  if (productJson.length > 0) {
    productJson.forEach((product) => {
      const sectionId = product.id.replace("ProductJson-", "shopify-section-");
      const variantSKU = document.querySelector('#' + sectionId + ' .variant-sku');
      const inputSelects = [...document.querySelectorAll('#' + sectionId + ' .single-option-selector')];
      const productInfo = JSON.parse(product.innerHTML);
      const inputValues = [];
      const optionValues = [];
      let count = 0;
      inputSelects.forEach((input) => {
        inputValues.push(input.value);
        optionValues.push(count);
        input.addEventListener('change', (evt) => {
          const currentValue = evt.currentTarget.value.toString();
          const changedIndex = inputSelects.indexOf(evt.target);
          inputValues[changedIndex] = currentValue;
          variantSKU.innerText = ' ';
          productInfo.variants.forEach((variant) => {
            if (JSON.stringify(variant.options) == JSON.stringify(inputValues)) {
              variantSKU.innerText = variant.sku;
            }
          });
        });
        count += 1;
      });
    });
  }
});- Klicke auf Speichern.
Schritte für Venture
- Klicke im Verzeichnis Assets auf
theme.js. -
Suche nach
variant.sku:- Wenn du
variant.skufindest, ist die Anpassung abgeschlossen. - Wenn du
variant.skunicht findest, fahre mit dem nächsten Schritt fort.
- Wenn du
Füge am Ende der Datei den folgenden Code ein:
document.addEventListener('DOMContentLoaded', () => {
  const productJson = [...document.querySelectorAll('[id^=ProductJson-')];
  if (productJson.length > 0) {
    productJson.forEach((product) => {
      const sectionId = product.id.replace("ProductJson-", "shopify-section-");
      const variantSKU = document.querySelector('#' + sectionId + ' .variant-sku');
      const inputSelects = [...document.querySelectorAll('#' + sectionId + ' .single-option-selector')];
      const productInfo = JSON.parse(product.innerHTML);
      const inputValues = [];
      const optionValues = [];
      let count = 0;
      inputSelects.forEach((input) => {
        inputValues.push(input.value);
        optionValues.push(count);
        input.addEventListener('change', (evt) => {
          const currentValue = evt.currentTarget.value.toString();
          const changedIndex = inputSelects.indexOf(evt.target);
          inputValues[changedIndex] = currentValue;
          variantSKU.innerText = ' ';
          productInfo.variants.forEach((variant) => {
            if (JSON.stringify(variant.options) == JSON.stringify(inputValues)) {
              variantSKU.innerText = variant.sku;
            }
          });
        });
        count += 1;
      });
    });
  }
});- Klicke auf Speichern.
SKU-Nummern zu Produktvarianten im Adminbereich hinzufügen
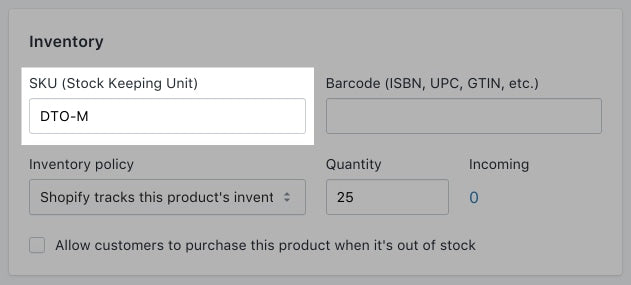
Damit SKUs auf deinen Produktseiten angezeigt werden, musst du im Shopify-Adminbereich SKU-Nummern zu deinen Produktvarianten hinzufügen.
Gehe im Shopify-Adminbereich zu Produkte.
Klicke auf das Produkt, das du bearbeiten möchtest.
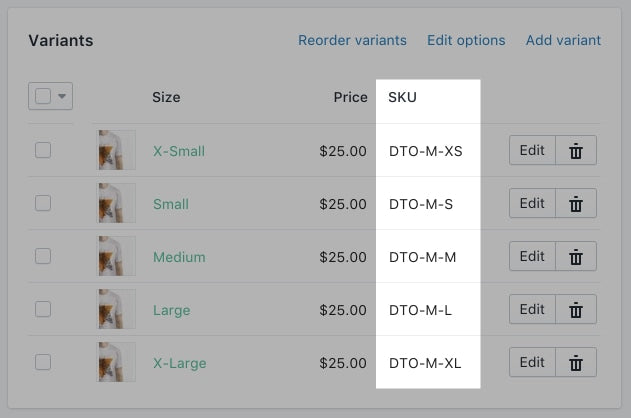
Füge bei Produkten mit mehreren Varianten im Abschnitt Varianten die SKU-Nummern hinzu:
Klicke auf Speichern.
Schritte für Themes ohne Abschnitte
SKU-Nummern auf Produktseiten anzeigen
Schritte:
- Gehe im Shopify-Adminbereich zu Onlineshop > Themes.
- Suche das Theme, das du bearbeiten möchtest, klicke auf die Schaltfläche ..., um das Aktionsmenü zu öffnen, und klicke dann auf Code bearbeiten.
- Klicke im Verzeichnis Vorlagen auf
product.liquid. - Suche nach dem folgenden Liquid-Tag:
{{ product.title }}Das ist der Code, mit dem deine Produkttitel auf der Produktseite gerendert werden.
- Füge in einer neuen Zeile unterhalb der Codezeile, die
{{ product.title }}enthält, Folgendes ein:
{% assign current_variant = product.selected_or_first_available_variant %}
<span class="variant-sku">{{ current_variant.sku }}</span>- Klicke auf Speichern.
- Wenn du ein kostenloses Shopify-Theme außer Brooklyn oder Venture verwendest, suche nach der folgenden Codezeile:
var selectCallback = function(variant, selector) {Wenn du die oben aufgeführte Codezeile nicht in product.liquid finden kannst, suche im Verzeichnis Layout in der Datei theme.liquid danach.
-
Brooklyn und Venture: Wenn du Brooklyn oder Venture verwendest, musst du nach einer anderen Codezeile suchen und diese bearbeiten. Klicke im Verzeichnis Assets auf
theme.js.liquidund suche nach der folgenden Codezeile:
theme.productVariantCallback = function (variant, selector) {- Füge in einer neuen Zeile darunter den folgenden Code ein:
if (variant) {
      document.querySelector('.variant-sku').innerText = variant.sku;
    }
    else {
      document.querySelector('.variant-sku').innerText = '';
    }
Der Code sollte etwa so aussehen:
var selectCallback = function(variant, selector) {

      if (variant) {
        document.querySelector('.variant-sku').innerText = variant.sku;
      }
      else {
        document.querySelector('.variant-sku').innerText = '';
      }

        self.productPage({
          money_format: theme.moneyFormat,
          variant: variant,
          selector: selector,
          translations: {
            add_to_cart : theme.productStrings.addToCart,
            sold_out : theme.productStrings.soldOut,
            unavailable : theme.productStrings.unavailable
          }
        });
};- Klicke auf Speichern.
SKU-Nummern zu Produktvarianten im Adminbereich hinzufügen
Damit SKUs auf deinen Produktseiten angezeigt werden, musst du im Shopify-Adminbereich SKU-Nummern zu deinen Produktvarianten hinzufügen.
Gehe im Shopify-Adminbereich zu Produkte.
Klicke auf das Produkt, das du bearbeiten möchtest.
Füge für Produkte mit mehreren Varianten im Abschnitt Varianten deine SKU-Nummern hinzu:


Klicke auf Speichern.